Storm Door Closer Mechanism: Installation and Adjustment Guide
By Housey · Last reviewed 24th of May 2026
Storm Door Closer Mechanism: Installation and Adjustment Guide
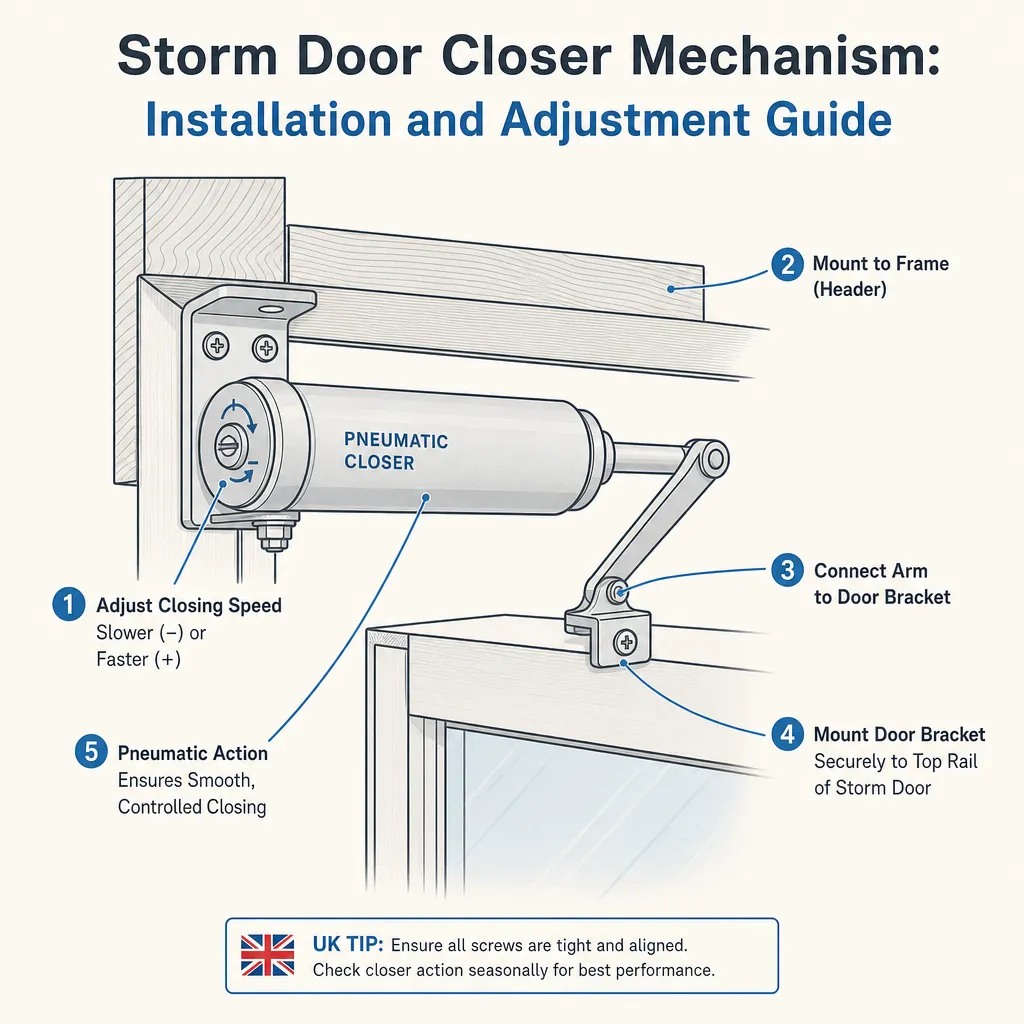
Storm door closers are the unsung workhorses of a well-fitted secondary exterior door — when they fail or fall out of adjustment, the door either slams shut, drifts open, or refuses to latch. Homeowners typically need to adjust or replace a closer after seasonal temperature changes cause the pneumatic cylinder to expand or contract, after a knock that misaligns the bracket, or simply as the mechanism wears with age. Getting the adjustment right is a straightforward task with the correct approach, but the fitting position and pin bracket placement matter as much as the speed-adjustment screw itself.
Key points
- Most domestic storm door closers are pneumatic (air-pressure) cylinders; a small adjustment screw at the end cap controls closing speed by restricting airflow
- Standard domestic closers suit doors up to approximately 910mm (36 inches) wide; wider doors require a heavy-duty or double-cylinder closer
- Self-closing devices fitted to fire doors or accessible routes in England and Wales must comply with EN 1154 and be appropriate for the door's fire rating and usage classification
- The door should complete its full swing and latch in one smooth motion within roughly 3–7 seconds; faster risks slamming, slower risks incomplete latching
- Fitting the pin bracket to the correct hole on the closer arm is critical — the wrong hole position changes the mechanical advantage and makes reliable adjustment considerably harder
Types of storm door closer
Domestic storm door closers fall into two main categories.
Pneumatic closers use air pressure within a sealed cylinder to resist and control the door's movement. They are the most common type for residential storm doors, available from most builders' merchants and door-hardware suppliers. Adjustment is made via a slotted screw at the end of the cylinder — usually clockwise to slow, anticlockwise to speed up. They perform well across a broad temperature range but may need seasonal tweaking.
Hydraulic (oil-filled) closers use oil rather than air, giving smoother, more consistent action and greater durability. They are more commonly specified for commercial or high-traffic residential installations and carry a higher price. Adjustment works similarly, often requiring a hex key rather than a flat-head screwdriver.
Feature | Pneumatic closer | Hydraulic closer |
|---|---|---|
Mechanism | Air pressure | Oil pressure |
Typical cost (unit only) | £15–£40 | £35–£80 |
Adjustment tool | Flat-head screwdriver | Hex key |
Temperature sensitivity | Moderate | Low |
Best for | Standard residential storm doors | High-traffic or premium installations |
Main limitation | May need seasonal readjustment | Higher upfront cost |
Indicative UK unit costs, last reviewed 2026-05-24. Prices vary by supplier and specification.
How to adjust a storm door closer
Before adjusting, check that the door frame, hinges, and latch are all correctly aligned. A mis-aligned door cannot be fixed by closer adjustment alone.
Tools needed: flat-head or hex screwdriver (check your closer model).
Adjustment checklist:
Door will not latch fully: If the door swings to within 50mm of the frame and stops, closing force is insufficient. Try increasing speed (anticlockwise). If this does not resolve the issue, check the pin bracket is in the correct hole on the closer arm — moving it to a hole closer to the pivot point increases closing force.
Door slams: Slow the closing speed (clockwise adjustment). If the door still slams after reaching maximum clockwise travel on the screw, the closer is likely worn and needs replacing.
How to install a storm door closer
Most storm door closers come with a door bracket and a pin bracket for surface mounting. The door bracket fixes to the door face; the pin bracket fixes to the frame or Z-bar.
Which mounting position should you use?
- Choose the top-mounted position if the door has a solid top rail of at least 38mm depth — the most common arrangement on aluminium storm doors
- Choose the side rail position if the door manufacturer has specified a dedicated storm bar or Z-bar with a pre-drilled closer mount
- Ask a qualified door installer if the frame is narrow-section UPVC or composite with insufficient material for surface screws — core-fill anchors or a bracket adapter may be needed
- Check the closer manufacturer's fitting guide if the door has an adjustable glazing panel, as some configurations require a different pin bracket hole position
Installation steps:
- Hold the closer body against the door face with the door closed — position approximately 100–150mm from the hinge edge
- Mark the bracket screw holes with a pencil
- Pre-drill pilot holes to avoid splitting timber or cracking UPVC profiles
- Fix the door bracket with the supplied screws
- Attach the closer arm to the door bracket
- With the door closed, hold the pin end of the arm against the frame — mark and drill the pin bracket position
- Fix the pin bracket and secure the pin
- Open the door to 90°, release, and observe the closing action
- Adjust the speed screw as described above
When to get professional help
Most closer adjustments and straightforward replacements are within reach of a confident DIYer. Seek professional help if:
- The door frame is distorted, rotten, or cracked — no closer adjustment can compensate for a failing frame
- The door itself has warped and consistently leaves a gap at the top or bottom when closed
- The door is fire-rated (FD30 or FD60) — fire door self-closing devices must comply with EN 1154, and the specification must not be changed without verifying the door's certification
- The door forms part of an accessible entrance in a HMO or commercial premises subject to Part M of the Building Regulations — closing force limits apply
- The closer has been struck by a vehicle or significant impact — check the frame and hinges for hidden damage before refitting
How Housey can help
If your storm door or its closer is beyond adjustment and you need a new installation or a full door replacement, Housey connects you with vetted window and door installers who can survey the opening, recommend the right door and hardware specification, and fit it correctly.
Frequently asked questions
Why does my storm door closer need readjusting every winter?
Pneumatic closers use trapped air, which contracts in cold weather and expands in warm weather. This changes the internal pressure and alters closing speed. A half-turn seasonal adjustment is normal and expected for pneumatic models. Hydraulic oil-filled closers are significantly less affected by temperature change and rarely need seasonal readjustment.
Can I use any storm door closer as a replacement?
Not always. Match the closer to the door width and weight as stated in the manufacturer's specification. Also check whether your door uses a standard rail-mounted arrangement or a bespoke fitting. Some branded storm doors use proprietary closer systems where only the manufacturer's replacement part fits the bracket correctly.
Does a storm door closer need to comply with fire regulations?
If the storm door forms part of a compartment wall, a flat entrance, or any opening within a fire-separation strategy, the self-closing device must comply with EN 1154. If you are unsure whether your door has a fire-rating requirement, consult Building Control or a fire-door specialist before changing the closer specification.
How do I stop the storm door from slamming in the wind?
First adjust the speed screw clockwise to slow the closing motion. If your closer has a wind-hold feature — a washer or pin that engages at approximately 90° — check it is correctly positioned. If the problem persists in strong gusts, consider a door with a built-in hold-open mechanism or fitting a separate door stop.
Sources and further reading
- Approved Document M — Access to and Use of Buildings — GOV.UK
- BS EN 1154: Controlled door closing devices — requirements and test methods — BSI Group
- Draught-proofing guidance — Energy Saving Trust
Useful next reads
 Improvement & Build
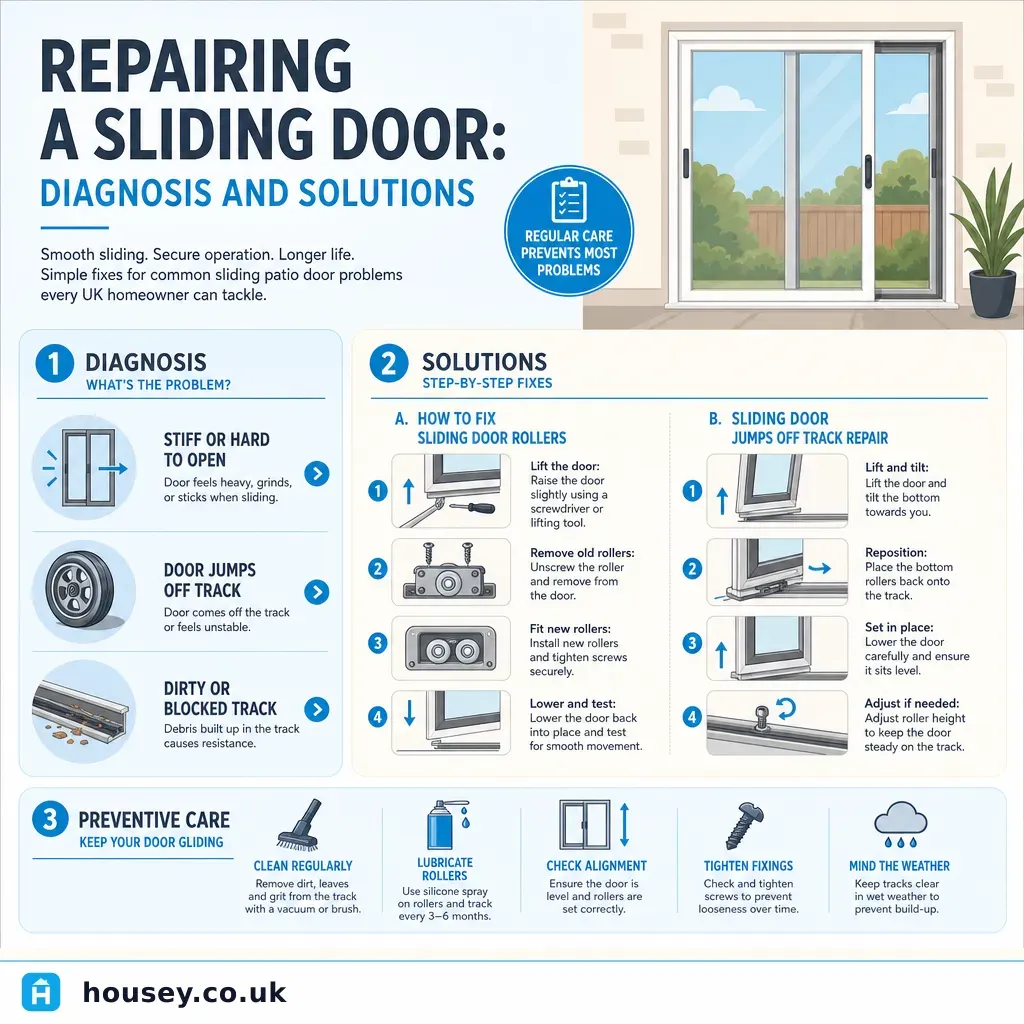
Repairing a Sliding Door: Diagnosis and Solutions
Most sliding door problems — stiffness, jumping off track, or draughts — are caused by dirty tracks, worn rollers, or misaligned guides.
 Improvement & Build
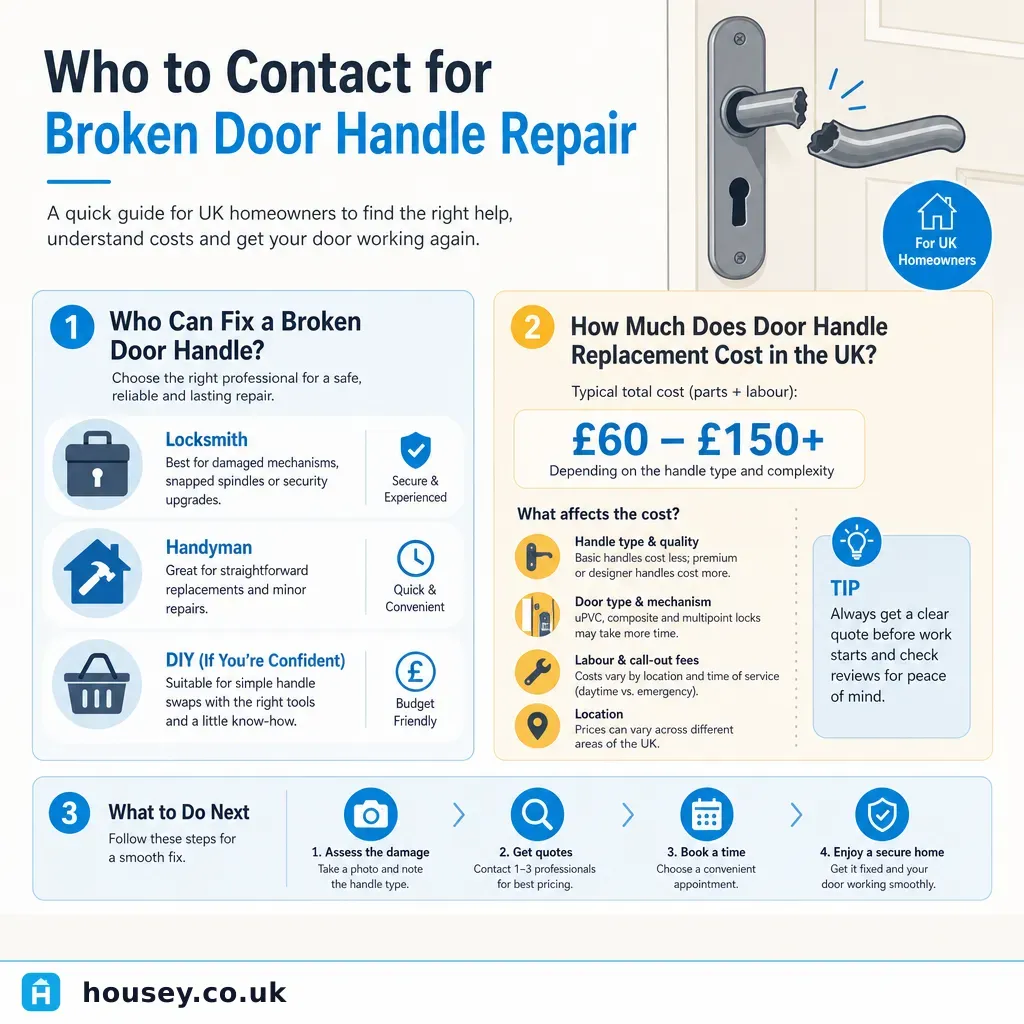
Who to Contact for Broken Door Handle Repair
For a broken door handle, a general handyperson can handle most internal timber door repairs, while a joiner or locksmith is better suited to external doors, particularly if the lock mechanism is affected.
 Improvement & Build
Retractable Door Latches: Function and Purpose Explained
A retractable door latch uses a spring-loaded bolt that is pushed inward by the angled face of the striker plate as the door closes, then springs forward into the keep to hold the door shut.
 Improvement & Build
Repairing a Broken uPVC Door Lock: Replacement and Solutions
A broken uPVC door lock usually needs a new cylinder, a replacement multipoint mechanism, or both.
 Improvement & Build
Finding the Best Keyless Door Locks for Your Home
The right keyless door lock for a UK home depends on your door type, how many people need access, and your insurer's security requirements.