Butcher Block Countertops: Installation and Maintenance
By Housey · Last reviewed 5th of May 2026
Butcher Block Countertops: Installation and Maintenance
Solid wood worktops — often described in the UK as butcher block countertops — are a recurring choice in kitchen renovations, valued for their warmth, visual character, and repairability. The decision of whether to fit one, where to position it, and how to care for it tends to arise when planning a full kitchen refit, replacing a worn surface, or adding a preparation island. Understanding the material's requirements from the outset prevents the most common causes of premature deterioration.
Key points
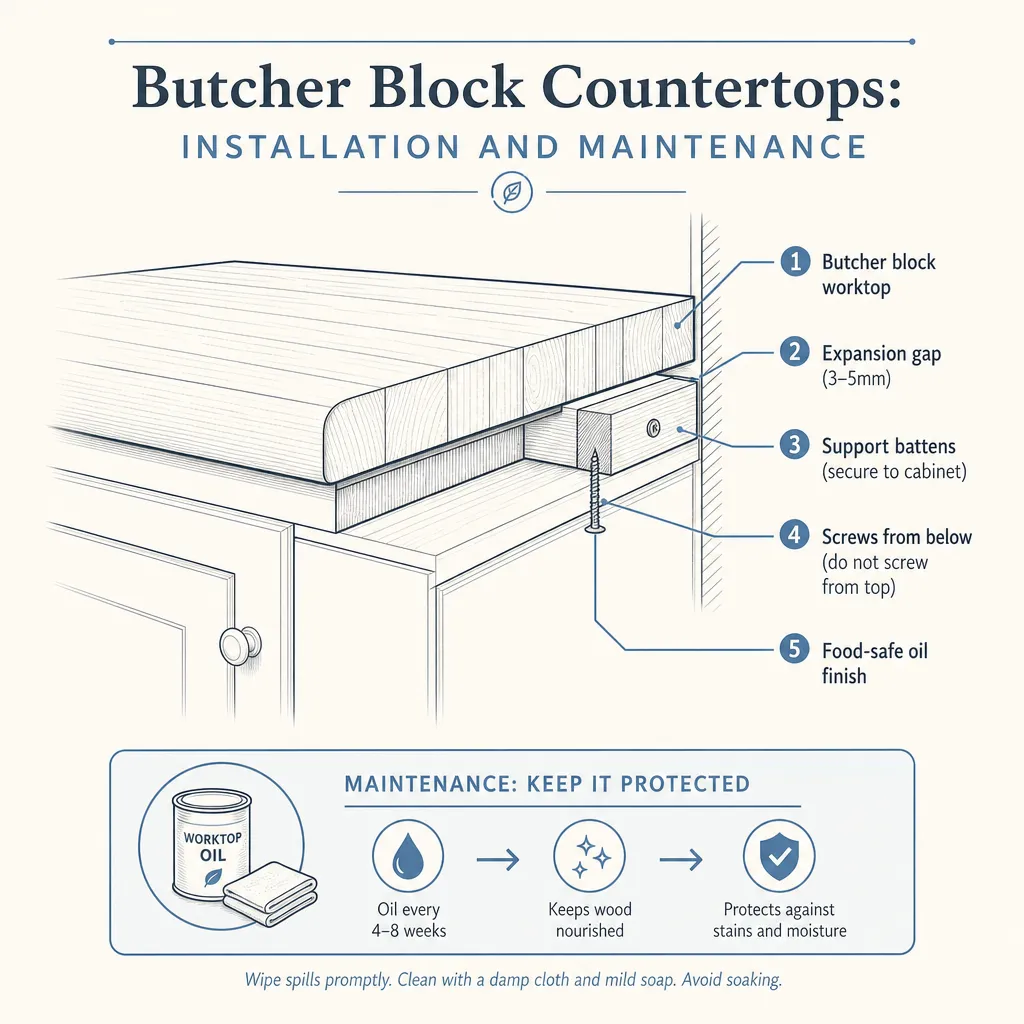
- Butcher block worktops must be treated with a food-safe finish — typically food-grade mineral oil or a purpose-made wood worktop oil — three to five times before use, then re-oiled every one to three months in a working kitchen.
- End-grain butcher block, where the growth rings face upward, is the most durable grain orientation for cutting surfaces; edge-grain and face-grain products are more commonly available in UK kitchen retail and better suited to general worktop use.
- Wood worktops must be fixed using slotted buttons or figure-8 fasteners to allow seasonal timber movement — rigid fixings cause cracking as the wood expands and contracts with changes in ambient humidity.
- UK kitchen worktops are commonly sold at 27 mm, 38 mm, and 40 mm thickness; 40 mm is the standard for kitchen use and provides better stability and resistance to warping over time.
- Butcher block can be re-sanded and re-oiled multiple times over its life, making it potentially longer-lasting than laminate if maintained correctly — a meaningful factor when comparing whole-life costs.
What is butcher block and how does it differ from solid wood worktops?
The term "butcher block" originates from the thick, end-grain chopping blocks used in professional butchery. In domestic kitchens, the label is applied more broadly to any thick wood worktop, regardless of grain orientation. Understanding the difference helps you choose the right surface for each area of the kitchen.
Grain type | Orientation | Best for | Durability | Relative cost |
|---|---|---|---|---|
End grain | Growth rings face upward | Heavy chopping and intensive prep surfaces | Highest — knife marks are partially self-healing | Most expensive |
Edge grain | Long edges of boards face upward | General worktop and island use | Good — shows surface wear gradually | Mid-range |
Face grain | Wide face of boards faces upward | Decorative or low-use surfaces | Lower — surface wear is most visible | Least expensive |
Most UK kitchen retailers sell edge-grain or face-grain products under the "solid wood worktop" or "butcher block worktop" label. True end-grain products are typically available from specialist timber merchants or bespoke joinery suppliers rather than mainstream kitchen showrooms.
Choosing the right timber species
Hardness affects how the worktop wears over time. Softer timbers scratch and dent more readily; harder species are more resilient but may cost more. The Janka hardness scale provides a useful comparison across species.
Species | Janka hardness (approx.) | Character | Notes |
|---|---|---|---|
Oak | 1,290 lbf | Pronounced grain, warm amber tones | Most common in UK kitchens; widely available |
Beech | 1,300 lbf | Fine grain, pale cream colour | Good value; widely used in professional kitchens |
Maple | 1,450 lbf | Subtle grain, very light colour | Hard-wearing; often specified for end-grain blocks |
Walnut | 1,010 lbf | Rich dark colour, distinctive grain | Premium choice; softer than oak |
Iroko | 1,260 lbf | Similar in character to teak; naturally oily | Good moisture resistance; check FSC certification |
Choose timber with FSC or PEFC certification to confirm responsible sourcing. The Furniture Industry Research Association (FIRA) recommends allowing wood worktops to acclimatise in the kitchen environment for 48–72 hours before fitting, to reduce the risk of post-installation movement.
Installation: what the process involves
Butcher block worktops can be installed by a competent kitchen fitter or joiner. There are several stages where small mistakes have significant consequences.
Measure and plan. UK walls are rarely perfectly square. Account for wall irregularities by scribing the worktop edge or using scribing strips. Measure twice before cutting.
Cut to size on a flat, supported surface. Use a circular saw or jigsaw with a fine-toothed blade. Support the cut line firmly to prevent breakout on the underside. Cut sink and hob apertures before the worktop is fitted wherever possible — it is considerably easier on a bench than in situ.
Oil the underside and all edges before fitting. Sealing the underside and end grain prevents moisture absorption from below — a common cause of warping in fitted worktops. Do not skip this step, even if it seems inconvenient before fitting.
Fix using slotted fasteners. Use wooden buttons or metal figure-8 fasteners that locate into a groove routed into the underside of the worktop. These allow the timber to expand and contract with changes in humidity without building internal stress. Never screw directly through the worktop top into the cabinet carcass — this restricts movement and will eventually cause cracking.
Apply finishing coats to the top surface. Sand from 80–120 grit up to 180–240 grit, then apply oil generously, leave for 15–20 minutes, and wipe off the excess. Repeat three to five times. The wood should look and feel consistently smooth and slightly sheen before the worktop enters regular use.
Seal cut-out edges thoroughly. Sink and hob apertures are the most vulnerable points for moisture ingress. Seal these edges completely with oil or a purpose-made waterproof wood finish and re-inspect them annually.
Ongoing maintenance schedule
Task | Frequency | Method |
|---|---|---|
Wipe down after use | Daily | Damp cloth and mild detergent; dry the surface immediately |
Re-oil the surface | Every 1–3 months | Apply food-safe mineral oil or purpose-made worktop oil; leave to penetrate; wipe off excess |
Re-sand and re-oil | Every 1–5 years depending on wear | 180–240 grit sandpaper with the grain, followed by a full oiling cycle |
Check fixings | Annually | Confirm buttons or figure-8 fasteners are not obstructed and continue to allow timber movement |
Avoid: bleach-based cleaners, leaving water pooled on the surface, placing hot pans directly onto the worktop without a trivet, and relying on a neat oil finish in a permanent wet area without additional waterproofing.
What not to assume
Several widespread assumptions lead to premature deterioration of butcher block worktops.
Do not assume that oiling once is sufficient. The first three to five coats are absorbed into dry, untreated timber and provide no durable surface protection until the pores are filled. Regular maintenance coats build and sustain the protective layer. Skipping ongoing maintenance is the most common cause of early failure.
Do not assume the worktop will not move. All solid wood expands and contracts as ambient humidity changes with the seasons. A worktop fixed rigidly will crack — sometimes dramatically. Slotted fixings are not an optional refinement; they are a structural requirement.
Do not assume wood is unsuitable near a sink. A well-maintained butcher block worktop can function well adjacent to a sink. It requires more frequent oiling than a dry-area worktop and benefits from prompt drying after splashing. Pooled water left unwiped is the primary cause of sink-area failure.
Do not assume scratches are permanent damage. Light surface scratches and knife marks can be sanded back and the area re-oiled. This repairability distinguishes solid wood from composite stone, quartz, or laminate worktops, none of which can be meaningfully resurfaced once scratched.
Do not assume solid wood worktops are a hygiene risk. Research published in food science literature indicates that hardwood surfaces, when cleaned correctly, perform comparably to plastic in terms of bacterial contamination. Hygiene is primarily a question of consistent cleaning routine rather than material choice alone.
Pre-installation checklist
Before your butcher block worktops are delivered, work through the following:
When to get professional help
A competent joiner or kitchen fitter can install a butcher block worktop without difficulty in most kitchens. Consider using a professional installer if:
- The kitchen has complex angles, curved runs, or an island requiring precise mitred joins.
- You are fitting a Belfast or undermount sink, which demands careful routing and thorough sealing of the cut-out edges.
- The worktop needs to be joined mid-run — poor joinery at a join is the most common entry point for water ingress and eventual splitting.
- You are unsure how to accommodate timber movement within your specific cabinet configuration or carcass material.
How Housey can help
Housey connects homeowners with vetted kitchen fitters and joiners across the UK, including professionals with experience in solid wood and butcher block worktop installation. Whether you need a single surface replaced or are managing a wider kitchen renovation, requesting quotes through Housey allows you to compare providers, check relevant experience, and move forward with confidence.
Frequently asked questions
How often should I oil a butcher block worktop?
New butcher block worktops should be oiled three to five times before use, allowing each coat to fully penetrate before applying the next. Once in regular service, re-oil every one to three months depending on use. Worktops beside sinks or in busy kitchens need more frequent attention — monthly is a reasonable guide. The surface will feel dry and look slightly pale when it is time to re-oil.
Can a butcher block worktop be installed next to a sink?
Yes, but it needs more care than a worktop in a dry area. Seal the edges of any sink cut-out thoroughly, do not leave water pooled on the surface, and oil more frequently — monthly rather than quarterly. A draining groove cut into the surface near the sink helps direct water away. An edge-grain or end-grain product is more suitable in this location than a face-grain worktop.
What is the best oil for a butcher block worktop?
Food-safe mineral oil is the most widely recommended option: it is colourless, odourless, and will not go rancid. Danish oil and purpose-made wood worktop oils are also commonly used and provide a slightly harder surface film. Avoid culinary oils such as olive oil or vegetable oil, which become rancid over time and can discolour and soften the wood surface.
How do I remove scratches from a butcher block worktop?
Light scratches can be sanded out using 120–180 grit sandpaper, working with the grain of the wood. Sand the affected area level, progress to finer grits if needed, then apply a full oiling cycle immediately — sanding removes the existing finish and the surface must be re-oiled promptly. This repairability is one of the main practical advantages of wood over quartz or laminate worktops, which cannot be resurfaced.
Are butcher block worktops more expensive than quartz in the UK?
It depends on species, thickness, and supplier. Edge-grain oak worktops typically cost £100–£250 per linear metre; end-grain products can reach £300–£600 or more per linear metre. Entry-level quartz worktops typically start at around £200–£400 per square metre installed. Wood worktops can be less expensive overall, but a fair comparison should include installation, ongoing maintenance, and expected lifespan. (Indicative UK costs, last reviewed 2026-05-05.)
Sources and further reading
- British Woodworking Federation — British Woodworking Federation; guidance on timber products and industry standards
- FSC UK — Forest Stewardship Council UK; timber certification and responsible sourcing standards
- FIRA International — Furniture Industry Research Association; furniture and worktop performance standards
- Kitchen worktops: a complete guide — Which?; independent comparison of kitchen worktop materials
Useful next reads
 Improvement & Build
Porcelain Countertop Installation: Costs and Considerations
Porcelain worktop slabs are non-porous, heat-resistant, and require no sealing.
 Improvement & Build
Kitchen Fitting Service Costs and Installation
Kitchen fitters in the UK typically charge £200–£350 per day, and a standard kitchen installation takes 3–7 days.
 Improvement & Build
Liniar uPVC Windows: Performance, Durability, and Quality Assessment
Liniar uPVC window profiles are manufactured in the UK using multi-chambered, foamed frames.
 Improvement & Build
Garden Tap Installation with Hot and Cold Water: Plumbing Options
Adding a cold garden tap is a common DIY project, but routing hot water outdoors requires a plumber to connect to your domestic hot water system and comply with the Water Supply (Water Fittings) Regulations 1999.
 Improvement & Build
Sealing and Maintaining Historic Leaded Glass Windows: Preservation and Performance
Leaded glass windows are maintained using traditional linseed oil cement — not silicone or modern sealants, which prevent natural movement in the lead came.