Curing Architectural Concrete: Best Practices for Quality Finishes
By Housey · Last reviewed 11th of May 2026
Curing Architectural Concrete: Best Practices for Quality Finishes
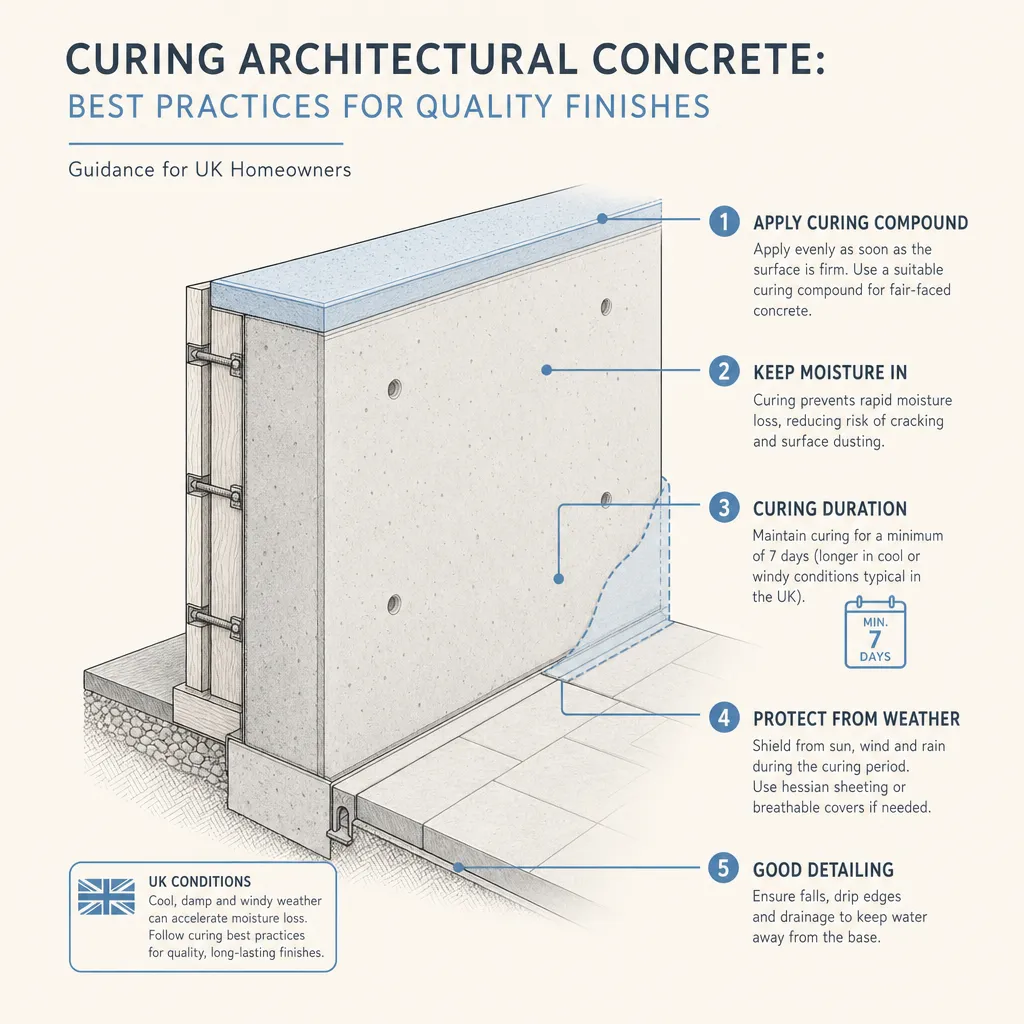
Architectural or fair-faced concrete — where the finished surface remains exposed rather than being plastered, tiled, or clad — demands careful attention during and after placement. Curing is the period after casting during which concrete gains strength and durability; get it wrong and the result can be cracking, surface dusting, colour variation, or long-term moisture ingress. Whether you are planning an extension with polished concrete walls, a garden studio with board-marked finishes, or an exposed concrete floor in a self-build home, understanding how curing works is essential before instructing a builder.
Key points
- Concrete achieves approximately 75% of its 28-day compressive strength in the first 7 days; inadequate early curing locks in that deficit permanently.
- BS EN 13670 (Execution of Concrete Structures) and Concrete Society Technical Report TR52 set out minimum curing durations; for fair-faced or architectural finishes, TR52 recommends a minimum 7-day continuous moist cure in UK ambient conditions.
- Curing compound application (sprayed resin or wax-based membrane) must begin within 30 minutes of formwork striking or final trowelling to prevent surface desiccation.
- Thermal cracking during curing is a risk in UK autumn and winter pours when ambient temperature drops below 5 °C — the minimum placement temperature recommended by Concrete Society guidance.
- Plastic shrinkage cracking typically occurs in the first 6 hours after placement when the evaporation rate exceeds the bleed-water rate, most commonly on exposed slabs in warm or windy conditions.
Why curing matters more for architectural concrete
Standard structural concrete can be repaired or covered if the surface is imperfect. Architectural concrete has nowhere to hide: blemishes, colour variation, efflorescence, and craze cracking are permanent unless costly remedial work is carried out. The curing phase controls four critical outcomes:
- Hydration: water must remain available for cement hydration; premature drying halts the chemical reaction and reduces final strength.
- Surface quality: rapid moisture loss causes plastic shrinkage cracks, surface dusting, and aggregate pull-out.
- Colour consistency: uneven drying produces patchy carbonation and colour variation — the most common complaint with exposed concrete.
- Durability: well-cured concrete is denser and more resistant to carbonation, chloride ingress, and freeze-thaw damage.
The investment in proper curing is disproportionately small compared with the cost of remediating or replacing a poorly cured architectural surface.
Curing methods compared
Choosing the right curing method depends on the concrete element, formwork type, ambient conditions, and the finish specified. The table below compares common approaches used in UK residential and light commercial projects.
Curing method | Best for | Not ideal for | Key risk if skipped or done poorly |
|---|---|---|---|
Leaving formwork in place | In-situ walls and columns cast in timber or steel shuttering | Large flat slabs where formwork must be struck early | Premature striking causes surface drying before 7 days |
Wet hessian + polythene sheeting | Horizontal slabs, upper surfaces, warm or dry UK weather | Areas prone to ponding or with difficult access | Hessian dries out and wicks moisture away if not kept continuously wet |
Curing compound (liquid membrane) | Slabs, walls after striking, large surface areas | Surfaces receiving bonded screeds, tiles, or further concrete | Poor coverage leaves bare patches; solvent-based types need ventilation |
Curing blankets and insulated covers | Winter pours below 5 °C; retaining heat in green concrete | Not suitable as the sole method in hot, dry summer conditions | Inadequate insulation allows freeze damage to green concrete |
Extended damp formwork (oiled plywood) | Fair-faced walls — retains moisture and prevents surface blemish | Complex formwork that must be stripped early for programme reasons | Early striking causes patchy carbonation and permanent colour variation |
Based on Concrete Society TR52 and BS EN 13670. Last reviewed 2026-05-11.
Step-by-step: curing process for fair-faced concrete
Pre-pour preparation
- Confirm formwork is clean and properly oiled with a mould-release agent compatible with the specified finish.
- Check the weather forecast: avoid pouring when rain, frost, or sustained winds above approximately 15 km/h are forecast for the curing period.
- Agree with the contractor which curing method is written into the specification or drawings before work begins.
Immediately after pour (0–30 minutes)
- Protect exposed horizontal surfaces from direct sun and wind using temporary sheeting.
- On slabs, begin plastic shrinkage cracking prevention by misting or using an evaporation retarder product.
First 24 hours
- Do not disturb formwork unless unavoidable.
- Monitor temperature: if it is forecast to drop below 5 °C, insulating blankets must be in place before it does.
After formwork striking (typically 24 hours to 3 days for walls)
- Apply curing compound within 30 minutes of striking while the surface is still damp, OR immediately wrap in wet hessian sealed under polythene.
- Inspect for honeycombing, bug holes, or surface defects while the concrete is still green enough for limited remediation.
Days 2–7 (minimum cure period)
- Maintain continuous moist curing or an intact compound membrane throughout.
- Do not allow polythene wrap or hessian to dry out.
- Protect from direct sun in summer; maintain insulation in cold weather.
After 7 days
- Remove curing membranes and allow gradual drying.
- Inspect the surface and note any craze cracking, colour variation, or efflorescence for the contractor's snagging record.
What not to assume
Common misunderstandings among homeowners commissioning architectural concrete work:
- "The concrete looks hard, so it must be cured." Concrete can be walked on within 24–48 hours but is nowhere near its design strength. Internal curing continues for weeks and cannot be rushed.
- "Any builder can produce fair-faced concrete." Architectural concrete is a specialist skill — formwork design, pour sequence, vibration technique, and curing discipline all affect the outcome. Always ask for photographs or site visits to comparable completed work.
- "Curing compounds seal the surface permanently." Most curing compounds are designed to dissipate or degrade over days to weeks. They do not provide long-term waterproofing and must be compatible with any subsequent surface treatment.
- "Cracks can always be repaired invisibly." Repairs to architectural concrete are almost always visible. Prevention during the curing period is far preferable to post-cure patching, which typically involves colour-matched grouts or coatings that rarely match perfectly over time.
Homeowner checklist before work starts
When to get professional help
Architectural concrete is technically demanding. Involve a specialist if:
- Your project specifies a board-marked, polished, pigmented, or exposed aggregate finish — these require mix design and formwork expertise beyond standard construction practice.
- You are working in challenging conditions (winter pours, large single pours, or exposed hilltop or coastal sites).
- Cracking or surface defects appear during or after curing — early intervention by a concrete technologist or specialist contractor can limit remedial costs significantly.
- Building control requires inspection of structural concrete elements — a qualified structural engineer or approved building inspector should be involved regardless of the aesthetic finish.
How Housey can help
Housey connects you with extension builders and design-and-build firms experienced in architectural concrete. Whether you are planning a concrete-walled garden studio, a contemporary rear extension, or a self-build with exposed structure, Housey can help you find specialists who understand the mix design, formwork, and curing discipline that quality architectural finishes demand.
Frequently asked questions
How long does concrete need to cure before formwork can be struck?
For most vertical formwork (walls and columns) in UK ambient conditions, 24–48 hours is common practice for structural purposes. For fair-faced architectural finishes, many specifications require formwork to remain in place for 3–7 days to protect the surface from drying and maintain colour consistency. Always follow the project specification rather than a general rule of thumb, as mix design and ambient temperature both influence the safe strike time.
What causes white staining (efflorescence) on architectural concrete?
Efflorescence is caused by soluble calcium hydroxide — a cement hydration product — migrating to the surface with evaporating water and reacting with atmospheric CO₂ to form calcium carbonate. It is most common when concrete dries unevenly or too quickly. Proper curing that limits rapid moisture loss significantly reduces the risk. Existing efflorescence can often be removed with dilute acid washing, but recurrence indicates an ongoing moisture pathway.
Can a curing compound be used on a concrete floor that will be polished?
Yes, but only if the compound is compatible with the polishing process. Some solvent-based curing membranes must be fully abraded away before polishing; water-based compounds tend to be easier to remove. Confirm compatibility with the compound manufacturer's data sheet and the concrete polishing contractor before application, as an incompatible compound can bond to the surface and affect the final sheen.
Is curing different in winter UK conditions?
Yes. Cold weather below 5 °C slows and can halt cement hydration, and frost can physically damage green concrete. In UK winter conditions, concrete should be protected from freezing for at least 48 hours after placement — longer for large pours or slow-gain mixes. Insulating blankets, heated enclosures, and admixtures such as accelerators or winter-grade cements are all used in cold-weather concreting, covered in detail by Concrete Society guidance and CIRIA C660.
Sources and further reading
- Concrete Society Technical Report 52: Visual Concrete — Design and Production — Concrete Society
- BS EN 13670: Execution of Concrete Structures — BSI (British Standards Institution)
- CIRIA C660: Early-age Thermal Crack Control in Concrete — CIRIA
- MPA The Concrete Centre: Curing — MPA The Concrete Centre
- Building Regulations Approved Document A: Structure — GOV.UK
Useful next reads
 Improvement & Build
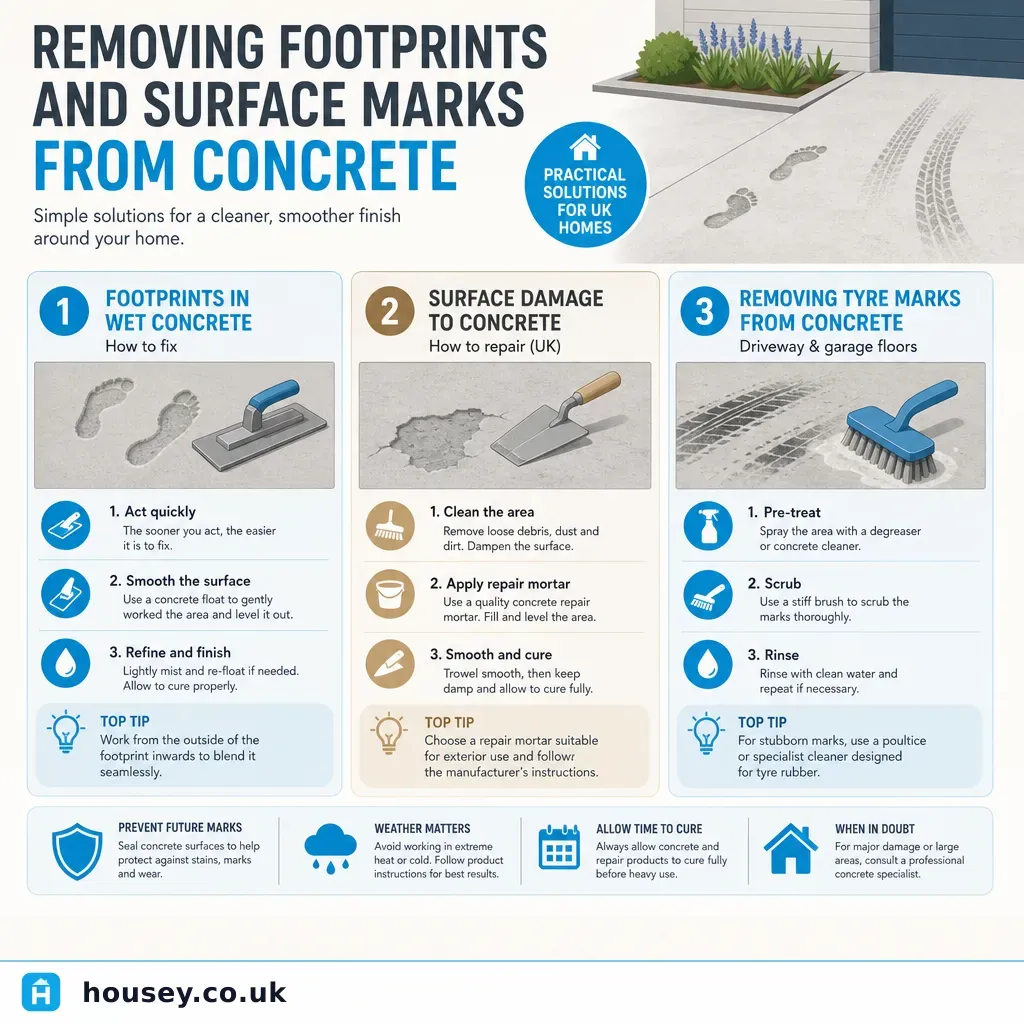
Removing Footprints and Surface Marks from Concrete
Footprints and marks in fresh concrete under 4–6 hours old can often be re-floated or trowelled smooth by a skilled finisher before initial set occurs.
 Improvement & Build
Window installation checklist for homeowners
Before installation, confirm your installer is registered with FENSA or CERTASS and can self-certify Building Regulations compliance.
 Improvement & Build
Pocket Door Installation: Techniques and Best Practice Guidance
Pocket doors slide into a cavity within the wall, requiring a proprietary steel or timber frame kit installed during the rough carpentry stage.
 Improvement & Build
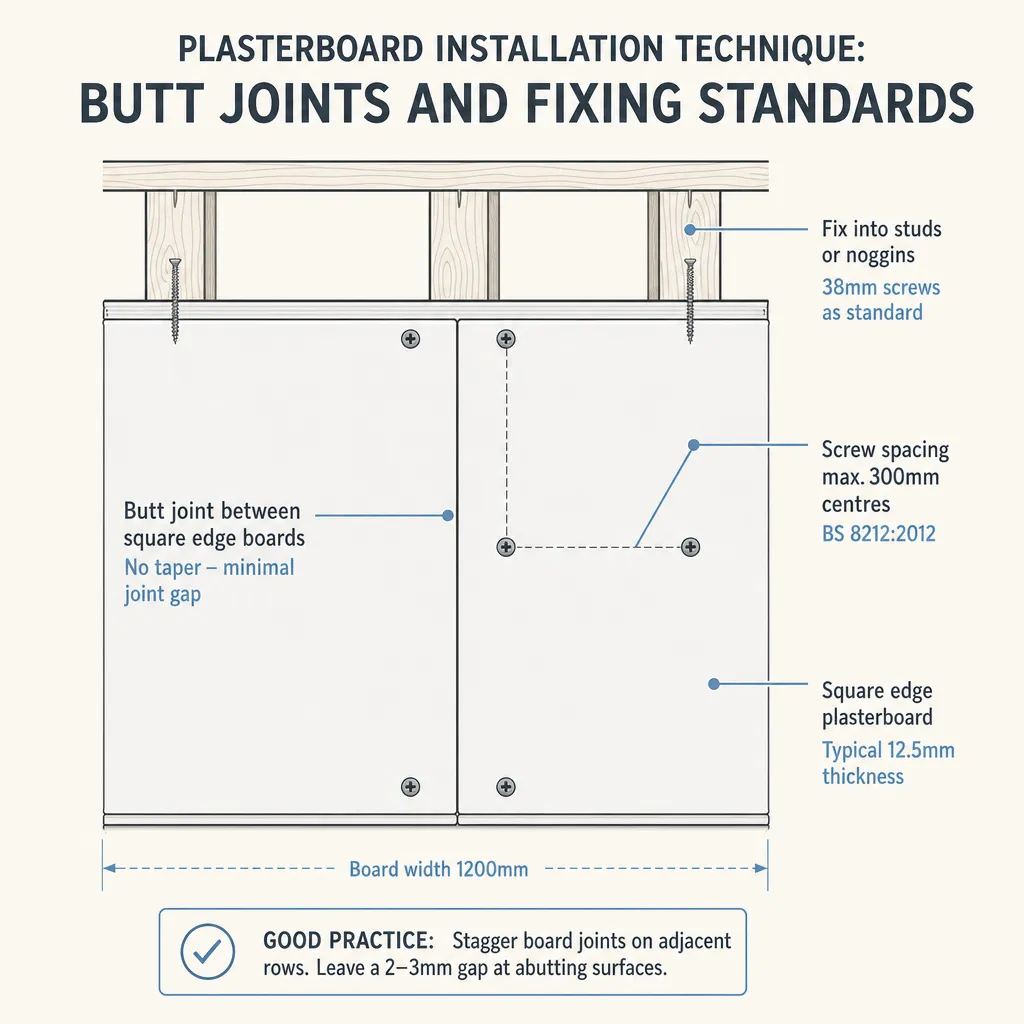
Plasterboard Installation Technique: Butt Joints and Fixing Standards
Butt joints in plasterboard — where two square-cut edges meet — need jointing compound feathered over at least 200mm each side to avoid a visible ridge after decoration.
 Improvement & Build
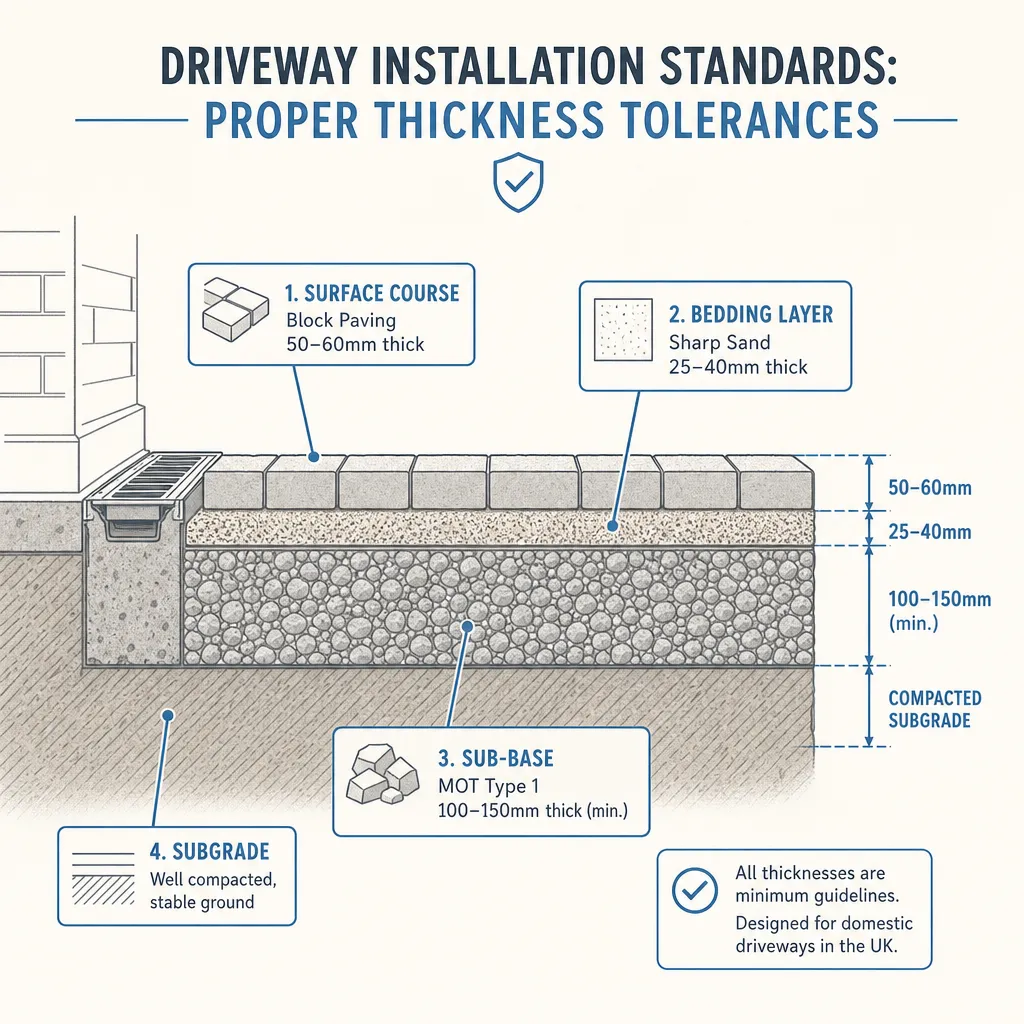
Driveway Installation Standards: Proper Thickness Tolerances
Driveway thickness in the UK depends on material and load.