Plasterboard Installation Technique: Butt Joints and Fixing Standards
By Housey · Last reviewed 18th of May 2026
Plasterboard Installation Technique: Butt Joints and Fixing Standards
Plasterboard installation underpins almost every UK interior build-out — loft conversions, extensions, partition walls, and ceiling renewals — yet joint preparation and fixing standards are the source of many cosmetic failures that emerge once decorating begins. Getting butt joints and screw patterns right the first time avoids costly rectification after painting.
Key points
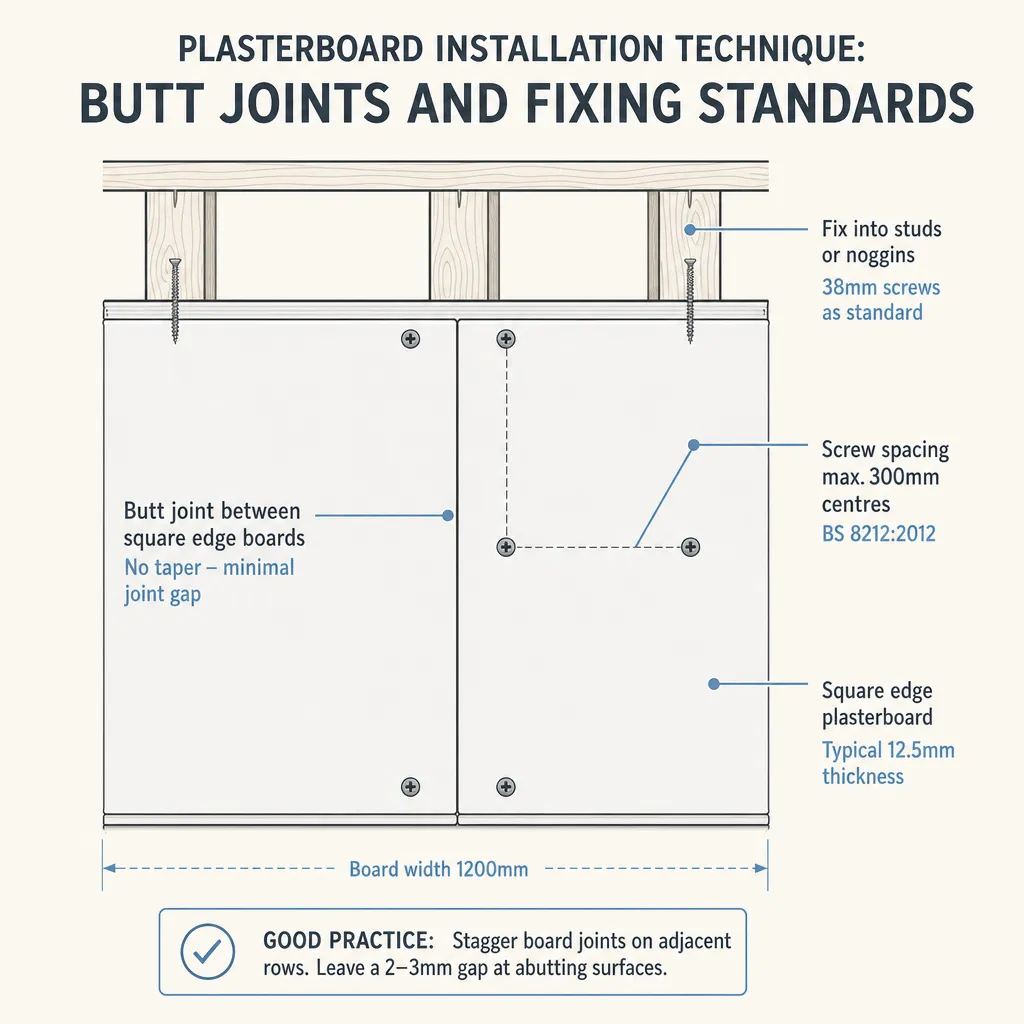
- BS 8212:1995 (Code of Practice for Dry Lining and Partitioning Using Gypsum Plasterboard) sets maximum screw spacings at 150mm at board edges and 300mm in the field; screws must be positioned 10–15mm from the board edge.
- Butt joints (square-cut edge meeting square-cut edge) require jointing compound feathered over at least 200mm each side to avoid a visible ridge; tapered-edge joints need only 100–150mm of feathering each side.
- Every board joint must fall on a stud, nogging, or batten — joints spanning a void mid-stud will crack through thermal and moisture movement.
- Screw heads should create a slight dimple in the board face without breaking through the paper; overdriven screws lose pull-through resistance and create a stress point in the board.
- For fire- or acoustic-rated partitions, the complete tested wall system — board type, thickness, stud gauge, and quilt infill — must be followed as an assembly, not approximated from individual components.
Board edges: tapered vs butt
Most plasterboard boards have two tapered long edges and two square short ends. The tapers create a shallow recess that allows jointing tape and compound to sit flush with the board face after finishing. The square short ends are factory-cut and have no recess — these are butt ends.
When a butt joint occurs: at board ends where rows terminate, where a board has been cut on site, or where boards of different dimensions meet in a configuration that cannot be avoided with careful layout planning.
Joint type | Edge condition | Compound feather width each side | Tape required | Visibility risk |
|---|---|---|---|---|
Tapered-edge (long side) | Factory-recessed taper | 100–150mm | Yes — paper tape recommended | Low if done correctly |
Butt joint (end or cut edge) | Square, no recess | 200–300mm | Yes — paper tape essential | Higher; requires careful feathering |
Cut edge meeting taper | Mixed | Use butt technique on the cut side | Yes | Moderate |
The wider the feather on a butt joint, the less visible the ridge — but wide feathering demands a very light touch with successive compound coats (typically three) and thorough sanding between each coat.
Fixing centres and screw standards
BS 8212:1995 and manufacturer technical data sheets from British Gypsum and Knauf set out the following requirements for plasterboard fixed to timber stud partitions:
Screw spacing:
- Edge fixings: maximum 150mm centres, placed 10–15mm from the board edge. Closer to the edge risks crumbling the paper face; further from the edge reduces holding strength.
- Field fixings (the central area of the board away from edges): maximum 300mm centres.
- Top and bottom of each board: first fixing within 150mm of the floor and ceiling line.
Screw length:
- 12.5mm board into 50mm × 100mm CLS timber studs: 38mm bugle-head drywall screws.
- 15mm board: minimum 42mm screws.
- Double-layer boarding (fire or acoustic partitions): outer-layer screws must penetrate at least 25mm into the timber stud beyond both board layers combined.
Screw type:
- Bugle-head drywall screws with phosphate coating for standard timber stud work.
- Self-tapping pan-head or wafer-head metal-frame screws for steel stud partitions.
The overdriving problem: Overdriven screws are the most common fixing error on site. The screw should dimple the paper face very slightly — enough to allow a thin coat of jointing compound over the head — without rupturing the paper. A broken paper face reduces pull-through resistance and creates a stress concentration in the board that may cause local cracking.
Nogging and support requirements
Every board joint — tapered or butt — must bear on a structural support. Boards spanning freely across a void at their joints will crack as the structure moves through thermal and moisture cycles.
Practical implications:
- Stud layout must be planned so that board edges land on a stud at each fixing line. Standard 1,200mm-wide boards fit 400mm and 600mm stud spacings; 900mm-wide boards suit 450mm spacings.
- At board-end (butt) joints, a horizontal nogging is installed between adjacent studs. The nogging should be at least 38mm deep to allow screws from both boards to sit side by side without splitting the timber.
- On ceilings, joist or resilient-bar spacing must be planned before boarding starts; the edges of ceiling boards must always be supported.
Board orientation and staggering:
- Vertical installation (long edges parallel to studs) is standard for wall partitions and minimises the number of butt joints in the finished surface.
- Horizontal installation can reduce butt joints on tall partitions but requires additional noggins at every board-end position.
- Always stagger butt joints in adjacent board rows so they are not collinear — a continuous horizontal line of butt joints is a structural and cosmetic weak point.
What not to assume: common plasterboard mistakes
Misunderstandings about plasterboard installation regularly lead to visible failures after decoration:
- "Any tape will do": Paper tape requires embedding in a first compound coat; self-adhesive mesh tape is easier to apply but more prone to cracking over butt joints. Paper tape is the preferred choice for butt joints and any surface that will be finish-skimmed.
- "The skim coat will hide a poor joint": A badly prepared butt joint will telegraph through a 3mm skim and become visible in raking light after painting. The compound preparation must be correct before plastering begins.
- "Boards can go directly to the floor": British Gypsum recommends a 12–15mm gap between the board bottom and a concrete or screed floor to prevent moisture wicking up the paper face and causing swelling or deterioration.
- "Fire board is just thicker standard board": Fire-rated boards — such as British Gypsum Fireline or Knauf Fire Panel — contain elevated gypsum content and glass-fibre reinforcement. A standard board of the same thickness does not replicate the fire performance.
- "One layer always meets the specification": Separating walls between dwellings and some protected escape routes under Approved Document B require two layers of fire board — the complete tested wall system must match the specification, not just the board type.
Homeowner checklist: plasterboard installation quality checks
Before skimming or decorating, check:
When to get professional help
Most competent second-fix joiners and specialist drylining contractors can produce a sound plasterboard installation. Seek additional professional guidance when:
- A partition must meet a specific fire-resistance period (30 or 60 minutes) — the complete tested system specification must be followed and signed off by building control.
- Acoustic performance is required for a separating wall between dwellings — verify that a tested wall system (per BS EN ISO 10140) is specified, not assumed from board thickness alone.
- The project is subject to a building control inspection — confirm the specification meets Approved Document B and Approved Document E before boarding starts.
- The substrate or existing wall shows damp, structural movement, or loose plaster — investigate and resolve before dry lining over the problem.
How Housey can help
If you are planning an extension, loft conversion, or internal fit-out involving partition walls and ceiling boarding, Housey can connect you with vetted extension builders and drylining specialists experienced in meeting building control requirements for fire, acoustic, and standard partitions.
Frequently asked questions
What is the maximum stud spacing for 12.5mm plasterboard?
For standard 12.5mm wallboard on vertical stud partitions, the maximum stud spacing is 600mm centres when boards are installed vertically. For ceilings, the maximum is 450mm joist or resilient-bar centres. Always check the manufacturer's technical data sheet for the specific board being used, as heavier or performance boards may have different limits.
Do butt joints always need jointing tape?
Yes. Even a carefully prepared butt joint will eventually develop a hairline crack without tape embedded in the first coat of compound. Paper tape provides the most reliable bridge across the joint gap. Skipping tape is the single most common cause of visible joint cracking once decoration is complete — there is no reliable shortcut.
What is moisture-resistant plasterboard and when is it needed?
Moisture-resistant (MR) board has a water-resistant paper face and gypsum core additives that reduce moisture absorption. It is specified for kitchens, bathrooms as a tile substrate, and utility rooms. Standard wallboard must not be used in wet areas, though MR board also requires protection from prolonged direct water contact and is not a substitute for a tanking system.
Do I need building regulations approval for a new internal partition?
Most non-structural internal partitions in a single dwelling do not require building regulations notification. However, if the partition creates a fire separation, affects a protected means of escape, or involves removing a loadbearing wall, building control notification is needed. Check with your local authority building control (LABC) or an approved inspector before starting work.
Sources and further reading
Useful next reads
 Improvement & Build
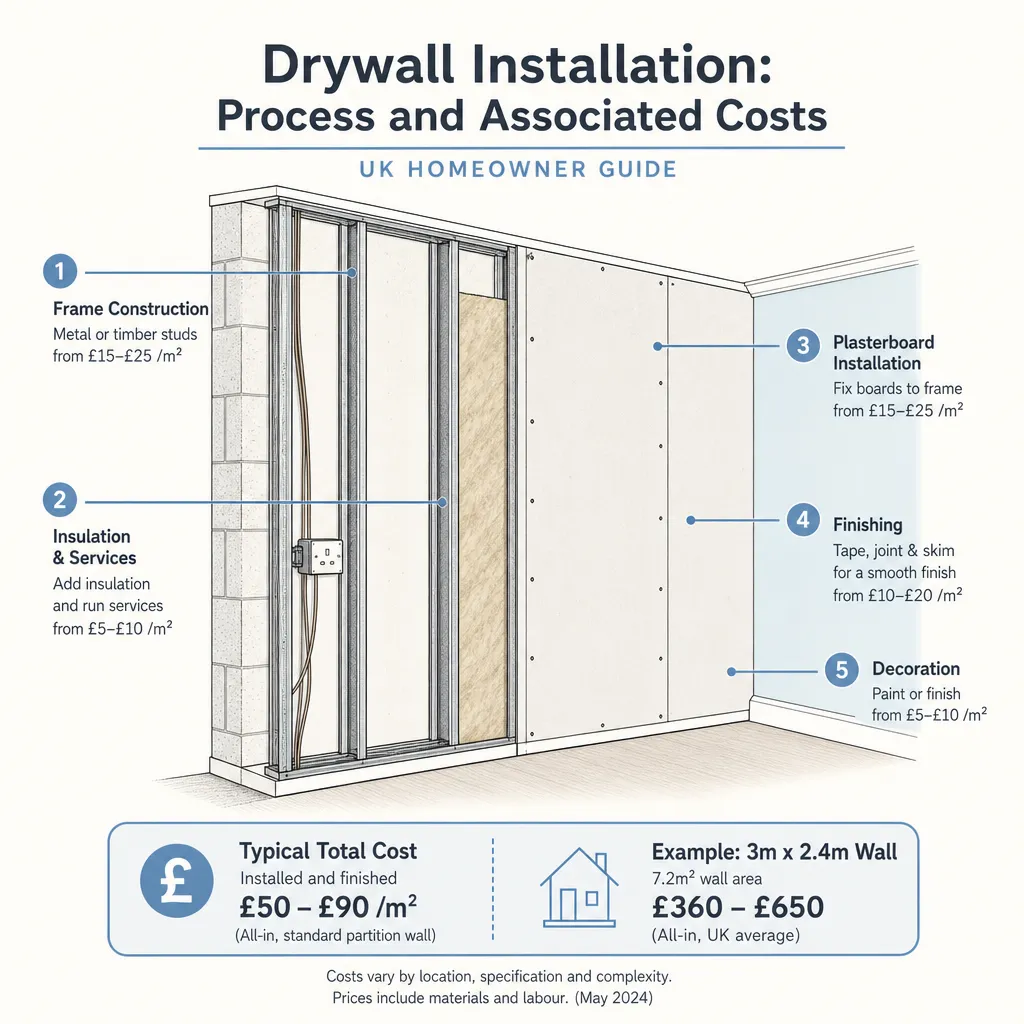
Drywall Installation: Process and Associated Costs
Drywall — known in the UK as plasterboard — is installed by fixing sheets to timber or metal studwork, or bonding directly to masonry using the dot-and-dab method.
 Improvement & Build
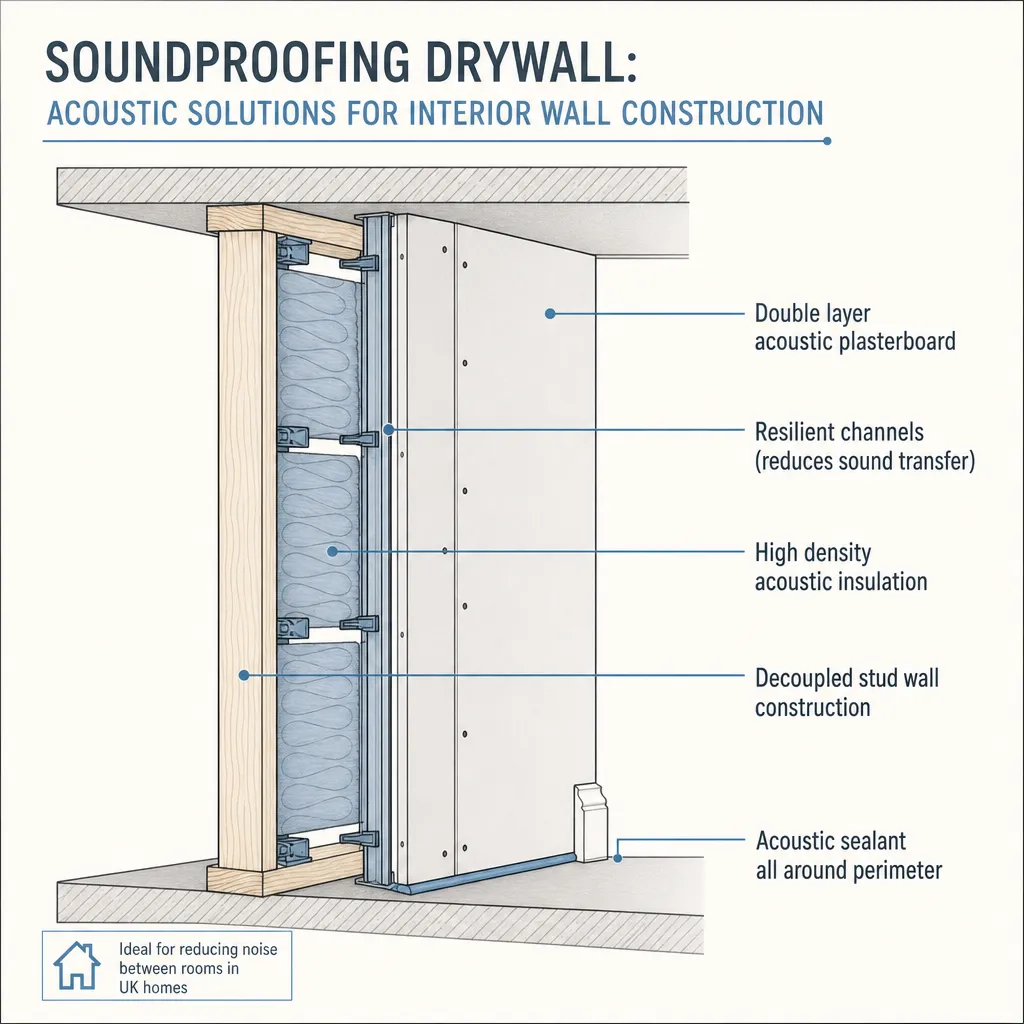
Soundproofing drywall: acoustic solutions for interior wall construction
Soundproofing drywall in UK homes typically combines acoustic plasterboard, resilient bar fixings, and mineral wool cavity fill to reduce airborne and structure-borne noise.
 Improvement & Build
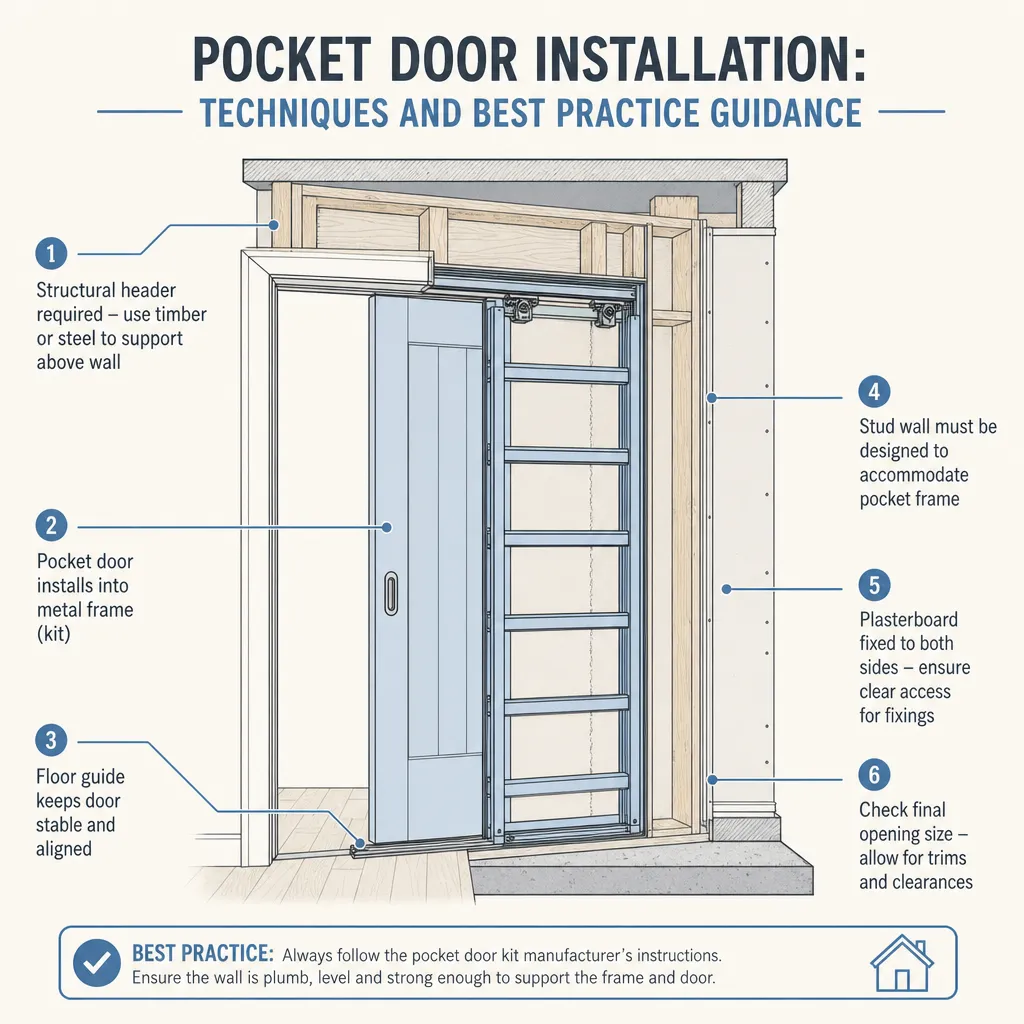
Pocket Door Installation: Techniques and Best Practice Guidance
Pocket doors slide into a cavity within the wall, requiring a proprietary steel or timber frame kit installed during the rough carpentry stage.
 Improvement & Build
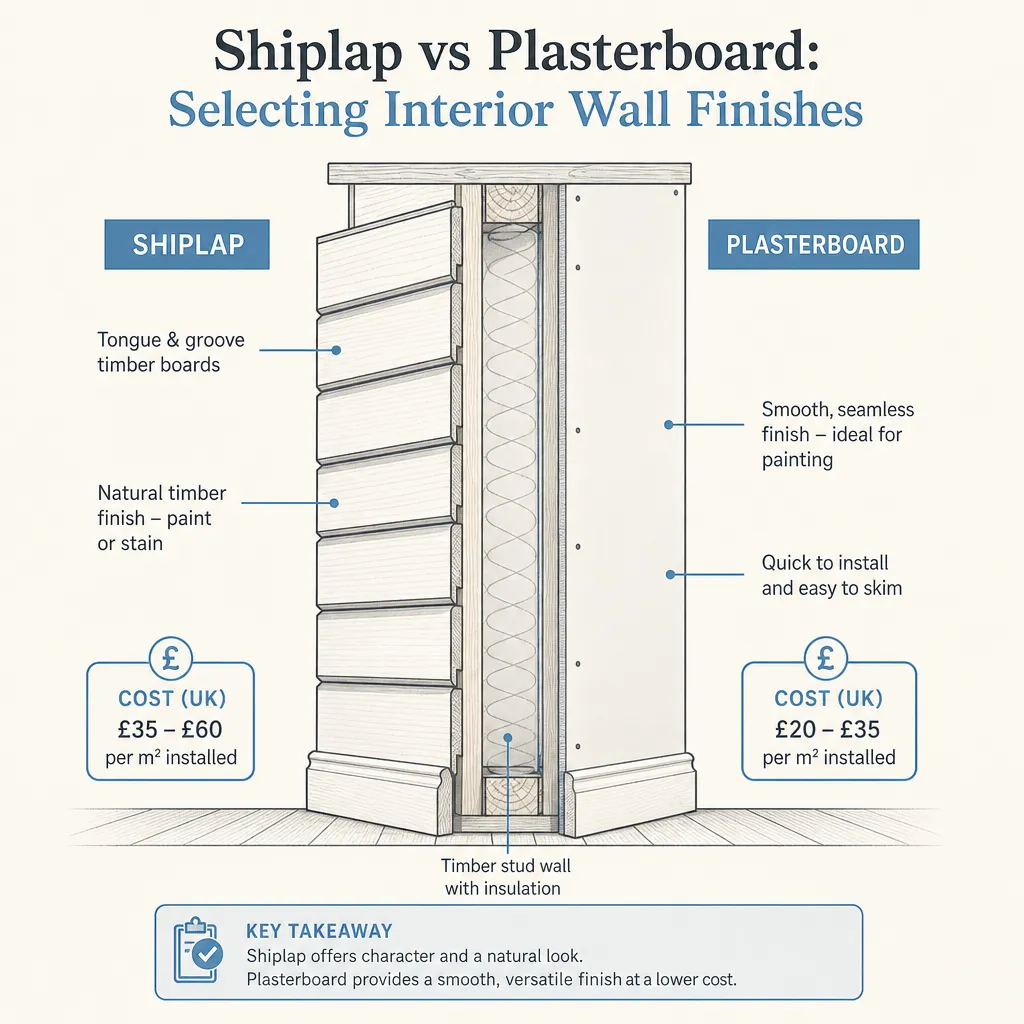
Shiplap vs Plasterboard: Selecting Interior Wall Finishes
Plasterboard is the standard interior wall finish for most UK homes and extensions, offering a smooth, paintable surface at lower cost.
 Improvement & Build
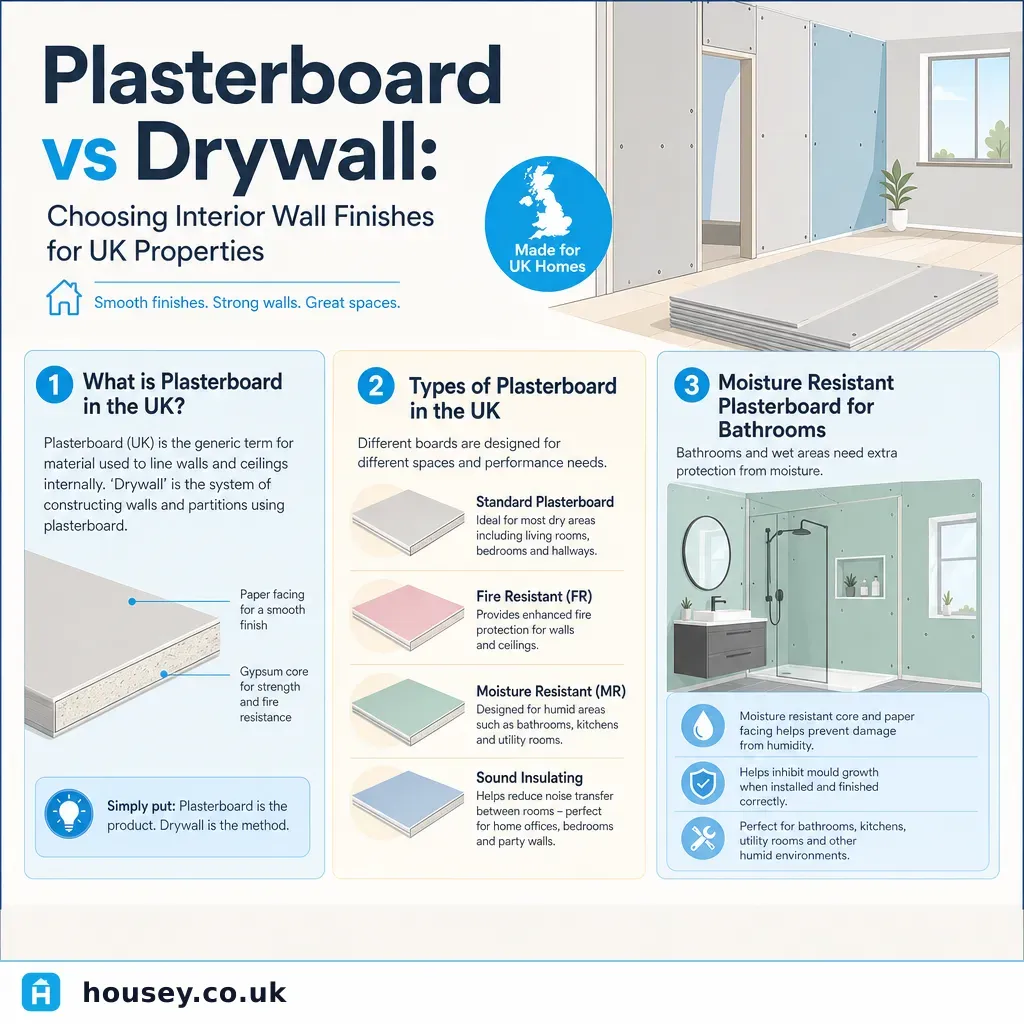
Plasterboard vs Drywall: Choosing Interior Wall Finishes for UK Properties
In the UK, plasterboard and drywall describe the same gypsum-core panel material.