Pocket Door Installation: Techniques and Best Practice Guidance
By Housey · Last reviewed 26th of May 2026
Pocket Door Installation: Techniques and Best Practice Guidance
Pocket doors have grown steadily popular in UK renovations, particularly in Victorian terraces and 1930s semis where corridors are narrow and swing clearance is limited. They are most commonly fitted during a refurbishment that involves opening up walls or during a new partition build — and they demand considerably more planning than a conventional hinged door.
Key points
- Pocket door frame kits are typically 90–148mm deep and must span at least double the width of the door leaf to allow full concealment.
- Approved Document M of the Building Regulations recommends a minimum 775mm clear opening width for wheelchair accessibility in new builds and some material changes of use.
- Electrical cables, gas pipes, and water pipes cannot run through the pocket (the concealed cavity) — they must be re-routed before installation.
- Most proprietary steel frame kits include a header track and floor guide system; quality units are typically rated for leaves up to 100kg.
- Fire door sets with FD30 or FD30S ratings can be specified for pocket door openings where Building Regulations Part B applies, though compliant ironmongery selection is critical.
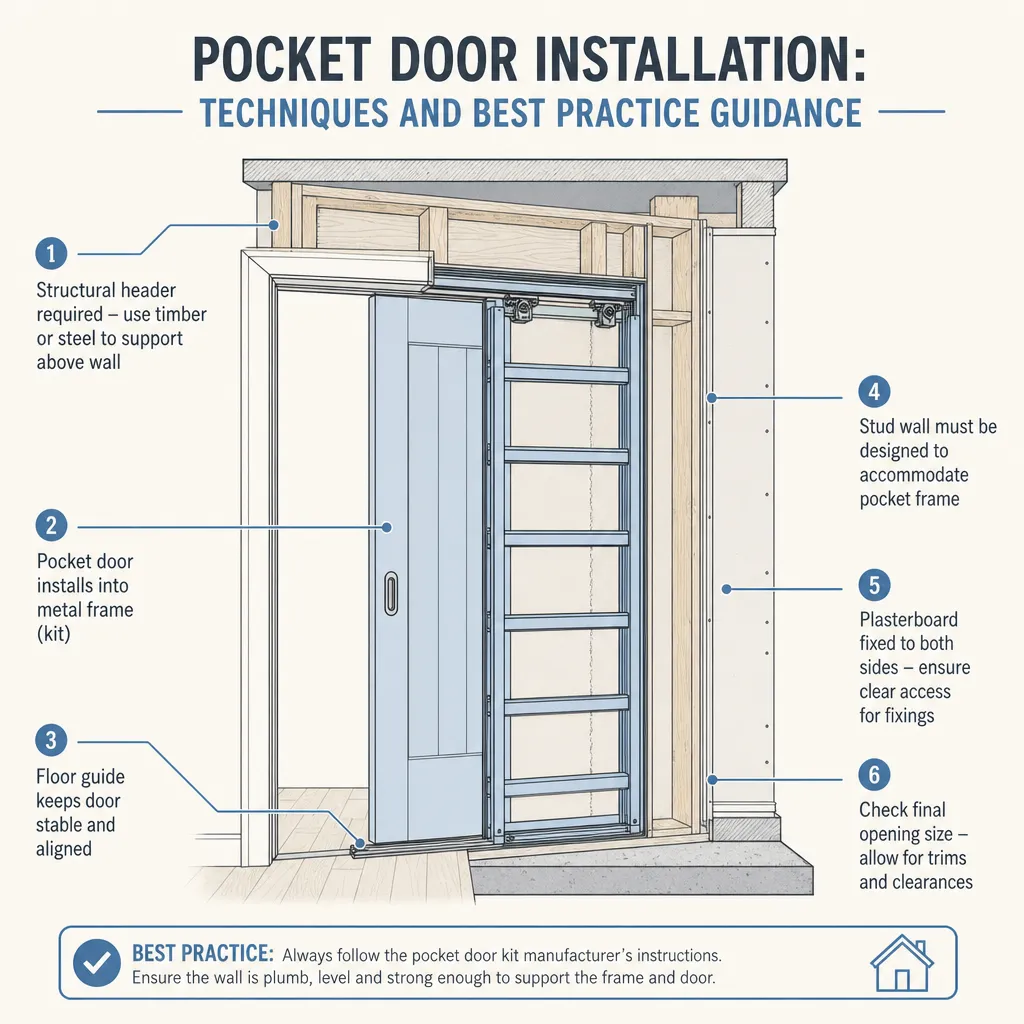
How pocket door frame systems work
A pocket door does not hang on a standard door frame. Instead, the door leaf slides horizontally into a dedicated cavity — the pocket — built into the wall. The frame kit provides the structural box that the wall lining (plasterboard or timber) is fixed to, along with the track and roller hardware that carries the leaf.
Two main system types are common in UK projects:
System type | Construction method | Best for | Limitations |
|---|---|---|---|
Steel-framed kit (e.g., Eclisse) | Flat-pack steel frame supplied with track and floor guide | New partitions or gut refurbishments | Requires wall to be built around kit — not suitable for retrofitting into most existing solid walls |
Timber-framed kit | Timber studwork with added track hardware | Bespoke carpentry; listed buildings where proprietary steel is restricted | Less dimensionally consistent; relies heavily on the carpenter's skill for squareness |
Retrofit or slim-profile kit | Reduced-depth frame designed for existing wall thickness | Refurbishments where full wall opening is not planned | Wall must be at least 100mm thick; structural elements must not be present in the pocket |
Track systems use overhead nylon or steel rollers, with a bottom floor guide to prevent the leaf swaying. Quality of the roller system matters for long-term reliability — budget systems can sag or derail after years of use.
Structural checks before you start
Before any frame is ordered or fitted, the wall being altered must be assessed.
Is the wall load-bearing? A wall running perpendicular to floor joists, or positioned directly above another wall on a lower storey, is likely load-bearing. An opening in a load-bearing wall requires an adequately sized lintel and may require temporary propping. A structural engineer or experienced builder should confirm the wall's status before work begins.
What is in the wall? Stud walls in UK homes often conceal ring-main cables, radiator pipework, or central heating flow and return pipes. Use a cable and pipe detector before cutting, and engage a qualified electrician or plumber to re-route any services found in the pocket zone.
Is the wall wide enough? A single pocket door needs wall length of at least the door leaf width plus the frame kit thickness on the pocket side. For a standard 762mm (2'6") leaf, the total wall length required on the pocket side is approximately 900–1,000mm.
Pre-installation checklist
Work through this before confirming your frame kit order:
The installation process: a stage-by-stage overview
- Wall preparation: Remove existing wall lining on both faces in the pocket zone. Re-route any identified services before the frame goes in.
- Lintel installation: If the wall is load-bearing, install a correctly sized steel or timber lintel and ensure propping is removed safely before proceeding.
- Frame kit assembly: Assemble the proprietary kit to the manufacturer's dimensions. Check for square using a spirit level — small errors at this stage create alignment problems after plastering.
- Track installation: Fit the overhead header track within the kit. Check it is level along its entire length; a slope of even 2mm per metre will cause the door to drift open or closed.
- Wall lining: Fix plasterboard or timber board to both faces of the frame kit, leaving the pocket opening clear. Tape, joint, and skim to finish.
- Door leaf hanging: Hang the door leaf on the track rollers and adjust wheel height to achieve even gaps at head and floor.
- Floor guide fitting: Fit the bottom guide — recessed into the floor finish or surface-mounted — to control lateral movement.
- Ironmongery and finishing: Fit edge pulls, privacy latches, and flush door stops. Paint or oil the leaf before hanging if access will be restricted once the door is in place.
Common problems and how to avoid them
- Door drifts open or closed: Almost always caused by a track that is not level. Remove the access panel and re-set the track to true horizontal.
- Noisy rolling: Check roller wheels for debris and lubricate with a dry PTFE spray — not oil, which attracts dust and causes sticking over time.
- Door drops over time: Roller wheel bearings wear, particularly on heavy leaves. Specify commercial-grade rollers for doors above 40kg.
- Plasterboard cracking at reveals: May indicate slight racking of the frame kit. Check that the kit was installed square and all fixing points are secure.
When to get professional help
Pocket door installation is within the skill set of an experienced carpenter, but several stages require qualified trades:
- Structural engineer: if there is any doubt about whether the wall is load-bearing.
- Part P-registered electrician: to re-route ring-main cables, reposition sockets, or certify the electrical work.
- Plumber: to re-route heating or water pipework found in the pocket zone.
- Building control: notify if the works form part of a larger notifiable project, such as a structural opening in a load-bearing wall.
Stop and seek professional advice if:
- The wall supports a ceiling beam or visibly carries load from the structure above.
- Cracking appears in the ceiling plaster adjacent to the proposed opening.
- The wall contains cast-iron pipework or old wiring with rubber or fabric insulation.
How Housey can help
Housey connects you with vetted window and door installers who can assess your wall, specify the right frame kit, and carry out the full installation — including co-ordinating with electricians or plumbers where services need re-routing. Submit a quote request to compare local specialists before committing to a system or supplier.
Frequently asked questions
Do pocket doors require building regulations approval in the UK?
Installing a pocket door in an internal non-load-bearing partition does not usually require building regulations approval on its own. However, if the work involves structural alterations, electrical re-routing, or fire compartmentation changes, those elements may be notifiable. A competent builder or local building control officer can confirm what applies to your specific situation.
Can a pocket door be retrofitted into an existing solid brick wall?
Retrofitting into a solid brick or blockwork wall is technically possible but significantly more complex and expensive than building into a timber stud partition. It typically requires cutting a double-width chase into the masonry, lining it with a structural box, and inserting a lintel. A structural engineer's assessment is strongly advisable before proceeding.
How long does pocket door installation typically take?
For a new timber stud partition with no services to re-route, a competent carpenter can usually complete the frame kit installation, boarding, and door hanging in one to two days. A retrofit into an existing wall — particularly where services need re-routing and replastering is involved — may take three to five days across multiple trades.
Can pocket doors be used as fire doors?
Yes, but the entire assembly must comply with Building Regulations Part B. This requires a rated fire door leaf (typically FD30 or FD30S), intumescent strips, smoke seals, and compliant ironmongery certified for pocket door use. Not all track systems are rated for fire door applications, so check system certification carefully before specifying.
Sources and further reading
- Building Regulations Approved Document M: Access to and use of buildings — GOV.UK / MHCLG
- Building Regulations Approved Document B: Fire safety — GOV.UK / MHCLG
- Building Regulations Approved Document A: Structure — GOV.UK / MHCLG
- Part P: electrical safety in dwellings — Electrical Safety First
Useful next reads
 Improvement & Build
Tar and Gravel Roofing Systems: Material Properties and Application Methods
A tar and gravel roof is a built-up system of bitumen-bonded felt layers finished with stone chippings.
 Improvement & Build
Window Screens and Insect Mesh: Options and Installation
UK window screens fall into four main types: fixed frame, roller retractable, pleated folding, and magnetic snap-fit.
 Improvement & Build
Cost of Wire Fence Installation in the UK
Wire fence installation in the UK typically costs £8–18 per metre for stock fencing, £15–35 per metre for chain-link, and £20–45 per metre for welded wire mesh panels, all installed.
 Improvement & Build
Expert Roofing Installation: Quality Materials and Craftsmanship
A quality roof installation depends on matching materials to your property type, hiring a suitably qualified roofer, and ensuring building regulations are met where required.
 Improvement & Build
Outdoor lighting problems: solutions for common issues in gardens and driveways
Outdoor lighting problems in UK gardens commonly stem from water ingress, incorrect IP ratings, faulty transformers, poor earth connections, or corroded contacts.