Flashing Arched Windows: Weatherproofing Curved Glazing
By Housey · Last reviewed 11th of May 2026
Flashing Arched Windows: Weatherproofing Curved Glazing
Arched windows add character to Georgian, Victorian, and contemporary properties alike, but their curved heads create a flashing challenge that catches out many installers. Water ingress around arched glazing is one of the more common complaints following window replacement or new installation — usually traced to poorly formed or incorrectly lapped flashing that could not accommodate the curve. Whether you are replacing existing arched lights in a 1930s bay or specifying new curved glazing in a single-storey extension, understanding what correct flashing looks like helps you commission the work properly and inspect it confidently on completion.
Key points
- Lead flashing (Code 4 minimum for soakers, Code 5 for cover flashings) is the traditional and most durable choice for curved window heads; GRP and aluminium alternatives are available where lead is impractical or restricted.
- Arched cover flashing must be formed in short sections — typically 150 mm segments for tight curves — to follow the radius without buckling or leaving gaps through which water can track behind the frame.
- The minimum overlap between flashing and window frame is 75 mm; the flashing should be dressed at least 75 mm up behind any facing material, render line, or DPC above.
- Cavity wall construction above an arched window head requires a correctly sloped cavity tray with weep holes, or interstitial moisture will migrate inward through the wall.
- Replacement window installation in England and Wales requires FENSA or CERTASS certification, or a separate building control notification.
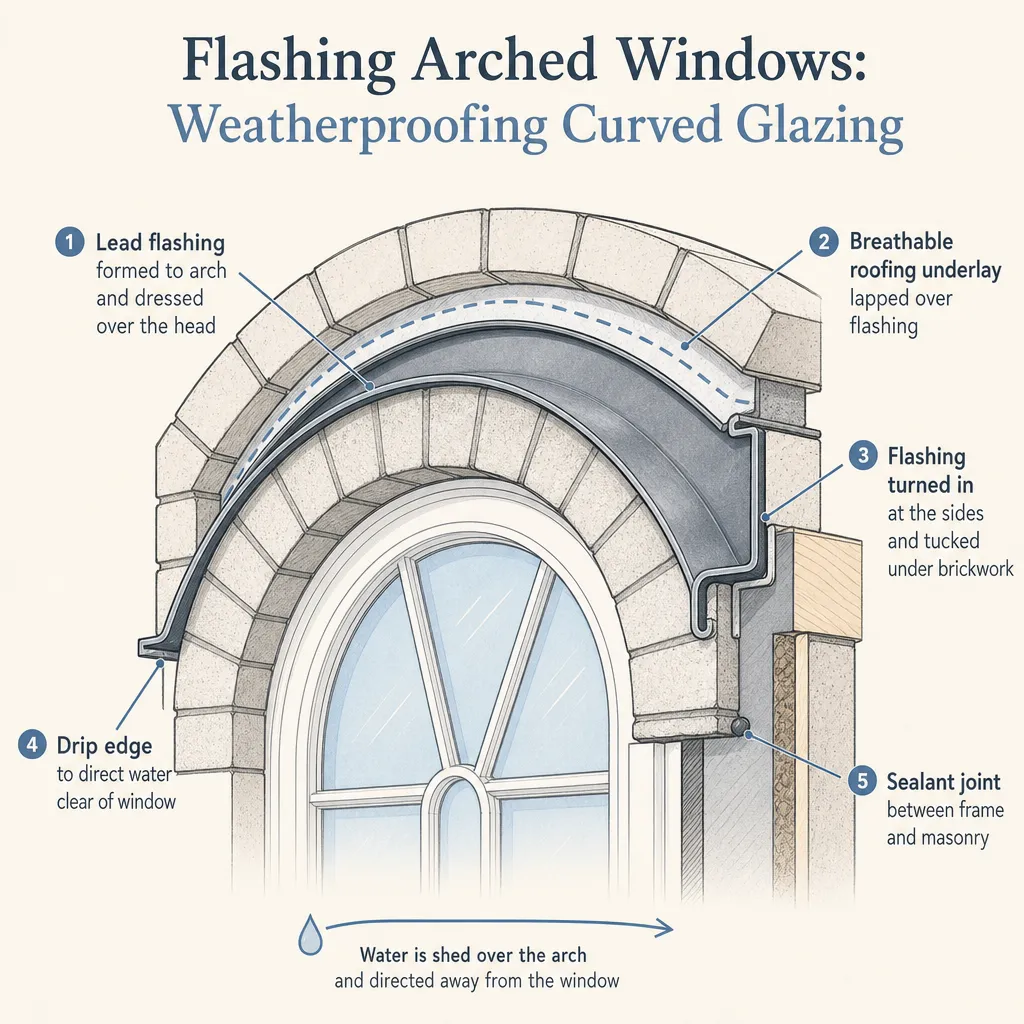
Why arched windows are harder to flash than rectangular ones
A rectangular window has straight top and side edges — standard lead soakers and cover flashings can be cut to length and dressed flat in a single operation. An arched head has a continuously changing angle. A straight section of lead laid across a curved surface will buckle, creating high points at the centre and gaps at the sides where rainwater finds its way behind the frame.
The solution is to form the flashing in segments small enough to follow the curve without excessive distortion. Lead is well suited to this because it is soft and malleable, and can be gently worked with a bossing mallet or dresser into a tight radius. GRP (glass-reinforced plastic) flashings can be manufactured to match a specific arch radius as a single purpose-formed piece, avoiding the segmenting problem — but they require accurate measurement of the curve before ordering and are less forgiving of site variation.
The Lead Sheet Association (LSA) publishes installation guidance, including curved window and arch details, which is the primary technical reference for competent lead workers in the UK.
Choosing the right flashing material
Material | Best for | Not ideal for | Main advantage | Key risk |
|---|---|---|---|---|
Code 4/5 lead | Most domestic arched windows, period properties | Very tight radii without a skilled lead worker | Durable (60+ years), fully malleable, repairable on site | Requires skilled installation; theft risk in some locations |
GRP (purpose-formed) | Consistent curves where the exact radius is known | Irregular or compound curves | Single-piece installation, no segmenting needed | Must be ordered to precise measurement; less tolerant of site variation |
Aluminium | Modern or contemporary properties, budget-conscious projects | Listed buildings, traditional masonry | Lightweight, corrosion resistant | Less malleable; colour match with surrounding masonry may be needed |
Zinc | Zinc-roofed or zinc-clad contemporary properties | Standard domestic replacement windows | Long lifespan, aesthetically coherent with zinc envelope | Specialist installation required; higher material and labour cost |
Always confirm material compatibility with the window frame manufacturer — some aluminium and composite frame alloys react with lead or zinc at the interface if not correctly isolated with a compatible tape or barrier.
What correct installation looks like: step by step
Understanding the installation sequence helps you ask the right questions when commissioning the work and verify the result before final payment.
1. Prepare the opening
The reveal and surrounding masonry should be clean, dry, and free from old mortar, failed sealant, or spalled brickwork. Any deteriorated pointing above the arch should be raked out and made good before the window frame is fitted.
2. Fit the window frame
The arched frame is positioned in the opening, levelled, and secured. A clearance gap of 10–15 mm at the curved head is typical, allowing for movement and thermal expansion.
3. Install cavity tray and soakers (cavity wall only)
For cavity walls, a pre-formed polypropylene or lead cavity tray is fitted above the arched head, sloping outward so water drains through weep holes at the base of the cavity rather than tracking inward. Stepped soakers are fitted to each course on the sides of the arch. This is the step most frequently omitted or done incorrectly in domestic installations — and the one most responsible for persistent damp patches on internal reveals.
4. Form and fit the arched cover flashing
Lead sections of approximately 150 mm are cut, dressed to the radius using a bossing mallet, and lapped at least 100 mm at each joint. The flashing is secured into a chase cut in the masonry with lead wedges, or dressed behind an existing DPC or render stop. The lower edge is dressed down over the frame's top edge by at least 75 mm.
5. Point up chases and finish joints
The chase into masonry is pointed with a mortar mix compatible with the surrounding brickwork. Where the flashing meets the window frame, a flexible sealant (such as a low-modulus neutral-cure silicone) accommodates movement. Sand and cement alone is not suitable at a moving joint.
6. Verify drainage and check weep holes
Water must have a clear path off the flashing and away from the frame. Check that the sill has sufficient drainage slope outward, and that any weep holes in cavity trays are open and unobstructed by mortar droppings.
What to ask before accepting a quote
- What flashing material do you intend to use, and what code or gauge is specified?
- How will you form the flashing around the curved head — in dressed lead sections, or as a purpose-formed GRP piece?
- Does the cavity wall require a cavity tray and weep holes above the arch, and are these included?
- Will the flashing be chased into the masonry, or dressed behind an existing DPC or render line?
- Is this installation registered with FENSA or CERTASS, or will you notify building control separately?
- Will you provide a completion certificate, and does your workmanship guarantee cover water ingress?
- Are pointing repairs, render reinstatement, or sill works included or excluded from the price?
Homeowner checklist: inspecting arched window flashing on completion
Use this list before making final payment:
When to get professional help
Most arched window flashing failures are installer quality problems rather than design issues. Seek professional assessment if:
- You notice dampness, tide marks, or mould on the internal reveal within 12 months of installation — do not wait until the next wet season to investigate.
- The installer is not FENSA or CERTASS registered and has not arranged building control notification.
- The property is listed or in a conservation area — lead is almost certainly required and a heritage-appropriate specification may be needed; consult your local planning authority before replacing windows.
- The arched window is part of a larger project involving roof abutments, parapet walls, or flat roofing — a specialist roofing contractor should be involved in the flashing design from the outset.
- Multiple windows show similar defects, suggesting a systemic specification problem rather than isolated workmanship.
How Housey can help
Housey connects homeowners with vetted window and door installers experienced in arched and curved glazing, and with specialist roofing contractors who carry out lead flashing and cavity tray work to Lead Sheet Association standards. Request quotes, compare credentials, and verify FENSA or CERTASS registration — all in one place.
Frequently asked questions
Does flashing an arched window cost more than a rectangular one?
Yes, in most cases. Forming, dressing, and lapping segmented lead around a curve takes more time and skill than straight flashing, adding to labour costs. Purpose-formed GRP flashings can reduce on-site time but carry a higher material cost. Confirm the premium with your installer and check exactly what is included. Indicative UK costs vary; obtain at least two quotes.
Can silicone sealant be used instead of lead flashing on an arched window?
No. Silicone sealant is a secondary weatherproofing measure only. It degrades under UV, is vulnerable to thermal cycling, and loses adhesion on curved surfaces where differential movement is greater. Lead or purpose-formed GRP flashings are required for a durable, compliant installation. Sealant may be used to finish joints but should never replace properly formed and lapped flashing.
Is planning permission needed to replace an arched window?
In most cases, replacing a window with one of similar appearance is permitted development in England and does not require planning permission. However, listed buildings, conservation area properties subject to Article 4 Directions, and some flats may require consent. Check with your local planning authority before replacing windows on any restricted property. FENSA or CERTASS registration is still required regardless of planning status.
How long should lead flashing around an arched window last?
Lead flashing correctly installed to Code 4 or Code 5 specification and properly pointed into masonry should last 60 years or more. Premature failure is almost always due to poor installation — insufficient lap, unpointed chases, or sealant used as a primary seal. GRP and aluminium flashings typically carry manufacturer warranties of 20–30 years. Inspect flashings every five to ten years as part of routine maintenance.
Sources and further reading
- Lead Sheet Association: installation guidance for lead flashings — Lead Sheet Association
- FENSA: competent person scheme for replacement windows — FENSA
- GOV.UK: windows, doors and roof lights — when permission is required — GOV.UK
- Building Regulations Approved Document C: site preparation and resistance to moisture — GOV.UK
Useful next reads
 Improvement & Build
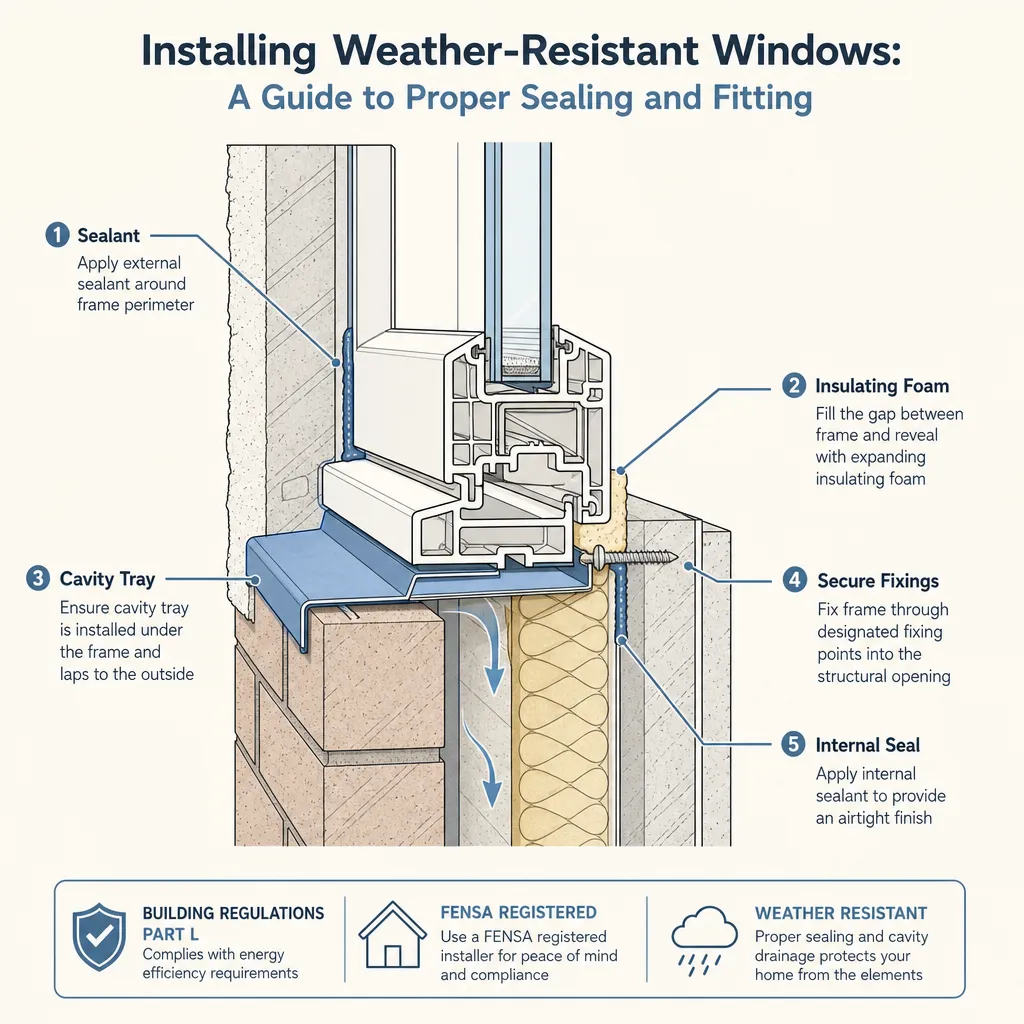
Installing Weather-Resistant Windows: A Guide to Proper Sealing and Fitting
Replacing windows in England requires Building Regulations compliance under Part L — either via a FENSA- or CERTASS-registered installer who self-certifies, or through local authority building control notification.
 Improvement & Build
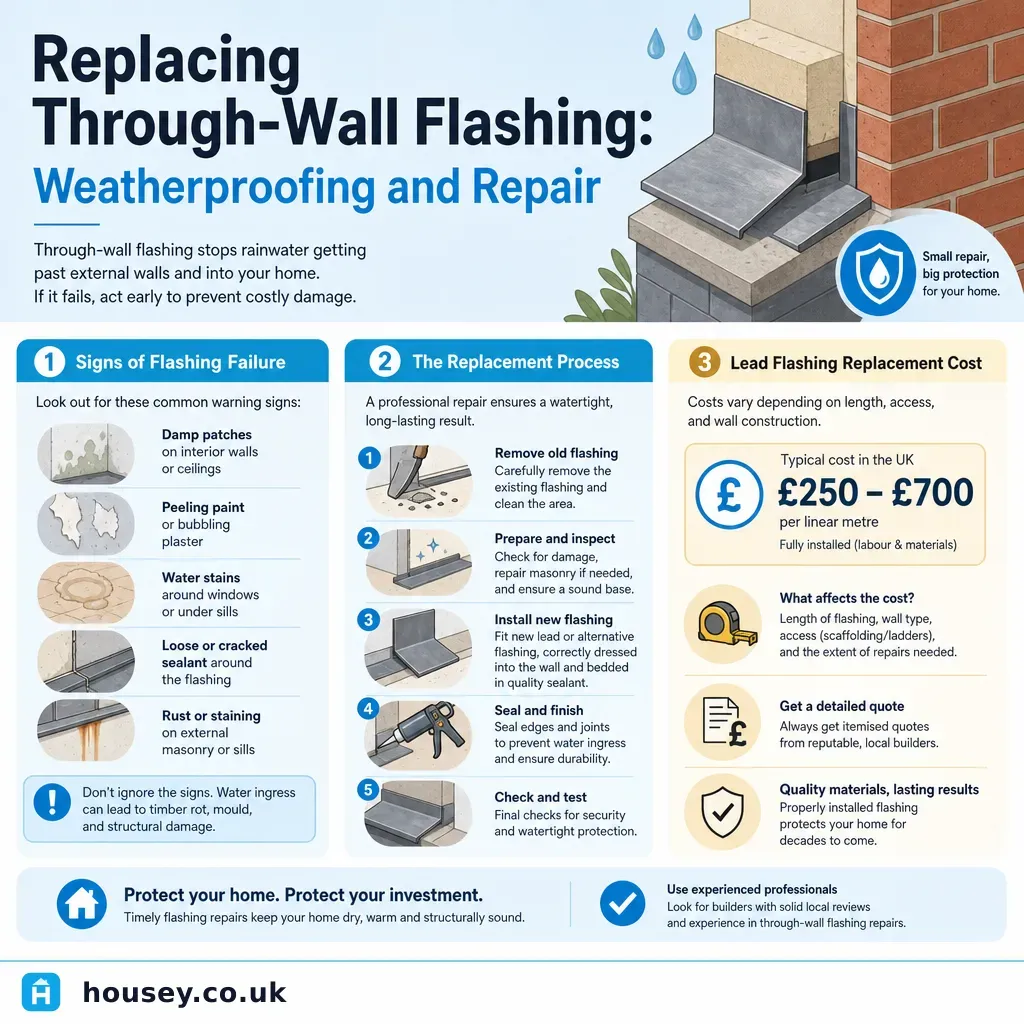
Replacing Through-Wall Flashing: Weatherproofing and Repair
Through-wall flashing is a damp-proof membrane embedded in masonry at roof-to-wall junctions, chimney bases, and above windows or doors.
 Improvement & Build
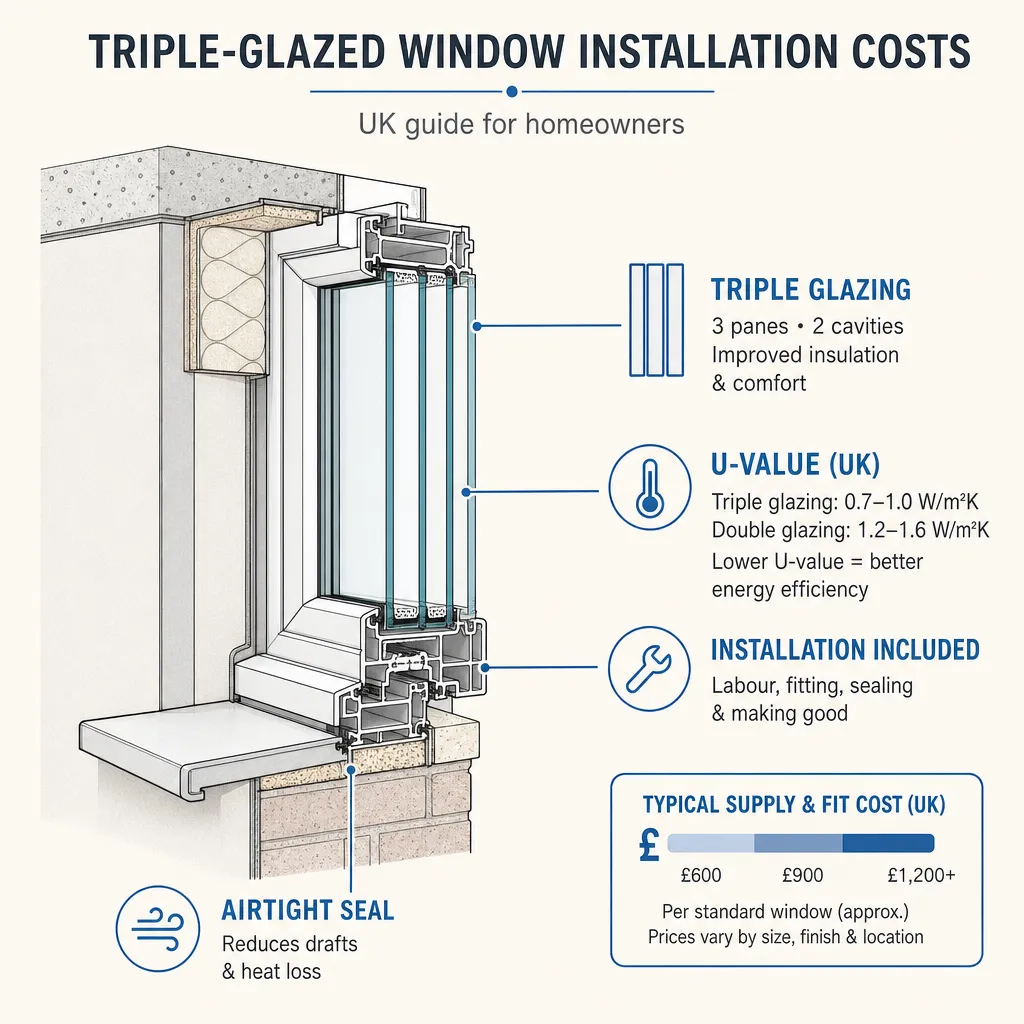
Triple-Glazed Window Installation Costs
Triple-glazed window installation in the UK typically costs £800–£1,800 per window, depending on size, frame material, and glazing specification.
 Improvement & Build
Concrete Sealing: Protecting and Maintaining Your Driveway
Sealing a concrete driveway protects against water ingress, freeze-thaw damage, oil stains, and surface wear.
 Improvement & Build
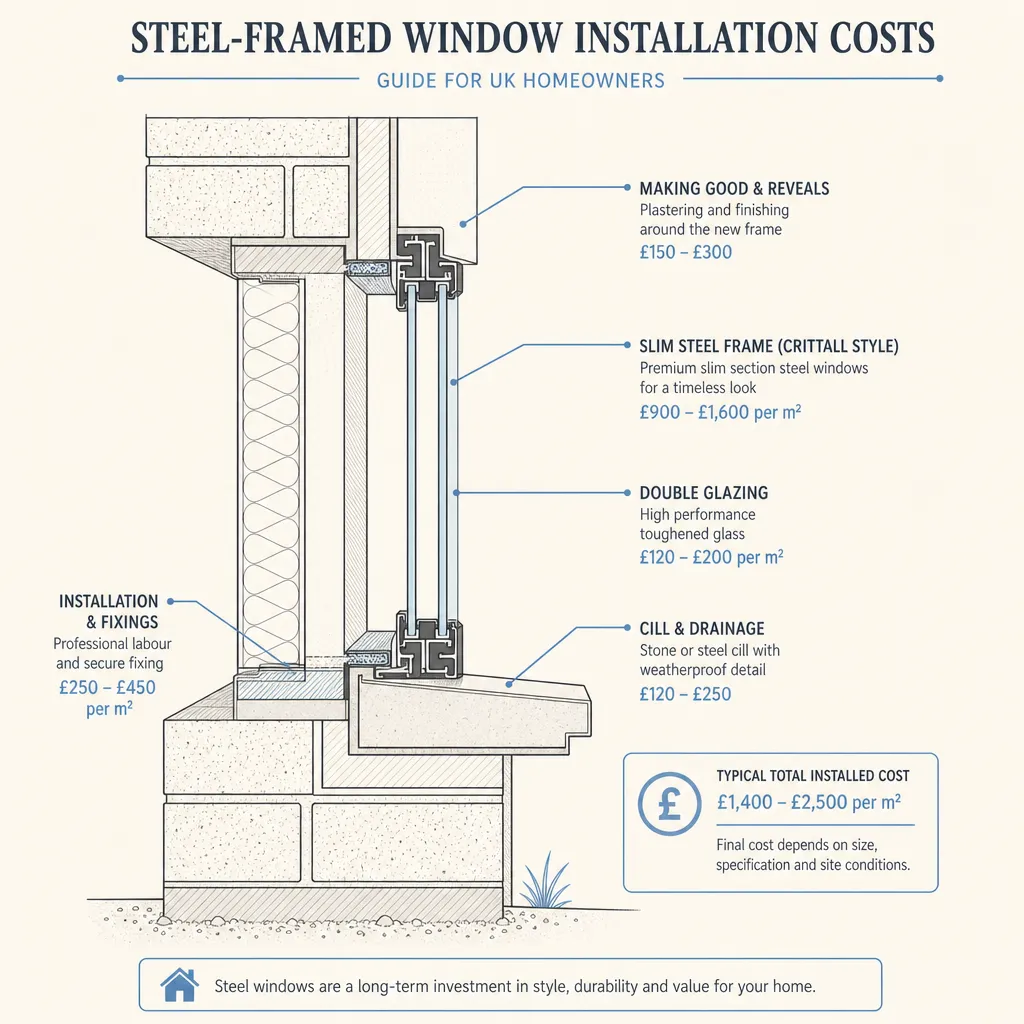
Steel-Framed Window Installation Costs
Steel-framed windows cost between £800 and £3,500 or more per window installed in the UK, depending on size, profile type, glazing specification, and whether old frames need removing.