Flashing Details for Brick Veneer: Preventing Water Penetration
By Housey · Last reviewed 11th of May 2026
Flashing Details for Brick Veneer: Preventing Water Penetration
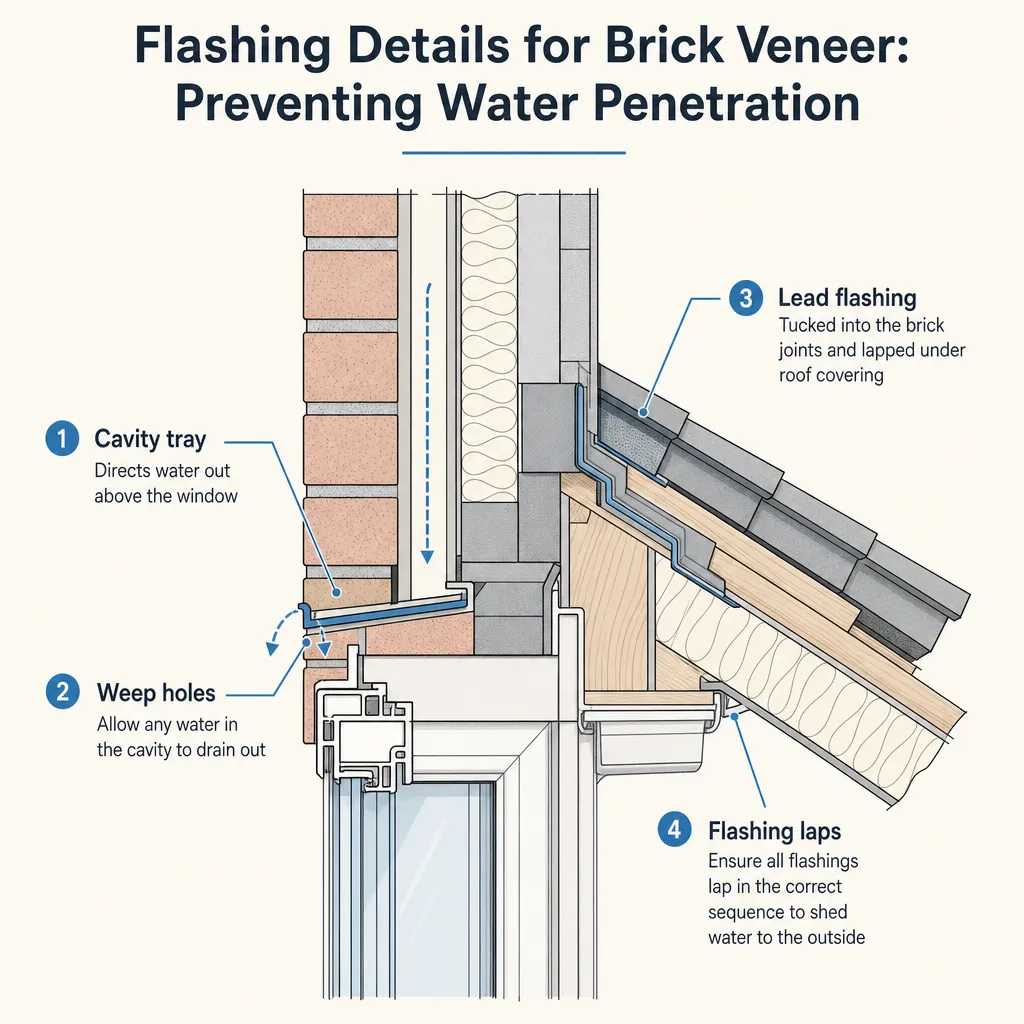
Brick veneer construction — where a single-leaf brick skin acts as a weathering facade tied to a structural backing — is widespread in UK housing from the 1970s onward and in much current new-build practice. The performance of this wall system depends entirely on the cavity remaining unobstructed and on correctly detailed junctions at every opening, level change, and roof abutment. When those junctions fail, water bypasses the drainage system and tracks into the building — sometimes years before the failure becomes visible as internal damp.
Key points
- Brick veneer facades are designed on the assumption that water will penetrate the outer brick face — the cavity and drainage system must remove that water before it reaches the inner leaf.
- Cavity trays (the UK term for flashing elements within a masonry cavity) must be installed above all door and window openings, at every change in cavity level, and wherever the cavity is bridged.
- Weep holes — open perpend joints — must be provided at the base of every cavity tray at a maximum of 450 mm centres (every third perpend joint) to allow collected water to drain out.
- Lead flashing at wall-to-roof junctions should be at least Code 4 lead (1.8 mm thick) for stepped and cover flashings; Code 5 (2.24 mm) is used at gutters and soakers where greater thickness is warranted.
- Missing or incorrectly formed cavity trays above window and door lintels are among the most common identifiable causes of localised damp patches above openings in UK brick-veneer homes.
How water enters brick veneer — and what is supposed to stop it
Brick is porous. Rain-driven water passes through mortar joints and hairline cracks in the outer leaf during prolonged or wind-driven rain. This is expected behaviour, not a defect in the masonry itself.
The control system has three components:
- The cavity — an unobstructed air gap (50–100 mm in modern construction; 40 mm minimum under BS EN 1996-2) separating the wet outer leaf from the dry inner leaf.
- Cavity trays — purpose-formed damp-proof membranes shaped to collect water in the cavity and direct it outward and downward to weep holes at the face of the wall.
- Weep holes — open perpend joints at the base of each cavity tray that allow collected water to drain out of the facade.
When any of these three elements is missing, blocked, or incorrectly formed, water crosses the cavity and reaches the inner leaf or the floor structure.
Where cavity trays must be installed
NHBC Standards Chapter 6.1 and BS EN 1996-2 identify the following locations as requiring cavity trays:
- Above door and window lintels — the most frequently missed location. A cavity tray with stop ends must sit directly above every lintel, with weep holes positioned at the outer ends of the tray.
- At the base of every cavity — a continuous DPC must close the base of the cavity at ground floor level and direct water out before it can track down to the foundation.
- At roof-to-wall intersections — where a flat roof, parapet, or sloping roof intersects the cavity wall; the cavity must be closed and water directed outward.
- At abutments — where the brick veneer meets a chimney stack, a neighbouring structure, or a change of construction type.
- Above partial-fill cavity insulation — the residual clear cavity (minimum 50 mm) must be maintained, and cavity trays must still be correctly formed even where insulation batts are present.
Lead flashing at wall-to-roof junctions
At the junction between a brick veneer wall and a pitched or flat roof, lead flashing is the standard UK solution. The Lead Sheet Association publishes detailed specifications for stepped, cover, and soaker flashings.
Pitched roof abutment — stepped flashing
A stepped flashing is cut into the brick joints (raked to 25 mm depth, secured with lead wedges and repointed) and overlaps the head of each course of slates or tiles by at least 65 mm. The overlap onto the roof covering and the stepping dimension relative to tile gauge are both critical — an undersized step allows capillary draw of water behind the flashing.
Flat roof or parapet — cover flashing
A cover flashing laps over the upstand of the roofing membrane by at least 75 mm. The top edge is turned into the brick joint and fixed with lead wedges. Expansion joints must be incorporated — lead moves significantly with temperature change, and a fixed-length flashing without provision for movement will crack or pull out of the joint in time.
Soakers at verges
At a pitched roof verge where slates or plain tiles abut a wall, soakers — individual lead pieces between each tile course, turned up against the wall by at least 65 mm — work in conjunction with step flashings to close the gap between tile courses and prevent water ingress at the overlaps.
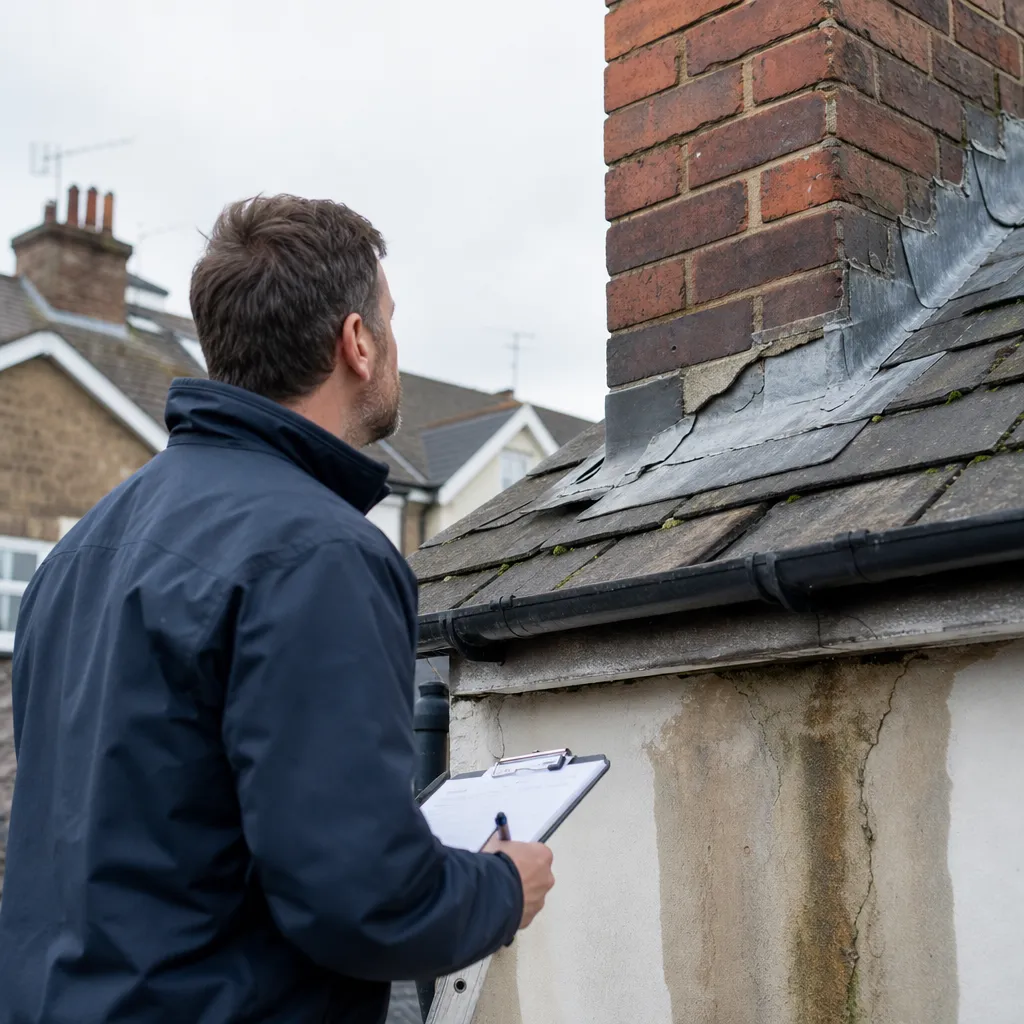
Homeowner inspection checklist
If you suspect a flashing or cavity tray failure, check from ground level or from safe access only — do not work at height without appropriate equipment and edge protection in line with the HSE's Working at Height Regulations 2005:
Red flags that mean call a specialist now
- Persistent damp patches appearing directly above window or door openings after rain — a strong indicator of cavity tray failure above the lintel.
- Timber lintels, door frames, or window boards showing softening, staining, or early rot — water has been reaching structural timber over a sustained period.
- Water ingress at a flat roof or parapet junction that returns after superficial repair — the cover flashing is likely undersized, poorly lapped, or lacking expansion provision.
- Efflorescence (white crystalline salt deposits) on the outer brick face at specific courses — water is dissolving soluble salts from the masonry, indicating a cavity drainage failure at that level.
- Any damp investigation report that identifies a bridged cavity — mortar droppings or construction debris conducting water from the outer leaf across to the inner leaf.
When to get professional help
Most flashing and cavity tray faults benefit from specialist diagnosis before any repair is attempted. A competent roofer can inspect and replace lead flashings at roof junctions; identifying a cavity tray failure within the masonry wall typically requires more invasive investigation. A chartered surveyor or experienced damp specialist can confirm the cause and the correct repair method before any work is commissioned. Do not seal weep holes — they are drainage points, not gaps to be blocked.
How Housey can help
Housey connects you with experienced roofers for lead flashing inspection and replacement, and with damp proofing specialists who can diagnose cavity tray failures and recommend the correct repair approach. Getting the right specialist for the specific failure type avoids repeated and ineffective treatments.
Frequently asked questions
What is the difference between a cavity tray and a DPC?
A damp proof course (DPC) is a horizontal membrane inserted into a masonry bed joint to prevent moisture rising through the wall. A cavity tray is a specifically formed version — shaped with upstands to collect water within the cavity and direct it outward through weep holes. All cavity trays are a type of DPC, but not all DPCs act as cavity trays.
How often should lead flashings be inspected?
Lead flashings correctly installed typically last 50 to 100 years, but the mortar pointing and lead wedges securing the top edge should be checked every 10 years or following any significant storm event. Cracked or missing pointing allows wind-driven rain behind the flashing even when the lead itself remains undamaged.
Can weep holes be sealed to prevent draughts or insect ingress?
Weep holes should not be sealed — they are essential drainage points for the cavity system. If draught or insect ingress is a concern, proprietary plastic weep hole ventilators that allow water to drain while reducing air infiltration are available from masonry accessory suppliers and are an appropriate substitute for open perpend joints.
Does the Party Wall Act apply to flashing or cavity tray repairs?
Not usually. Flashing repairs on your own wall that do not involve structural work on the party wall itself do not require notice under the Party Wall etc. Act 1996. However, if scaffolding requires access over a neighbour's land or airspace, their written permission is required separately from any party wall procedures.
Sources and further reading
- NHBC Standards Chapter 6.1: External masonry walls — NHBC
- Lead Sheet Association: Technical guidance on lead flashings — Lead Sheet Association
- Brick Development Association: Guide to good brickwork — Brick Development Association
- BS EN 1996-2: Eurocode 6 — Design of masonry structures — British Standards Institution
- Working at height: a brief guide (INDG401) — HSE
Useful next reads
 Improvement & Build
Why incorrect roof repairs lead to masonry water damage
Poorly executed roof repairs — including failed flashing, incorrect mortar on chimney stacks, and unrestored weathering details — allow water to track behind masonry, causing damp patches, spalling, and timber decay, often months after the original work.
 Improvement & Build
Chimney Flashing Maintenance: Preventing Leaks at Roof Penetrations
Chimney flashings most commonly fail at the raggle joint — where the mortar holding the counter flashing cracks — rather than through lead deterioration.
 Improvement & Build
Replacing Through-Wall Flashing: Weatherproofing and Repair
Through-wall flashing is a damp-proof membrane embedded in masonry at roof-to-wall junctions, chimney bases, and above windows or doors.
 Improvement & Build
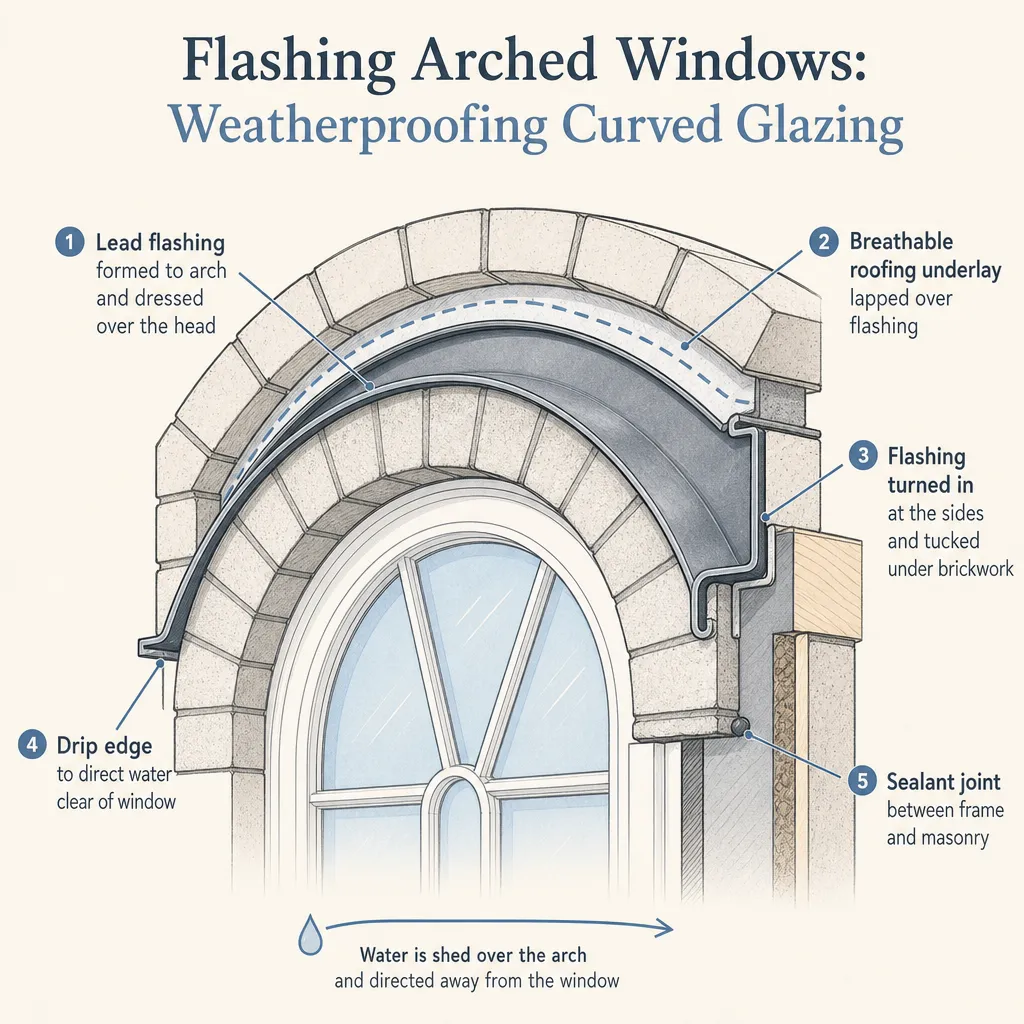
Flashing Arched Windows: Weatherproofing Curved Glazing
Flashing an arched window requires flexible or purpose-formed lead, GRP, or aluminium shaped to follow the curved head, with stepped soakers at the sides and a correctly dressed sill.
 Improvement & Build
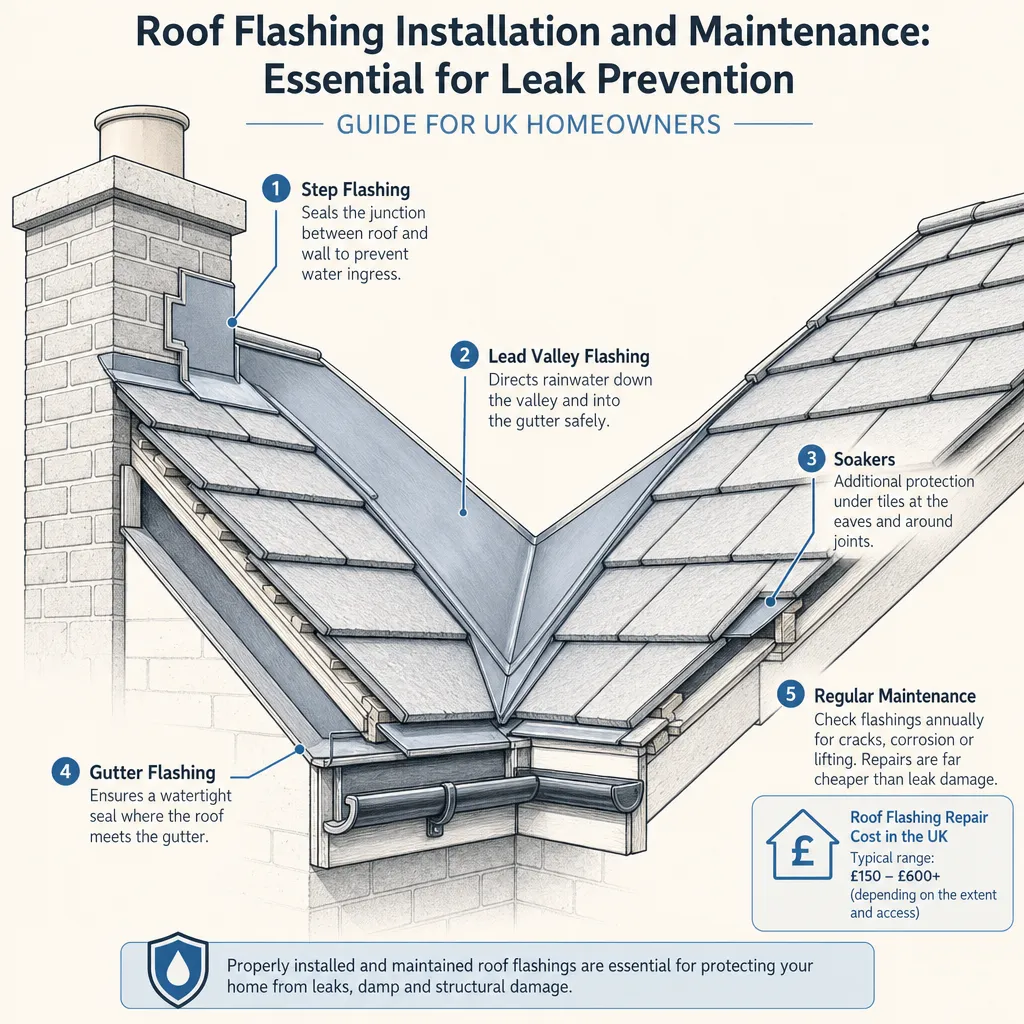
Roof Flashing Installation and Maintenance: Essential for Leak Prevention
Roof flashings seal every junction between the roof covering and an adjoining surface.