Roof Flashing Installation and Maintenance: Essential for Leak Prevention
By Housey · Last reviewed 11th of May 2026
Roof Flashing Installation and Maintenance: Essential for Leak Prevention
Roof flashings protect every junction between your roof covering and another surface — whether that is a chimney, a dormer wall, a skylight, a soil vent pipe, or a change in roof slope. In UK housing stock, which spans the Victorian era through to contemporary builds, flashing failures are one of the most common causes of unexplained internal damp. Getting the specification right at installation, and carrying out periodic maintenance, can prevent significant and costly damage to ceilings, roof timbers, and insulation.
Key points
- The Lead Sheet Association's technical manuals specify minimum lead codes for different flashing applications: Code 3 (1.32 mm) minimum for soakers; Code 4 (1.80 mm) or above recommended for cover flashings and most weather-exposed junctions.
- Approved Document C (Site preparation and resistance to contaminants and moisture) of the Building Regulations sets the requirement that roof junctions must resist rain penetration, but does not specify materials — the design detail is left to the contractor and relevant British Standards.
- Velux and other branded roof window manufacturers publish their own flashing kit specifications; using non-approved flashings can void the window warranty and is a common source of pitched-roof junction failures.
- Applying a new roof covering to more than 25% of a roof area is notifiable under Building Regulations Part L (Conservation of fuel and power), which may also trigger building control inspection of flashing details.
- Lead theft affects residential properties as well as churches and public buildings; some home insurers specify lead-alternative materials such as GRP or EPDM in higher-risk postcodes as a condition of cover — check your policy before specifying materials.
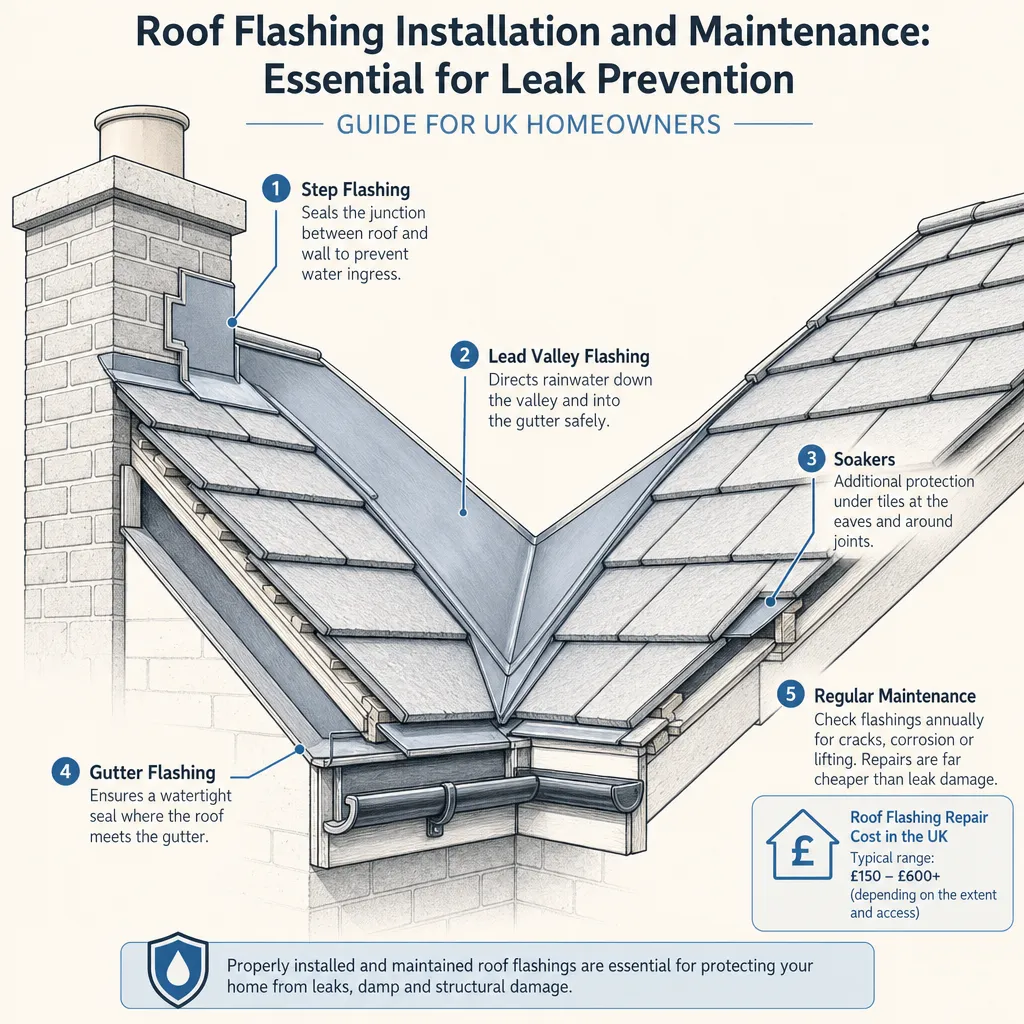
Types of roof flashing and where they are used
Flashing type | Typical location | Material options | Key failure mode |
|---|---|---|---|
Step flashing / soakers | Alongside chimney and dormer side walls | Lead Code 3/4 | Mortar failure in raggle joint; insufficient overlap |
Valley lining | Internal angle between two roof slopes | Lead Code 5/6, GRP, EPDM | Debris blockage causing water to back up; insufficient upstand height |
Apron flashing | Front face of chimneys; base of dormers | Lead Code 4/5 | Sealant cracking; mortar failure at base |
Upstand flashing | Parapet walls, flat-to-pitched junctions | Lead Code 4/5, EPDM | Thermal expansion cracking; inadequate mechanical fixing |
Pipe flashing | Soil vent pipes, flue outlets | Lead collar, GRP sleeve, rubber boot | UV degradation of rubber; incorrect pipe diameter fitting |
Roof window / skylight | Around Velux, Fakro, and similar units | Manufacturer-specific flashing kit | Wrong kit for roof pitch; incorrect bedding on tile courses |
Materials used for roof flashing in UK practice
Lead remains the default for most UK residential flashing work. It is malleable, durable, and resistant to UV and temperature cycling. The relevant standard is BS EN 12588. Code numbers relate to thickness: Code 3 (1.32 mm), Code 4 (1.80 mm), Code 5 (2.24 mm), Code 6 (2.65 mm). Higher codes are heavier and are specified for more exposed or high-stress applications such as valley linings.
GRP (glass-reinforced plastic) is used where lead theft risk is elevated or on flat-roof upstands. It is lighter and quicker to install, with a typical design life of 20–30 years depending on specification.
EPDM (ethylene propylene diene monomer) rubber is common in flat-roof waterproofing systems and increasingly used for valley linings and upstands. It is flexible, UV-stable, and typically carries a 20-year or longer manufacturer warranty from reputable suppliers.
Aluminium and zinc flashings appear in some contemporary construction. Aluminium can react adversely with alkaline masonry if not properly isolated with a suitable separation layer — ask your contractor about compatibility before specifying.
Common flashing failure points and causes
Most flashing failures in UK residential properties fall into one of these categories:
- Raggle joint failure — mortar or sealant securing the counter flashing into a cut joint in the masonry cracks, allowing the flashing to lift and water to enter behind it.
- Insufficient overlap or upstand — flashing not lapped far enough over the tile course, or not turned up high enough against the adjacent wall, allows water to track under in driving rain conditions.
- Sealant substitution — silicone or bituminous mastic used in place of properly dressed lead; this typically deteriorates within 2–5 years.
- Thermal expansion cracking — lead flashings fixed too rigidly, or in single runs that exceed maximum bay lengths, crack at fixings due to thermal movement; BS 6915 specifies maximum bay lengths to prevent this.
- Valley blockage — debris such as moss, leaves, and tile fragments accumulates in a valley lining, holds moisture against the upstand, and eventually forces water up under the tile courses above.
- Wrong specification for pitch — roof window flashings are designed for specific pitch ranges; using the wrong kit for the actual roof pitch allows water ingress at the frame perimeter.
What to ask before accepting a quote
Use these questions to compare any contractor quoting for flashing work:
- What lead code (BS EN 12588) will you use, and what is your reason for that choice for this application and location?
- Will you cut a proper raggle joint, or apply a surface sealant only?
- What is the maximum bay length for your lead runs, and how will you accommodate thermal movement?
- Will all flashings be fully dressed and wedged, or surface-bedded in mortar or mastic?
- If you identify related defects during access — tile condition, pointing failures, sarking felt damage — how will you communicate these to me before proceeding with any additional work?
- What guarantee do you offer on materials and workmanship, and is it backed by an insurer?
- Is your business a member of the National Federation of Roofing Contractors (NFRC) or a similar trade body?
- Is VAT included in your quote?
- What access method are you proposing — scaffold, tower, or ladder — and does this affect the quoted price?
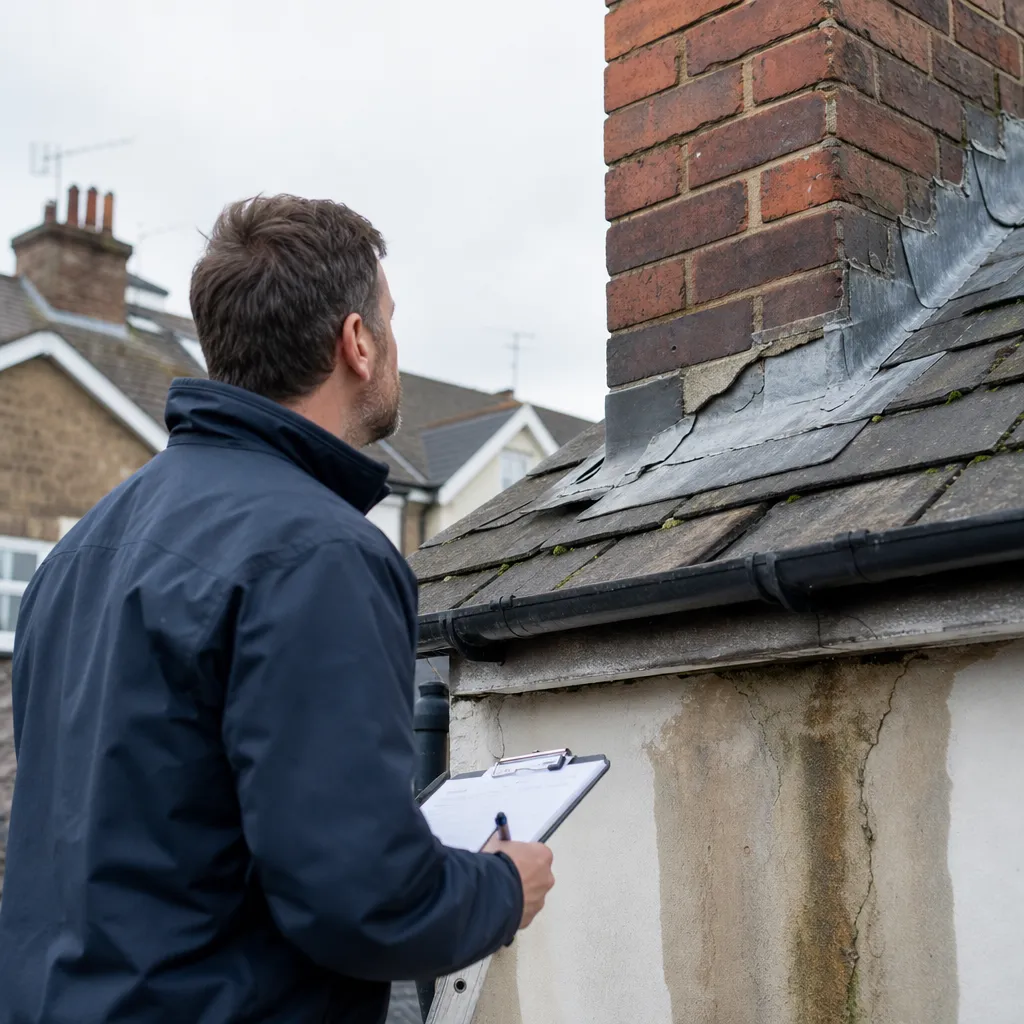
When to get professional help
Do not attempt to inspect or repair roof flashings by climbing onto the roof slope without appropriate access equipment. Working at height is one of the leading causes of fatal injuries in the UK construction sector, and homeowners without proper scaffold or mobile elevated work platforms are at serious risk.
Arrange a professional inspection if:
- You have unexplained damp patches on ceilings or walls that appear or worsen after rainfall.
- Your loft inspection reveals water staining on timbers, wet insulation, or daylight visible around any roof penetration.
- A RICS Home Survey has flagged flashings as a defect item.
- Your roof is more than 15 years old and flashings have never been inspected.
- A previous flashing repair has failed, or mastic has been applied as a patch.
- You are buying or selling the property — visible flashing defects are a common buyer renegotiation point and may be flagged in a mortgage lender's valuation report.
- Moss or lichen is growing aggressively in a valley, which often indicates moisture retention from a partial failure.
How Housey can help
Housey connects homeowners with vetted qualified roofers across the UK who are experienced in lead and alternative flashings for all roof junction types. Describe the location, roof type, and symptoms to receive up to four quotes — allowing you to compare specification and materials approach, not just headline price.
Frequently asked questions
Does roof flashing work need building regulations approval?
Like-for-like repair or replacement is generally classed as maintenance and does not require a building regulations application. If the work forms part of a larger project — re-roofing more than 25% of a roof, adding a new roof window, or structural dormer alterations — building regulations notification is likely required. Check with your local building control body if uncertain.
How long does lead flashing last?
Lead flashing specified to BS EN 12588 Code 4 or above, correctly installed with proper raggle joints and adequate bay lengths for thermal movement, typically lasts 50 to 80 years. Shorter life expectancy usually reflects incorrect installation — under-gauge lead, mortar bedding instead of raggle joints, or a previous temporary repair that has now failed.
Can I use Flashband or repair tape to fix a flashing leak?
Self-adhesive flashing tapes such as Flashband are a temporary repair product, not a permanent solution. They may hold for one to three seasons before the adhesive breaks down under UV and temperature cycling. A correctly installed lead flashing with proper raggle joints is the right permanent fix.
What is an NFRC contractor?
The National Federation of Roofing Contractors (NFRC) is the UK's largest roofing trade association. NFRC members are vetted against requirements for insurance, technical competence, and business conduct. Selecting an NFRC member is a useful baseline check, though it does not replace reviewing specific experience with the type of flashing work required and checking references.
How much does roof flashing repair cost?
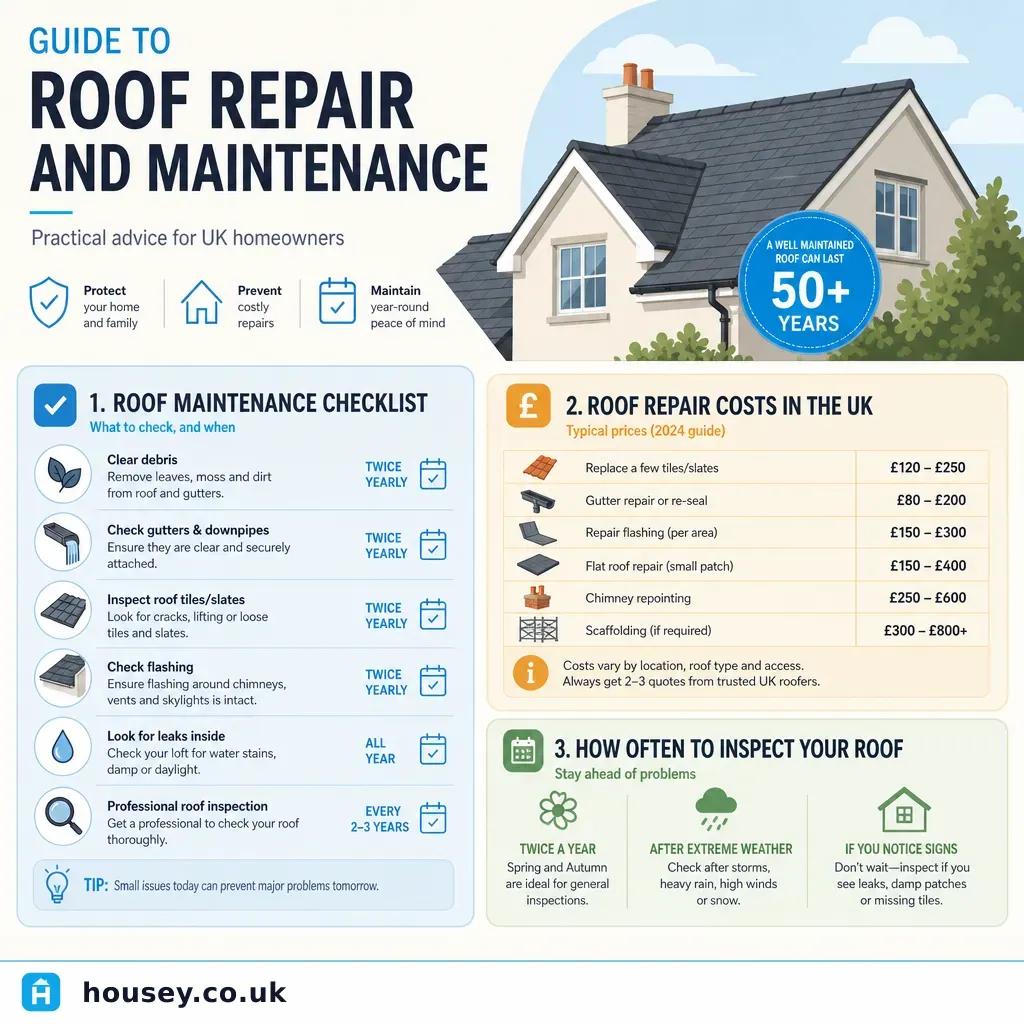
Costs vary widely depending on access, materials, extent of work, and location. A straightforward raggle joint repoint may cost £150–£400. Full lead flashing replacement for a chimney stack typically falls in the £400–£900 range excluding scaffold, which can add a further £300–£700 for a typical two-storey property. Indicative UK costs, last reviewed 2026-05-11. Obtain at least two to three quotes.
Sources and further reading
- Lead Sheet Association — Technical Resources — Lead Sheet Association
- National Federation of Roofing Contractors — NFRC
- GOV.UK — Approved Document C: Site preparation and resistance to contaminants and moisture — GOV.UK
- GOV.UK — Approved Document L: Conservation of fuel and power — GOV.UK
- BS EN 12588 — Lead and lead alloys for building applications — BSI
Useful next reads
 Improvement & Build
Chimney Flashing Maintenance: Preventing Leaks at Roof Penetrations
Chimney flashings most commonly fail at the raggle joint — where the mortar holding the counter flashing cracks — rather than through lead deterioration.
 Improvement & Build
Guide to Roof Repair and Maintenance
Regular roof inspections every 3–5 years, prompt repair of damaged tiles and failed flashings, and annual gutter clearance are the core of effective UK roof maintenance.
 Improvement & Build
Why incorrect roof repairs lead to masonry water damage
Poorly executed roof repairs — including failed flashing, incorrect mortar on chimney stacks, and unrestored weathering details — allow water to track behind masonry, causing damp patches, spalling, and timber decay, often months after the original work.
 Improvement & Build
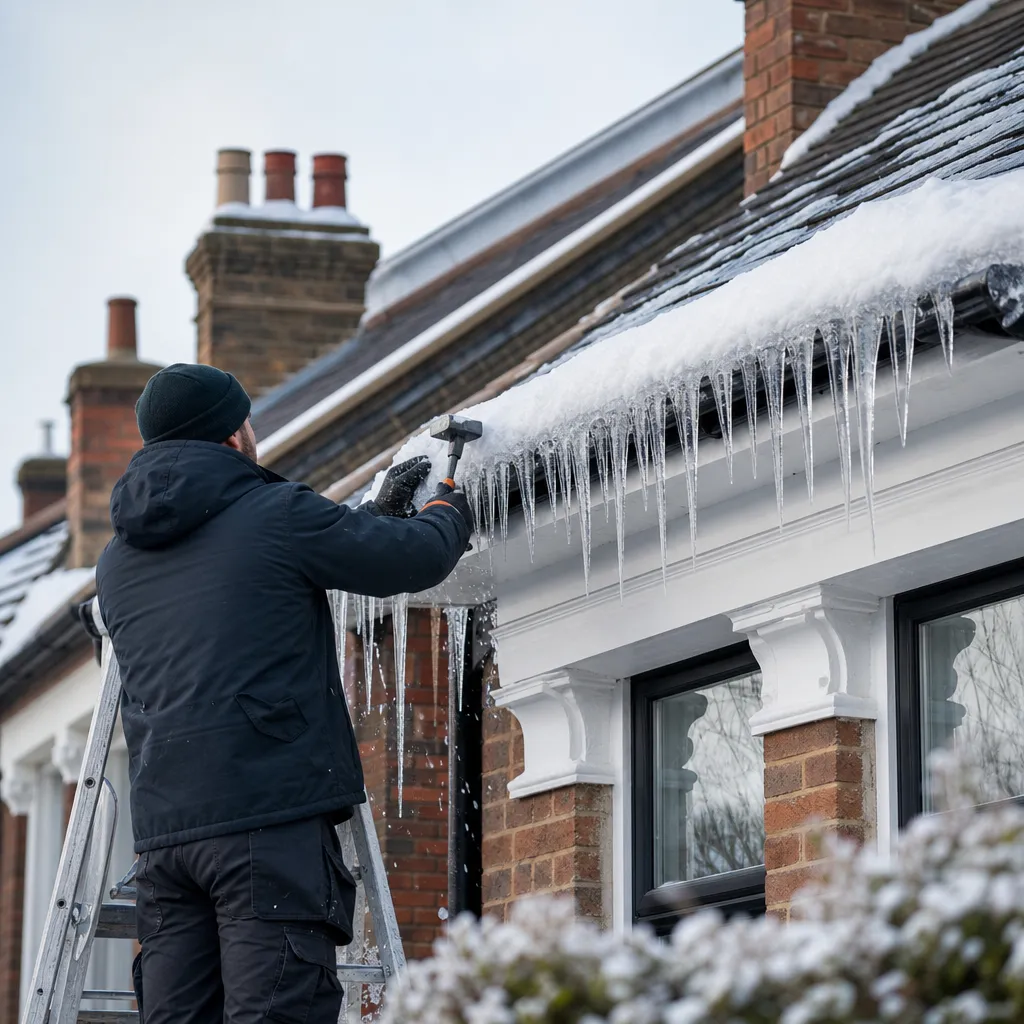
Ice Dam Removal and Roof Protection Services
Ice dams form when heat escaping through a poorly insulated roof melts snow, which refreezes at the colder eaves.
 Improvement & Build
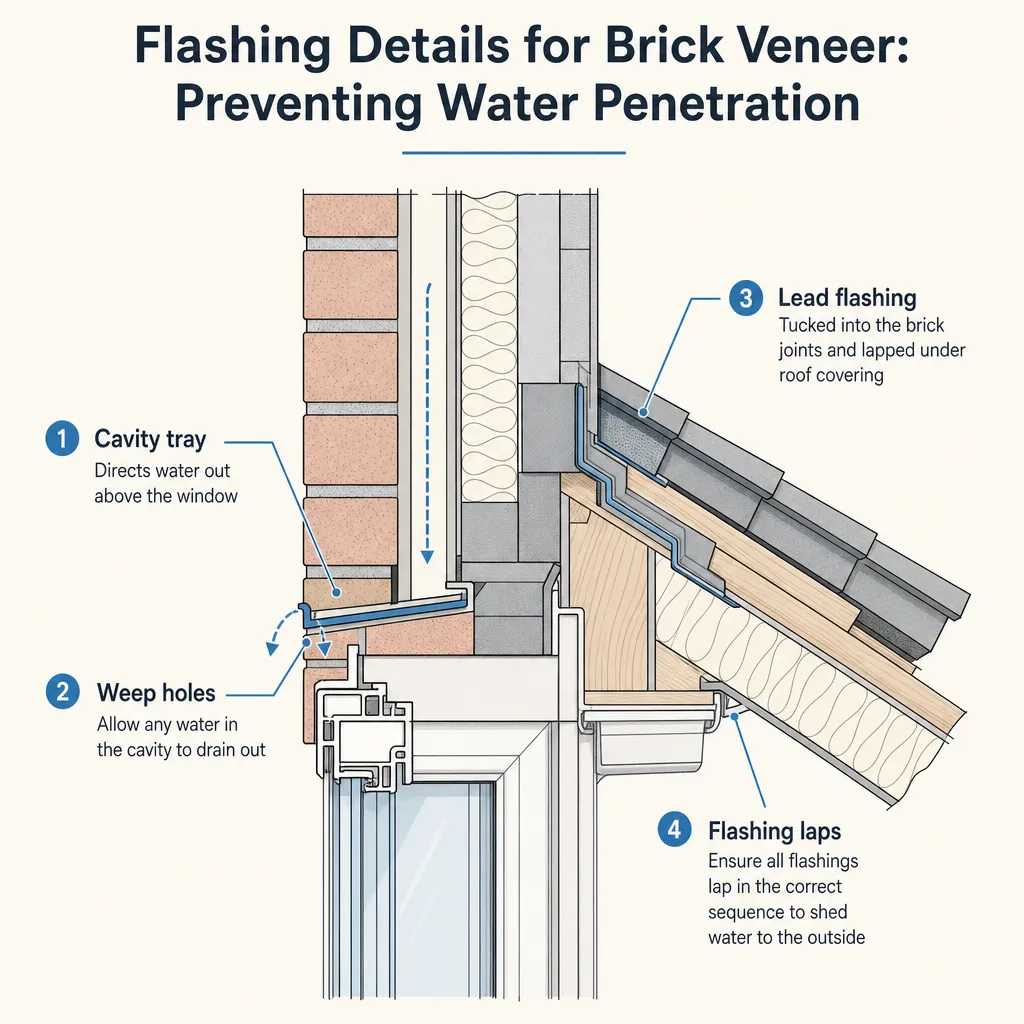
Flashing Details for Brick Veneer: Preventing Water Penetration
Brick veneer facades are designed to allow water into the cavity and drain it away through cavity trays and weep holes before it reaches the inner leaf.