Is Your Shower Tile Installation Truly Waterproof?
By Housey · Last reviewed 31st of May 2026
Is Your Shower Tile Installation Truly Waterproof?
A poorly waterproofed shower enclosure can cause far more damage than a dripping tile — moisture that penetrates the surface can travel undetected through substrate layers for months, rotting timber, corroding fixings, and promoting black mould growth behind walls and under floors. This concern most commonly arises when commissioning a new bathroom, investigating recurring damp patches, or assessing the quality of work carried out by a previous builder.
Key points
- BS 5385 Parts 1 and 4 (British Standard for wall and floor tiling in wet areas) set the industry baseline for tile installation, covering substrate preparation, adhesive specification, and joint treatment in shower enclosures.
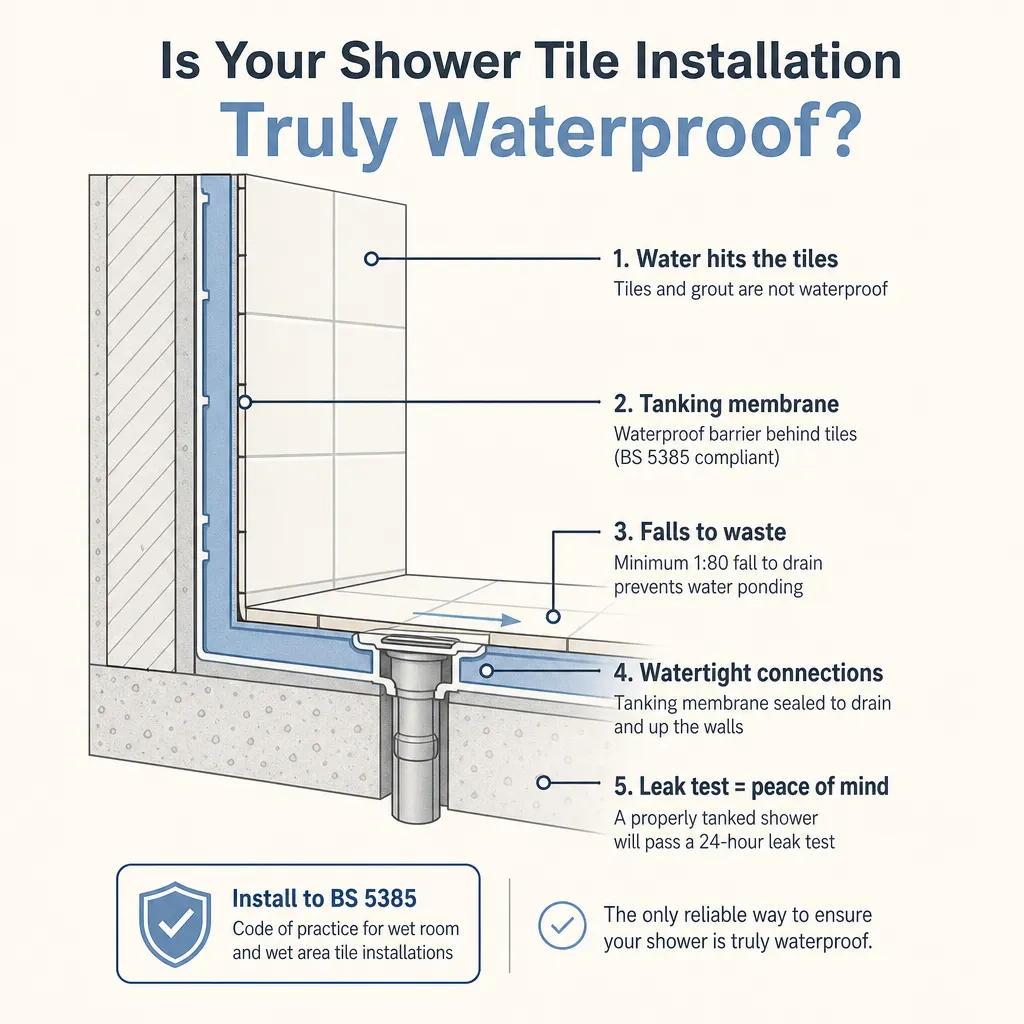
- A waterproof tanking membrane or liquid-applied waterproofing system should be installed behind tiles in shower enclosures before any adhesive or tile is applied — grout alone is not a waterproof barrier.
- Movement joints filled with flexible silicone sealant (not grout) are required at all changes of plane — wall-to-floor junctions and internal corners — to accommodate thermal and structural movement and prevent cracking.
- Epoxy grout offers significantly better water and stain resistance than standard cement-based grout; standard grout should be sealed after the 28-day curing period to reduce porosity.
- Water ingress through failed grouting or missing tanking membrane is the most common cause of shower installation failures, and visible damage may not appear for 12–24 months after the initial installation.
Why grout alone is not waterproof
Standard cement-based grout is porous. It absorbs water, expands when wet, and — unless sealed — allows moisture to migrate behind the tile surface. In a shower enclosure, where water hits the surface daily and pools in corners and grout lines, this porosity creates a pathway for water to reach the substrate, adhesive bed, and the structural elements beneath.
BS 5385 and The Tile Association are clear that wet-area tile installations require an independent waterproofing layer behind the tiles. This tanking layer — whether a sheet membrane, a liquid-applied system, or a reinforced fleece tape at joints — is the primary waterproof barrier. The tiles and grout sit on top of it and protect it from direct impact and cleaning products, but they are not the waterproofing system itself.
What a correctly waterproofed shower installation should include
Installation element | Purpose | Red flag if absent |
|---|---|---|
Substrate preparation | Provides a flat, stable base with controlled suction for adhesive | Uneven surfaces cause tile rocking and adhesive voids |
Tanking membrane or liquid waterproofing | The primary waterproof barrier, applied before tiling | Water reaches the structure; damage often invisible for 12+ months |
Reinforcement tape at joints and corners | Bridges movement at changes of plane | Membrane cracks over time at high-stress junctions |
C2 S1 or C2 S2 adhesive (wet areas) | Bonds tiles with required flexibility and grip per BS 5385 | Tiles delaminate; hollow-sounding areas develop |
Movement joints at all internal corners and junctions | Accommodates thermal and structural movement | Grout cracks, tiles lift, water ingress accelerates |
Sealed or epoxy grout | Reduces water absorption through grout lines | Grout stains, mould forms, or persistent moisture penetrates |
Silicone sealant at corners and tray junctions | Maintains a waterproof seal at points of movement | Water tracks behind tiles at the wall-floor junction |
How to assess whether your shower is properly waterproofed
Without removing tiles, it is not possible to confirm definitively whether a tanking membrane was installed. However, several indicators point to poor or absent waterproofing.
Signs that warrant investigation:
- Grout that consistently darkens, stains, or shows mould growth despite regular cleaning.
- Hollow-sounding tiles when tapped gently — indicating adhesive voids or delamination.
- Efflorescence (white mineral deposits) appearing on grout lines or tile surfaces.
- Silicone sealant in corners that is cracked, peeling, or absent entirely.
- Any tile that moves under light hand pressure.
- Damp patches on the ceiling directly beneath the shower room.
- Swollen or discoloured skirting boards and flooring adjacent to the enclosure.
Signs of a quality installation:
- Consistent, uniform grout lines with no voids, cracks, or unfilled sections.
- Silicone movement joints (not grout) at all internal corners and wall-floor junctions.
- The installer provided product data sheets for the waterproofing system and adhesive.
- Tiles are firmly bonded with no hollow-sounding areas after adhesive has cured.
Decision tree: what should you do next?
- Planning a new installation not yet tiled: Specify a tanking membrane and C2-rated adhesive in writing before work begins; ask the installer to photograph the membrane before tiling conceals it.
- Recently tiled with defects already visible: Have the installation inspected before any defects warranty expires — typically 12 months for domestic work.
- Older installation with signs of damp or failed grout: Commission a damp specialist or building surveyor to establish whether water has reached the structure before deciding between re-grouting and full tile removal.
- Buying a property: Tap visible tiles for hollow sounds; check rooms below for damp staining; ask the vendor for specifications or building control certificates relating to recent bathroom work.
- Planning a renovation: Require the contractor to confirm the waterproofing specification in their written quote, including product names and adhesive classification.
Homeowner checklist: commissioning a new shower installation
Before work begins:
During and after installation:
When to get professional help
Shower waterproofing failures are rarely obvious until significant moisture damage has already accumulated behind the tiles. Seek professional advice if:
- Grout is persistently mouldy despite regular cleaning, suggesting ongoing moisture behind the tiles.
- One or more tiles have become loose or can be moved by hand.
- You can see damp on the ceiling directly beneath the shower.
- Skirting boards or flooring near the shower show swelling, staining, or active mould growth.
- You are buying a property and cannot obtain information about when or how the bathroom was installed.
- A newly completed installation shows hollow-sounding tiles within a few weeks, suggesting adhesive failure.
How Housey can help
Housey connects homeowners with experienced extension builders and bathroom installation specialists who can inspect shower enclosures, identify waterproofing failures, and carry out remedial or new installation work to BS 5385 standards. Use Housey to find and compare qualified local tradespeople for your project.
Frequently asked questions
Can I just re-grout a failing shower rather than removing the tiles?
Re-grouting addresses the grout surface only — it cannot repair a missing or failed tanking membrane behind the tiles. If the underlying waterproofing is absent or compromised, moisture will continue to penetrate even through fresh grout. A damp specialist or building surveyor should establish the root cause before re-grouting is considered as a permanent fix.
How long should a properly installed shower enclosure last?
A correctly specified and installed shower enclosure with appropriate waterproofing should remain serviceable for 15–25 years before significant remedial work is needed, subject to normal maintenance such as periodic silicone renewal and grout sealing. The most common early failures — within one to five years — are attributable to absent or inadequate waterproofing rather than tile or grout quality.
Is a tanking membrane a legal requirement for a domestic shower?
There is no specific Building Regulation that mandates a named tanking product for domestic shower enclosures. However, Building Regulations Part C requires dwellings to be adequately protected against moisture ingress. BS 5385 is the relevant British Standard for tile installation practice and is widely treated as the industry benchmark by building inspectors and in legal disputes.
What does a hollow-sounding tile mean and is it serious?
A hollow-sounding tile indicates a void between the tile and its adhesive bed — it has either never fully bonded or has since delaminated. In a shower enclosure this is serious: water can track into the void, and tiles may become loose or fracture underfoot. Multiple hollow tiles in a wet area usually require professional investigation and remediation rather than simple re-adhesion.
Sources and further reading
- BS 5385: Wall and floor tiling — Parts 1 and 4 — BSI Group
- The Tile Association technical guidance — The Tile Association
- Approved Document C: Site preparation and resistance to moisture — GOV.UK
Useful next reads
 Improvement & Build
Labour and material costs for floor tiling projects
Floor tiling in the UK typically costs £30–£60 per m² in labour, plus materials ranging from £10–£40/m² for ceramic to £50–£150+/m² for natural stone.
 Improvement & Build
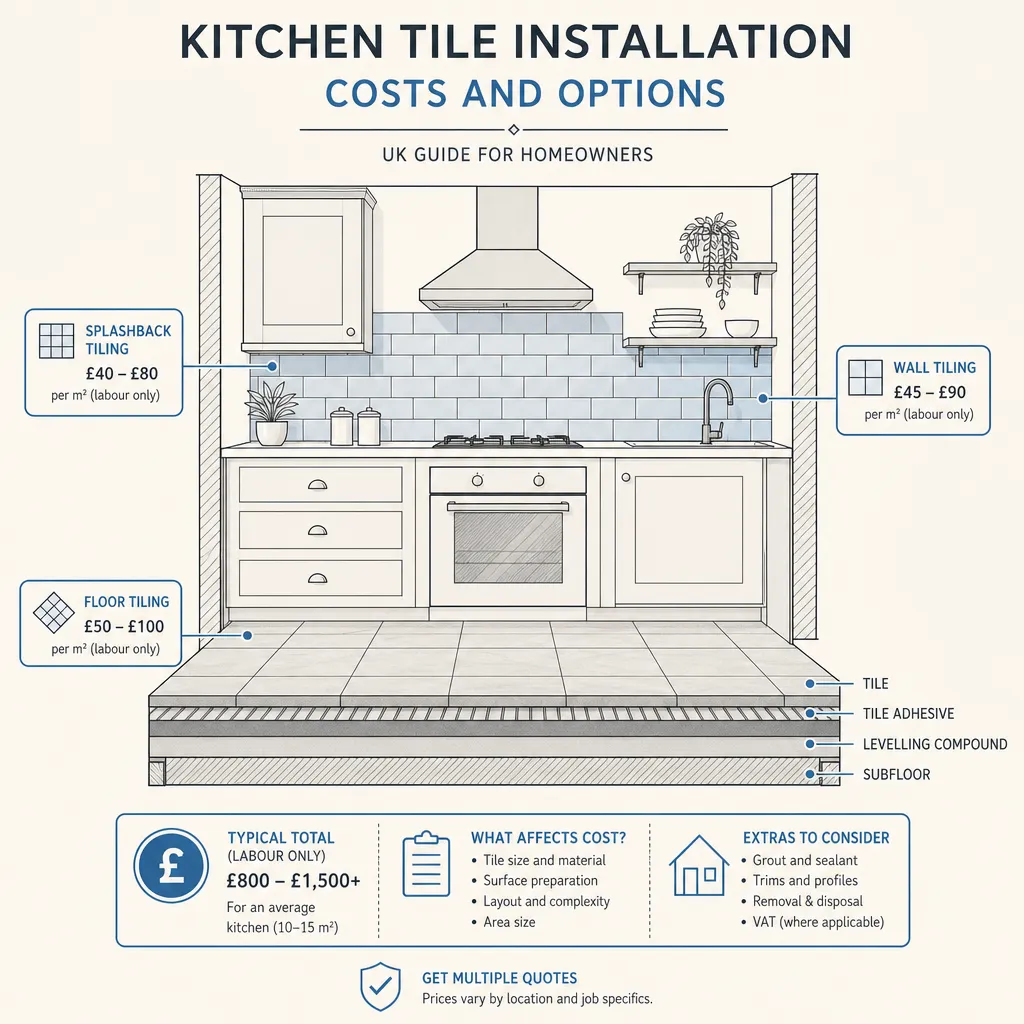
Kitchen Tile Installation Costs and Options
Kitchen tiling in the UK costs roughly £20–£40 per square metre for labour, plus £15–£80 per square metre for materials depending on tile type.
 Improvement & Build
Bathroom Reconfiguration and Its Effect on Home Value
Bathroom reconfiguration can improve saleability, but the impact on value depends heavily on what you change and who your likely buyers are.
 Improvement & Build
Large Format Tile Installation and Design
Large format tiles (600mm × 600mm or larger) need a substrate flat to within 3mm under a 2m straightedge, a C2-rated flexible adhesive, and a minimum 2mm grout joint.
 Improvement & Build
Common Window Problems and When to Call a Professional
The most common window problems in UK homes are condensation between panes (failed sealed unit), draughts from worn seals or warped frames, stiff or broken hardware, and rotting timber frames.