Plastering Timeline After Damp Proofing Installation: Process Sequencing
By Housey · Last reviewed 4th of May 2026
Plastering Timeline After Damp Proofing Installation: Process Sequencing
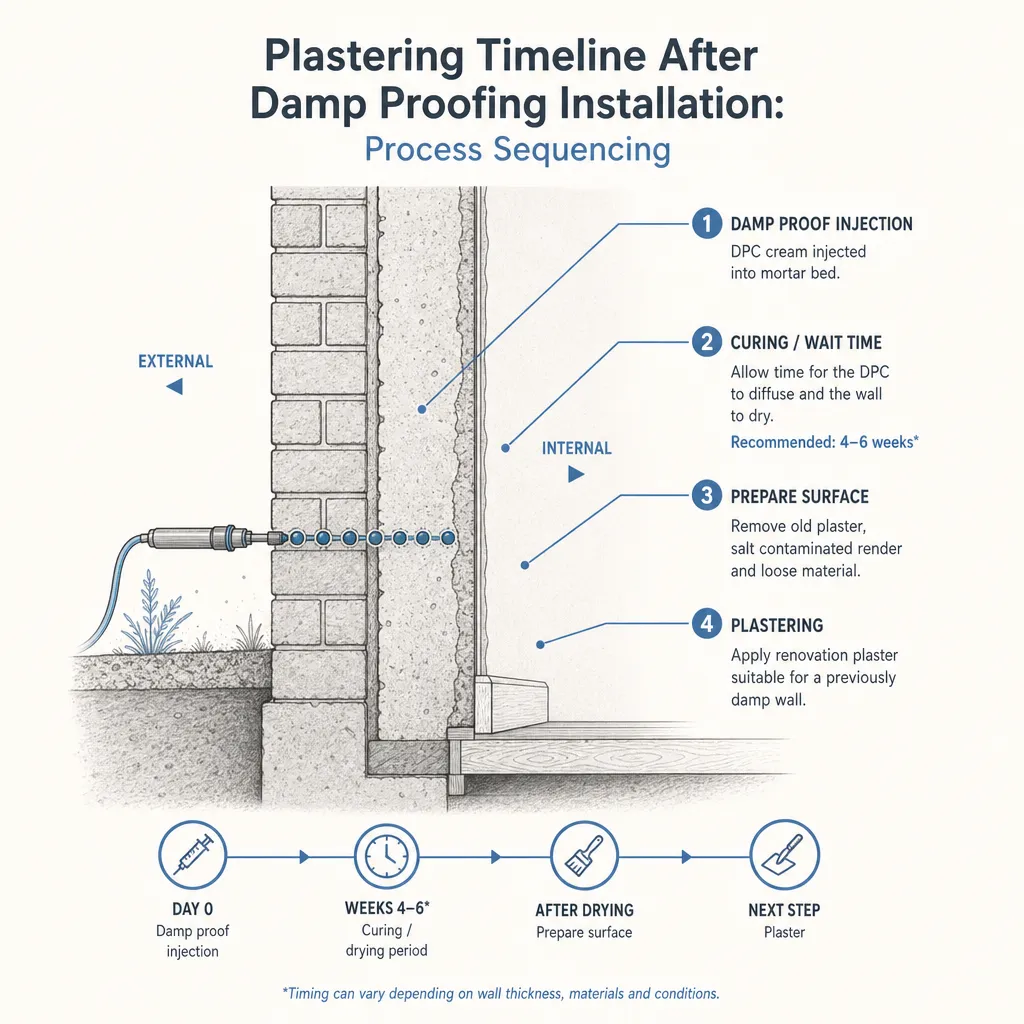
Sequencing plaster after damp proofing is one of the most common sources of remedial failure in UK property renovation. Homeowners and contractors alike face pressure to finish walls quickly, but applying plaster before the substrate is ready causes efflorescence, blistering, delamination, and a costly redo. The correct timing depends on which damp proofing method was used, which plaster system is specified, and how well the building is ventilated during drying. Getting this right the first time avoids significant additional expenditure.
Key points
- BS 6576:2005 (the British Standard for installation of chemical damp-proof courses in masonry walls) requires that treated walls dry before plastering and that a salt-retardant renovation plaster is used rather than standard backing plaster.
- Most specialist contractors recommend a minimum of 6–12 months before standard sand-cement render or gypsum plaster is applied over a chemically injected wall; salt-retardant renovation plasters can often be applied within 4–6 weeks — always follow the product's technical datasheet.
- Tanking systems applied to below-ground or wet-side walls use a different sequencing logic: the tanking coat cures within 24–72 hours, after which a finish plaster coat can follow without an extended drying period.
- PAS 2035:2023 requires a whole-house moisture risk assessment before and after remedial treatments in retrofit projects; plastering too early can trap moisture and cause interstitial condensation.
- Salt contamination from rising damp migrates into plaster over time, causing efflorescence (white crystalline bloom); renovation plasters contain additives that neutralise sulphates and chlorides and tolerate residual moisture better than standard mixes.
Why timing matters: what goes wrong when you plaster too soon
Damp-affected walls — particularly those treated for rising damp — contain accumulated salts (sulphates, chlorides, nitrates) that have migrated through the masonry over years. After chemical DPC injection, the silicone barrier forms relatively quickly, but the salts remain in the wall and the residual moisture takes much longer to leave.
Applying standard plaster before the wall is ready typically results in:
- Efflorescence crystallising on or beneath the surface, causing staining and disruption that is difficult to redecorate over
- Adhesion failure as moisture prevents the plaster key from bonding to the substrate
- Blistering and delamination as moisture continues moving through the plaster film
- Mould growth continuing behind the surface where moisture is trapped
The outcome is usually a full or partial replaster — adding cost and disruption on top of the original damp proofing spend.
Damp proofing methods and their plastering timelines
Damp proofing method | How it works | Minimum wait before plastering | Recommended plaster system |
|---|---|---|---|
Chemical DPC injection (rising damp) | Silicone cream or fluid injected into the mortar course | 6–12 months for standard plaster; 4–6 weeks for renovation plaster (confirm with datasheet) | Salt-retardant renovation plaster (e.g., Safeguard, Wykamol, Sika systems for post-DPC use) |
Cementitious tanking (basement or below-ground) | Waterproof slurry applied to wall surface; hardens to form a barrier | 24–72 hours curing; no extended dry-out required as tanking isolates moisture | Lightweight backing plaster over bonding agent; follow tanking system manufacturer's spec |
Cavity drainage membrane (basement) | Dimpled membrane channels moisture to a sump rather than stopping it at the wall | No extended drying period; plasterboard or render can follow once membrane is fixed | Dot-and-dab plasterboard or render to battens — not direct adhesion onto the membrane face |
Electro-osmotic system | Alters electrical charge in wall fabric to repel moisture movement | 3–6 months typically; confirm with system installer | Salt-retardant renovation plaster |
Breathable lime render (heritage and pre-1919 properties) | Replaces non-breathable cement render; allows moisture to evaporate through the wall | Applied as part of the remedial system; governed by lime cure schedule — avoid frost or below 5°C | Hydraulic lime finish or lime putty; do not apply gypsum plaster over lime without an appropriate bonding primer |
Timelines are indicative. Always follow the specific product's technical datasheet and obtain the recommended waiting period in writing from your contractor.
Renovation plasters: what makes them different
Standard gypsum backing plaster and sand-cement render are not formulated for use over chemically treated or salt-contaminated substrates. Renovation plasters differ in three key ways:
- High porosity — residual moisture passes through and evaporates rather than being trapped
- Salt tolerance — additives neutralise sulphates and chlorides before they reach the surface
- Flexibility — reduced cracking risk as the wall continues to dry
Common UK products include Safeguard Dryzone Renovation Plaster, Wykamol UltraCure, and Sika MonoTop systems, as well as lime-based renders for heritage properties. The product should be specified by the damp proofing contractor, confirmed in writing, and matched to the treatment system used.
Process sequencing checklist
Red flags: when to pause and seek advice
Stop and contact your damp proofing contractor or an independent specialist if you notice:
- White salt deposits on the treated wall before any plaster is applied — the wall may still be actively releasing salts
- Moisture meter readings remaining elevated despite the specified drying period having elapsed
- New or spreading damp patches appearing near the treated area — the original source may not have been fully resolved
- A persistent musty smell after treatment — possible hidden mould or a secondary moisture source
- A plasterer proposing standard bonding plaster over a chemically treated wall with no salt-retardant specification
- Condensation forming on walls during drying — the building may need improved ventilation as well as, or instead of, the damp proofing treatment
Important limitations
This article provides general guidance on the typical sequence between damp proofing and plastering. It is not a substitute for the specific technical instructions from your contractor and the product manufacturer.
Damp proofing outcomes depend on correctly diagnosing the moisture source. Rising damp, penetrating damp, condensation, and leaking services each require different treatments, and misdiagnosis is not uncommon. If there is any doubt about whether the diagnosis was accurate or whether the treatment has been effective, commission an independent assessment by a RICS-qualified surveyor or a Property Care Association (PCA) member before proceeding with plastering.
For retrofit projects funded through ECO4 or other government schemes, PAS 2035:2023 requires moisture remediation to be covered within a whole-house assessment by a qualified Retrofit Coordinator. Skipping this step may affect scheme compliance.
What to ask a qualified professional
- Which damp proofing method was used, and do you have the manufacturer's technical datasheet confirming the waiting period?
- Which specific renovation plaster or render system do you recommend, and can you confirm in writing it is compatible with the treatment used?
- What moisture meter readings are you taking before plastering, and what is the acceptable threshold?
- How long should I allow for drying-out given this property's construction, heating, and ventilation?
- Will you provide a written specification and warranty covering the plaster system?
- If you believe the original moisture source has not been fully resolved, what do you recommend before we proceed?
When to get professional help
Damp diagnosis and remediation should always be assessed by a qualified professional — ideally a PCA member or a RICS-qualified surveyor with dampness experience. Do not proceed with plastering if:
- The original damp diagnosis was informal or not supported by a written survey report
- Moisture meter readings remain above recommended thresholds after the specified drying period
- New damp staining is visible in or near the treated area
- The property is a listed building or of traditional solid-wall construction (typically pre-1919) — lime-based systems may be required and an inappropriate plaster choice can have conservation implications
How Housey can help
If you need qualified help with damp proofing assessment or treatment, Housey can connect you with damp proofing specialists in your area. For properties where moisture remediation forms part of a wider energy-efficiency programme, our retrofit assessments service can help you find a PAS 2035-qualified Retrofit Coordinator to oversee the sequencing correctly.
Frequently asked questions
How long should I wait to plaster after damp proof injection?
For standard gypsum or sand-cement plaster, most specialists recommend waiting 6–12 months after chemical DPC injection to allow salts and residual moisture to dissipate. With a specialist salt-retardant renovation plaster, this can often be reduced to 4–6 weeks, but confirm the exact waiting period with your contractor and check the plaster manufacturer's technical datasheet.
Can I use normal plaster after damp proofing?
Standard gypsum backing plaster and ordinary sand-cement render are not recommended directly over chemically treated or salt-contaminated walls. They lack the porosity and salt tolerance of renovation plasters, and applying them without adequate drying time or salt-retardant additives typically leads to efflorescence, blistering, and adhesion failure within weeks or months of completion.
What is a renovation plaster and where can I buy it?
Renovation plasters are specialist products designed for walls treated for dampness or containing residual salts. Common UK products include Safeguard Dryzone Renovation Plaster and Sika MonoTop systems. They are available from specialist builders' merchants and damp proofing suppliers. Your contractor should specify the appropriate product and confirm compatibility with the treatment used.
Does the damp proofing guarantee cover the plastering?
Most damp proofing guarantees cover the treatment system — injection, tanking, or membrane — but not the subsequent plastering. Some contractors offer a combined guarantee covering both. Always ask for this in writing before work starts and confirm what conditions, such as using a specified renovation plaster, are required to keep the guarantee valid.
What if damp reappears after plastering?
If damp returns after plastering, likely causes include an unresolved moisture source, incorrect plastering sequence, or an incompatible plaster product. Contact the original damp proofing contractor in the first instance; if a guarantee is in place, they should investigate. An independent assessment by a Property Care Association member or RICS-qualified surveyor may be needed if there is a dispute.
Sources and further reading
- BS 6576:2005 — Code of practice for installation of chemical damp-proof courses — BSI
- PAS 2035:2023 — Retrofitting dwellings for improved energy efficiency — BSI / DESNZ
- Damp guidance for consumers — Property Care Association
- ECO4 — Energy Company Obligation — GOV.UK
- Practical Building Conservation: Mortars, Renders and Plasters — Historic England
Useful next reads
 Energy & Retrofit
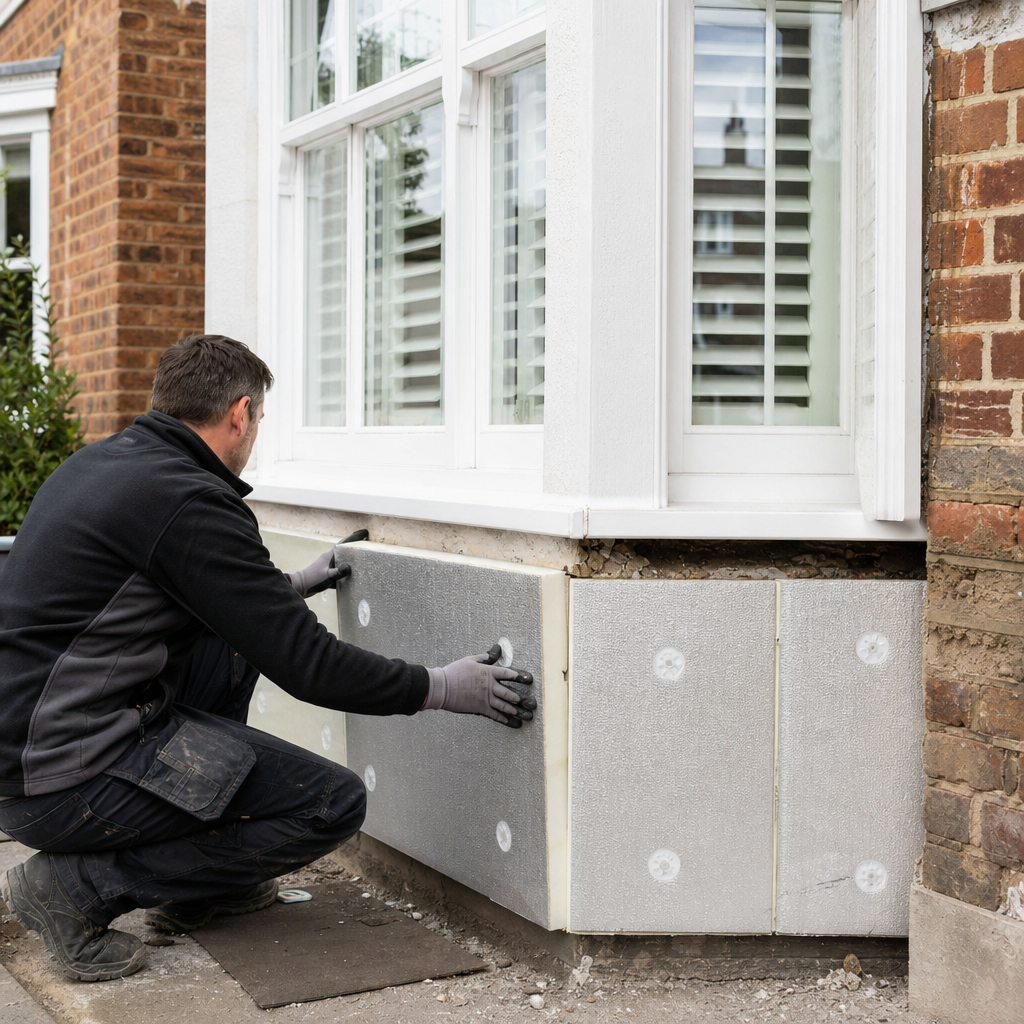
Insulating Solid Masonry Walls Under Bay Windows: Technical Guidance
Insulating solid masonry walls under bay windows requires specialist detailing at angled wall faces, window reveals, and the bay floor and ceiling junctions.
 Energy & Retrofit
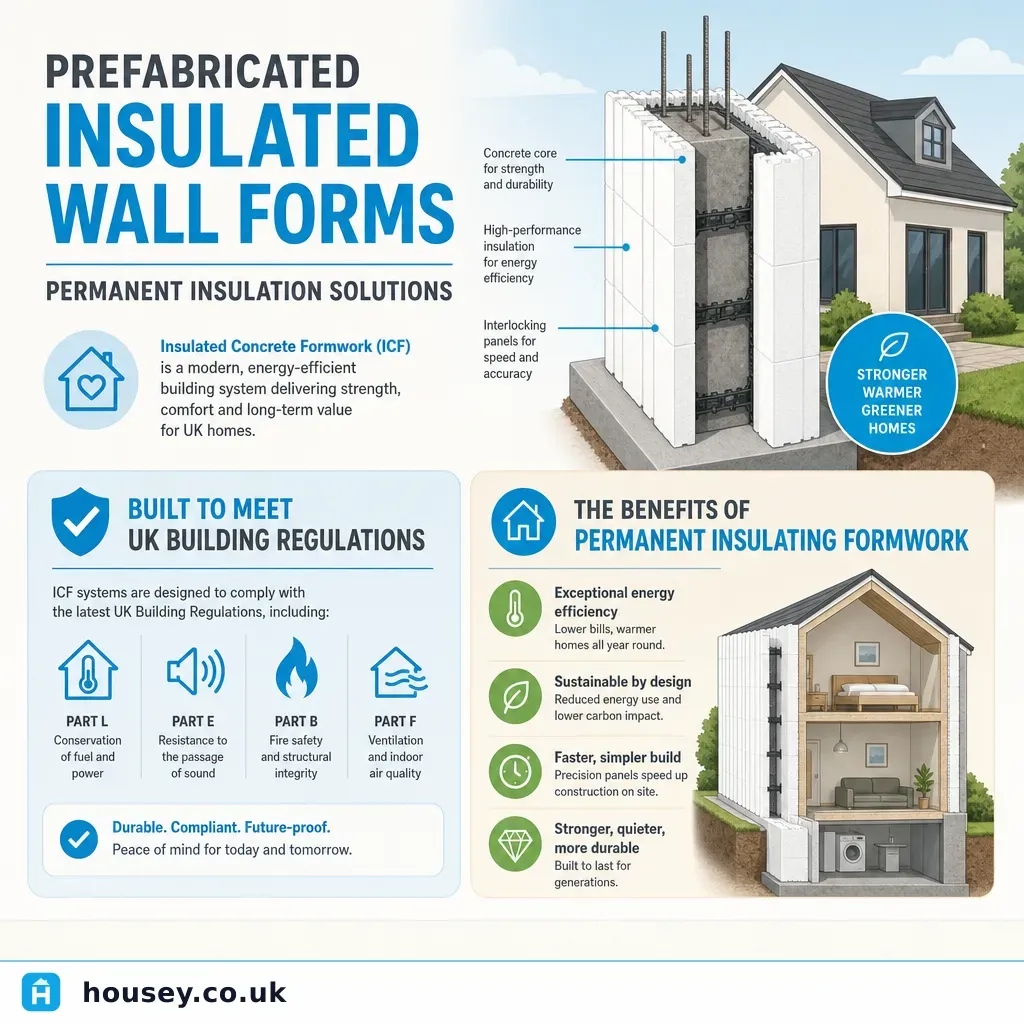
Prefabricated Insulated Wall Forms: Permanent Insulation Solutions
Prefabricated insulated wall forms — including ICF and SIPs systems — deliver high thermal performance by combining permanent insulation with structural concrete or timber in a single wall assembly.
 Energy & Retrofit
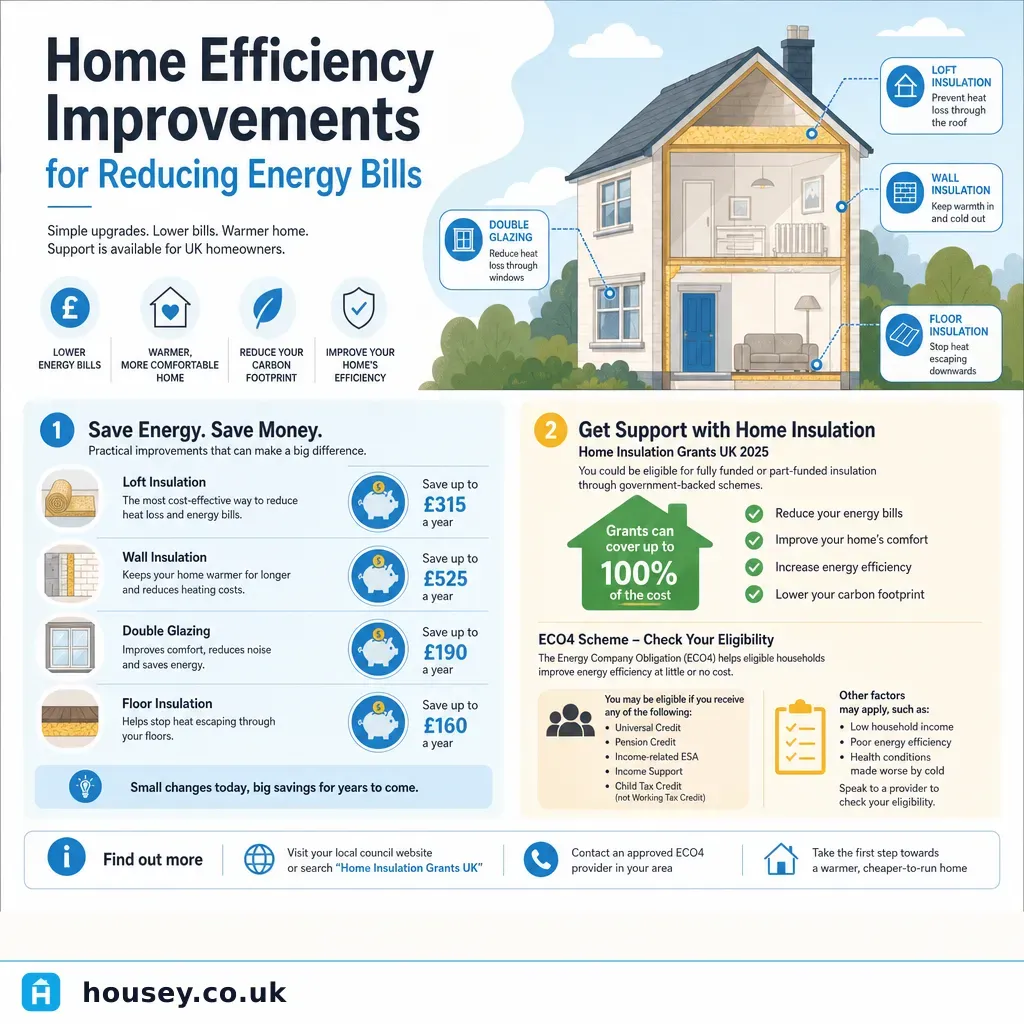
Home Efficiency Improvements for Reducing Energy Bills
The most cost-effective UK home efficiency improvements are usually loft insulation, cavity wall insulation, draught-proofing, and upgrading heating controls.
 Energy & Retrofit
Solar Energy Integration in Below-Ground Structures: Design and Feasibility
Below-ground structures cannot host solar panels on their own roofs but can use surface-mounted panels connected via cable runs, solar light tubes for daylighting, and battery storage.
 Energy & Retrofit
Climate-Ready Home Improvements for the Future
Climate-ready home improvements tackle four main risks for UK properties: overheating, increased rainfall and flooding, storm damage, and energy cost volatility.