Roof Flashing and Weather Protection: Critical Installation Details
By Housey · Last reviewed 1st of June 2026
Roof Flashing and Weather Protection: Critical Installation Details
Roof flashing is one of the most consequential details in any building's weather envelope, yet it is frequently overlooked until water ingress has already caused significant damage. In the UK's persistently wet and variable climate, poorly specified or incorrectly installed flashing at chimneys, abutments, valleys, and roof penetrations is a leading cause of damp, timber rot, and structural deterioration found in survey reports. Whether you are commissioning a new roof, extending a property, or investigating a damp patch on an internal ceiling, understanding how flashing should be installed — and what failure looks like — is essential knowledge for any homeowner.
Key points
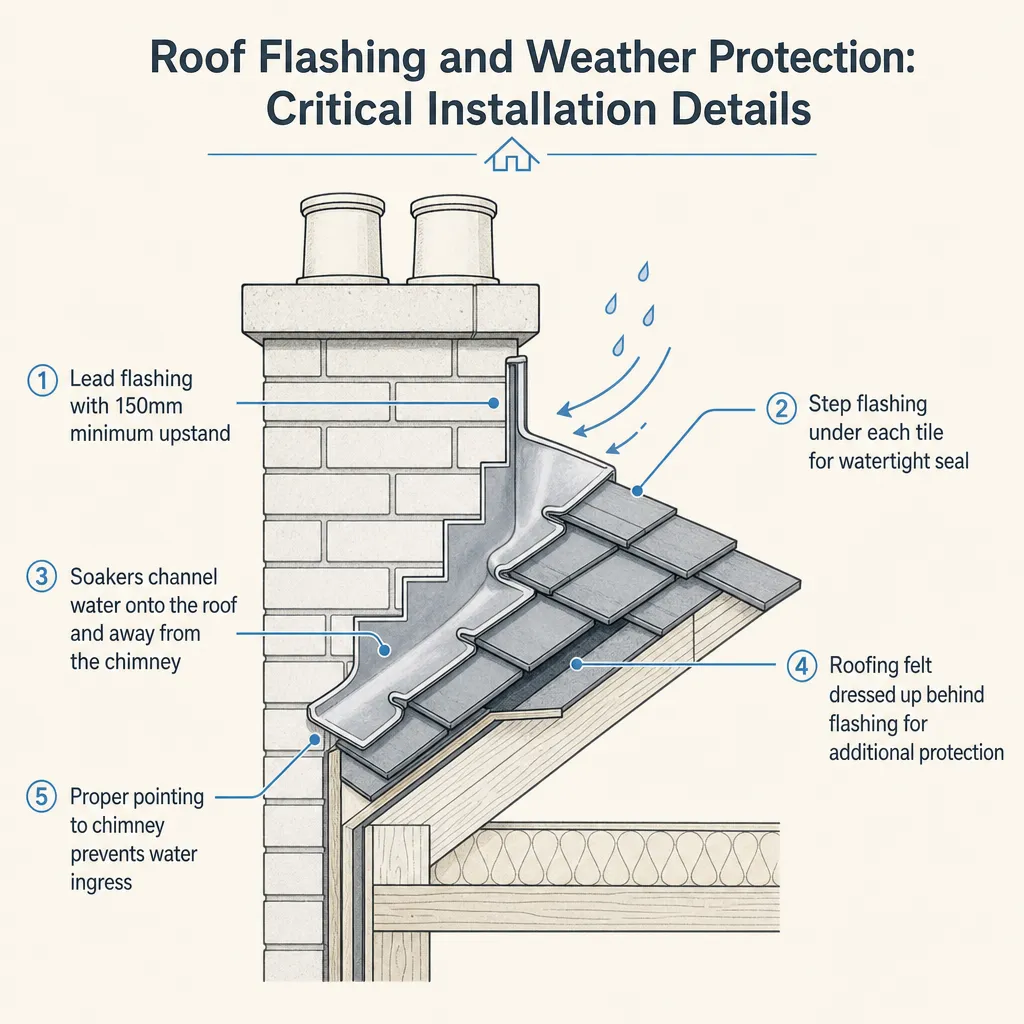
- Lead flashing to BS EN 12588 is the accepted standard for most UK roof junctions; the Lead Sheet Association recommends minimum Code 3 (1.25 mm) for soakers and Code 4 (1.80 mm) for flashings and valleys.
- Stepped and cover flashings at chimney abutments must be chased into mortar joints to at least 25 mm depth — surface-bedding with mortar or mastic alone is a common and costly failure mode.
- Building Regulations Approved Document C requires roofs and their junctions to be weathertight; new or replacement flashing on a re-roofing or extension project typically falls within building control notification requirements.
- GRP, aluminium, and zinc are acceptable alternatives to lead in certain applications, but material selection must account for substrate compatibility, lifespan, and any local planning or conservation requirements.
- A RICS Level 2 or Level 3 Home Survey will note visible flashing defects, but concealed failures often require a specialist roof survey or intrusive investigation to diagnose fully.
What is roof flashing and where is it used?
Flashing is waterproof material — usually a formed metal sheet or profile — installed at junctions between roof surfaces and vertical elements such as chimneys, parapet walls, dormer cheeks, and abutments; at changes in roof pitch (valleys); around roof penetrations including soil pipes, rooflights, and flues; and at eaves and verges to direct water away from the building fabric.
Without correctly installed flashing, water tracks behind tiles or slates, into wall cavities, and into ceiling voids. In older UK properties — Victorian terraces with clay-pot chimneys, 1930s semis with lean-to roofs abutting the main house, or post-war bungalows with flat-to-pitched transitions — flashing failure is among the most common defects identified in building surveys and RICS inspection reports.
Common flashing junction types and failure modes
Junction type | Typical flashing used | Common failure mode |
|---|---|---|
Chimney front apron | Step-and-cover flashing, Code 4 lead | Cracking at bends; mastic-only detailing with no metal |
Chimney back gutter | Lead back gutter, Code 4 | Ponding due to poor falls; chase too shallow |
Pitched-roof abutment (e.g. dormer cheek wall) | Stepped soakers plus cover flashing | Soakers missing; cover flashing not properly chased in |
Valley (two roof pitches meeting) | Lead valley or GRP valley trough | Debris blockage; undersized width; insufficient lap length |
Flat-to-pitched junction | Lead or GRP upstand | Upstand less than 150 mm; adhesive failure at edges |
Rooflight or skylight perimeter | Proprietary factory flashing kit | Incorrect lap with tile underlay; no end-dam fitted |
Parapet wall coping | Lead or aluminium cap flashing | Missing drip edge; mortar joint not chased |
Materials: lead, GRP, aluminium, and zinc compared
Material | Typical lifespan (UK conditions) | Suitability | Planning and conservation notes | Main limitation |
|---|---|---|---|---|
Lead (BS EN 12588) | 60–100+ years | All roof types; universally accepted | Preferred by conservation officers for listed and conservation-area properties | Theft risk; must use correct Code for application; avoid contact with low-pH runoff |
GRP (fibreglass) | 25–40 years | Modern flat roofs; new-build extensions | Generally acceptable outside conservation settings | Requires skilled application; UV degradation without topcoat |
Aluminium (powder-coated) | 30–50 years | Rooflight surrounds; dormers; proprietary flashing systems | Acceptable in some conservation areas; discuss with officer | Can react with lime mortars; less malleable than lead |
Zinc (titanium-zinc) | 40–80 years | Contemporary architecture; standing-seam roof systems | Accepted in many conservation areas with careful detailing | Higher installed cost; correct substrate ventilation required |
Butyl or EPDM strip | 20–30 years | Soil-pipe surrounds; minor emergency repairs | Not normally suitable for primary flashing in conservation-area or listed-building settings | Temperature sensitivity; adhesion failure if incorrectly primed |
Building regulations and installation standards
In England, Building Regulations Approved Document C (Site preparation and resistance to moisture) requires that roofs and their interfaces with walls, chimneys, and other structures are constructed to be weathertight. Where a contractor replaces or installs new flashing as part of re-roofing or a new roof build, this typically falls within building control notification requirements — either through a full plans application or a building notice.
The Lead Sheet Association publishes the definitive technical guidance on correct lap dimensions, Code selection, roll sizes, and thermal movement allowances. Key requirements include:
- Maximum bay length of 1.5 m for Code 4 lead to accommodate thermal expansion without fatigue cracking.
- Minimum upstand height of 150 mm at vertical junctions.
- Minimum 75 mm horizontal cover of flashing over the tile or slate surface below.
- Soakers to be cut from Code 3 lead and sized to the tile gauge plus 25 mm for the upstand.
For listed buildings, Historic England guidance recommends retaining or reinstating lead wherever possible and discourages substitution with modern materials without appropriate justification and consent.
Red flags: signs that flashing has failed or was poorly installed
The following are warning signs that a roof flashing detail requires professional assessment:
- Damp patches on ceilings or walls adjacent to a chimney, dormer, or abutment — the most common symptom of flashing failure, typically more pronounced after sustained or heavy rain.
- Visible cracks, splits, or lifting edges on lead flashing — thermal cycling and age cause lead to fatigue and crack at bends, particularly on older or poorly sized bays.
- Mortar-only or mastic-only detailing at chimney abutments with no chased metal flashing — a common shortcut that typically fails within a few years of installation.
- Staining or efflorescence on chimney stacks or parapet walls, indicating persistent moisture entering at the junction.
- Vegetation growth — moss, fern, or grass — in valley or abutment zones, suggesting debris accumulation and prolonged standing water.
- Rust staining below a roof junction — may indicate steel or galvanised-iron soakers common in pre-1970 properties that have corroded through.
- Previous makeshift repairs visible in photographs or during inspection — layers of flashing compound or self-adhesive tape often indicate a history of repeated failure at the same junction.
- Survey reports noting "monitor" at chimney or abutment flashings — take this recommendation seriously and commission a specialist roof inspection promptly rather than waiting for the next survey cycle.
Important limitations
This article provides general information about roof flashing principles and common failure patterns in UK residential properties. It does not constitute structural, building control, or professional surveying advice. Roof conditions vary substantially by property age, construction type, exposure, and maintenance history. All roofing and flashing work at height must be carried out by qualified and insured tradespeople observing safe working-at-height practices under the Work at Height Regulations 2005. A chartered surveyor, RICS-registered building surveyor, or specialist roofing contractor should inspect and advise on any suspected flashing defect before remedial work is commissioned.
What to ask a qualified professional
Before instructing a roofer or surveyor about flashing work, ask:
- What Code of lead — or alternative material — are you specifying, and why is it appropriate for this junction type and roof pitch?
- Will the flashing be chased into the mortar joint, and to what depth?
- What is the maximum bay length you are using, and how will thermal movement be accommodated within the design?
- Is this work notifiable to building control, and will you submit the notification or should I arrange it separately?
- What are the minimum upstand height and cover dimensions you are working to, and which published standard are you referencing?
- For valley flashings: what is the minimum valley gutter width relative to the roof catchment area and expected rainfall intensity for this location?
- Will you provide a written guarantee on the completed flashing work, and what defects and timescales does it cover?
- Are you a member of the National Federation of Roofing Contractors (NFRC) or registered with a recognised competent-person scheme?
When to get professional help
Instruct a qualified roofer or surveyor whenever:
- A building survey, mortgage valuation, or routine visual inspection identifies defective or suspect flashing.
- There are damp patches on ceilings or internal walls close to a chimney, dormer, or parapet — particularly following rainfall.
- Lead flashing is visibly cracked, split, or detached from the chase.
- The property is being purchased and the survey has flagged flashing concerns — obtain a specialist roof survey or roofer's inspection report before exchange of contracts.
- The property is listed or in a conservation area and flashing replacement is needed — consent and material requirements add complexity that requires specialist input.
- A loft conversion, extension, or full re-roofing project is being planned — specify and inspect all flashing details at practical completion before the contractor leaves site.
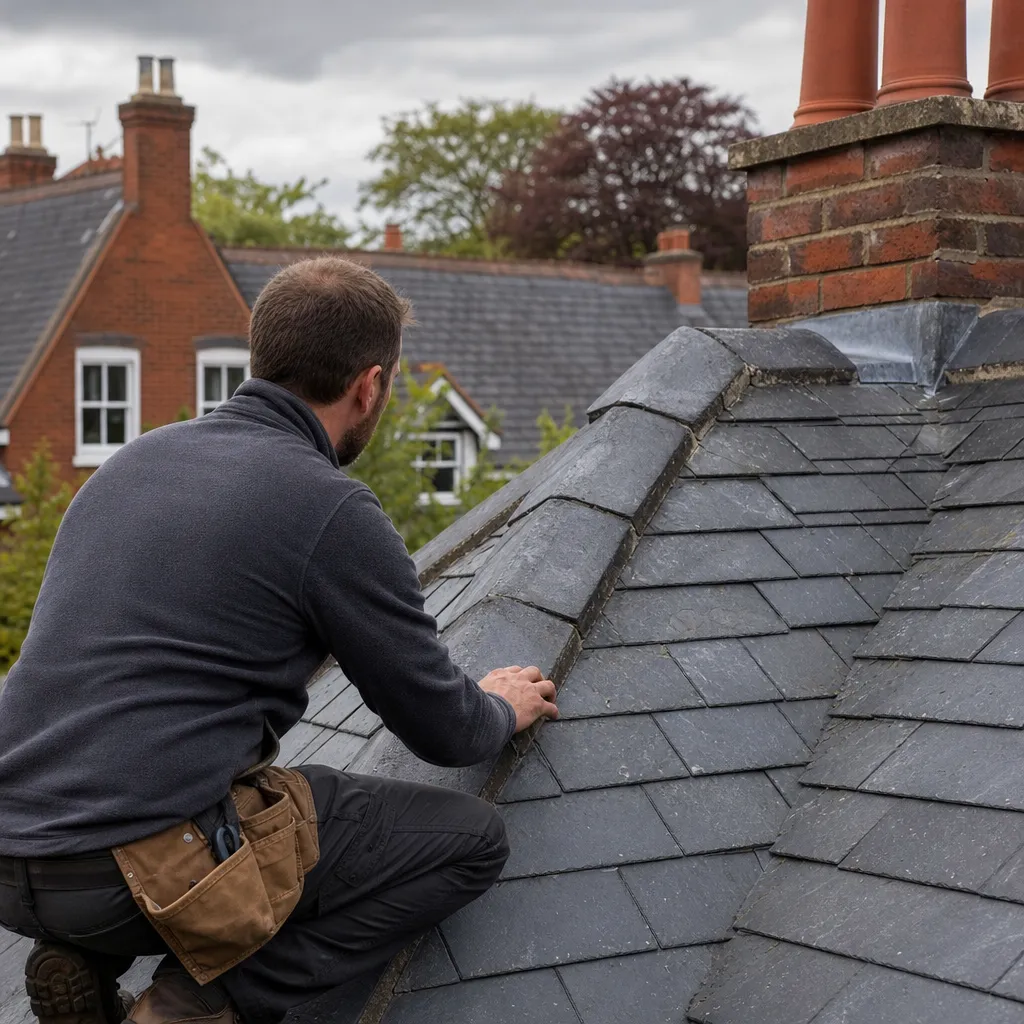
Do not attempt to inspect or repair roof flashing at height yourself. Falls from height are among the most frequent causes of serious injury in UK construction and domestic DIY. Instruct a qualified roofer with appropriate access equipment, insurance, and safe working-at-height procedures in place.
How Housey can help
Whether you need a professional roof survey to assess suspected flashing failure, a vetted qualified roofer to carry out compliant repairs, or a structural survey where persistent water ingress has raised concerns about deeper damage to the building fabric, Housey connects you with specialists who can advise on the right course of action for your property.
Frequently asked questions
How long does lead flashing last on a UK roof?
Lead flashing installed to BS EN 12588 and correctly detailed to Lead Sheet Association guidance typically lasts 60 to 100 years or more. Premature failure usually results from incorrect Code selection, insufficient bay-length management leading to thermal fatigue cracks, or shallow mortar-joint chasing that allows the flashing to move and admit water over time.
What are the signs that roof flashing has failed?
The most common signs are damp or water staining on ceilings and walls near chimneys, dormers, or roof abutments — particularly after heavy rain. Visible cracking or lifting of lead sheet, efflorescence on adjacent brickwork, rust staining below a junction, and vegetation growth in valley zones also indicate flashing problems. A specialist roof survey gives a definitive assessment.
Do I need building control approval for roof flashing repairs?
Minor like-for-like flashing repairs as routine maintenance generally do not require building control notification in England. However, flashing work as part of a re-roofing project, new extension roof, or loft conversion is typically within building control scope. If in doubt, contact your local building control body or a contractor registered with a recognised competent-person scheme.
What is the difference between lead flashing and aluminium flashing?
Lead is heavier, more malleable, and has a longer proven service life — 60 to 100-plus years — compared with aluminium at 30 to 50 years. Lead is the material preferred by conservation officers for historic and listed buildings. Aluminium is lighter, less expensive, and commonly used for rooflight surrounds and proprietary flashing systems. Both require correct specification for the application and substrate.
Sources and further reading
- Building Regulations Approved Document C: Site preparation and resistance to contaminants and moisture — GOV.UK
- Work at Height Regulations 2005 — legislation.gov.uk
- Lead Sheet Association: Technical guidance — Lead Sheet Association
- NHBC Standards: Roofs — NHBC
- Historic England: What is listed building consent? — Historic England
- National Federation of Roofing Contractors — NFRC
Useful next reads
 Surveys & Inspections
Maintaining slate roofs: essential care and upkeep guidance
A well-maintained natural slate roof can last 80–150 years, but it relies on regular inspections, prompt replacement of slipped or cracked slates, clear gutters, and sound lead flashings.
 Surveys & Inspections
Roof Lifespan and Maintenance Planning for Property Owners
Most UK pitched roofs last 40–100+ years depending on covering material, with natural slate lasting longest and concrete tiles typically 40–60 years.
 Surveys & Inspections
Roof Snow Removal: Safety and Structural Considerations
In the UK, most pitched roofs in good condition can tolerate typical snowfall without intervention.
 Surveys & Inspections
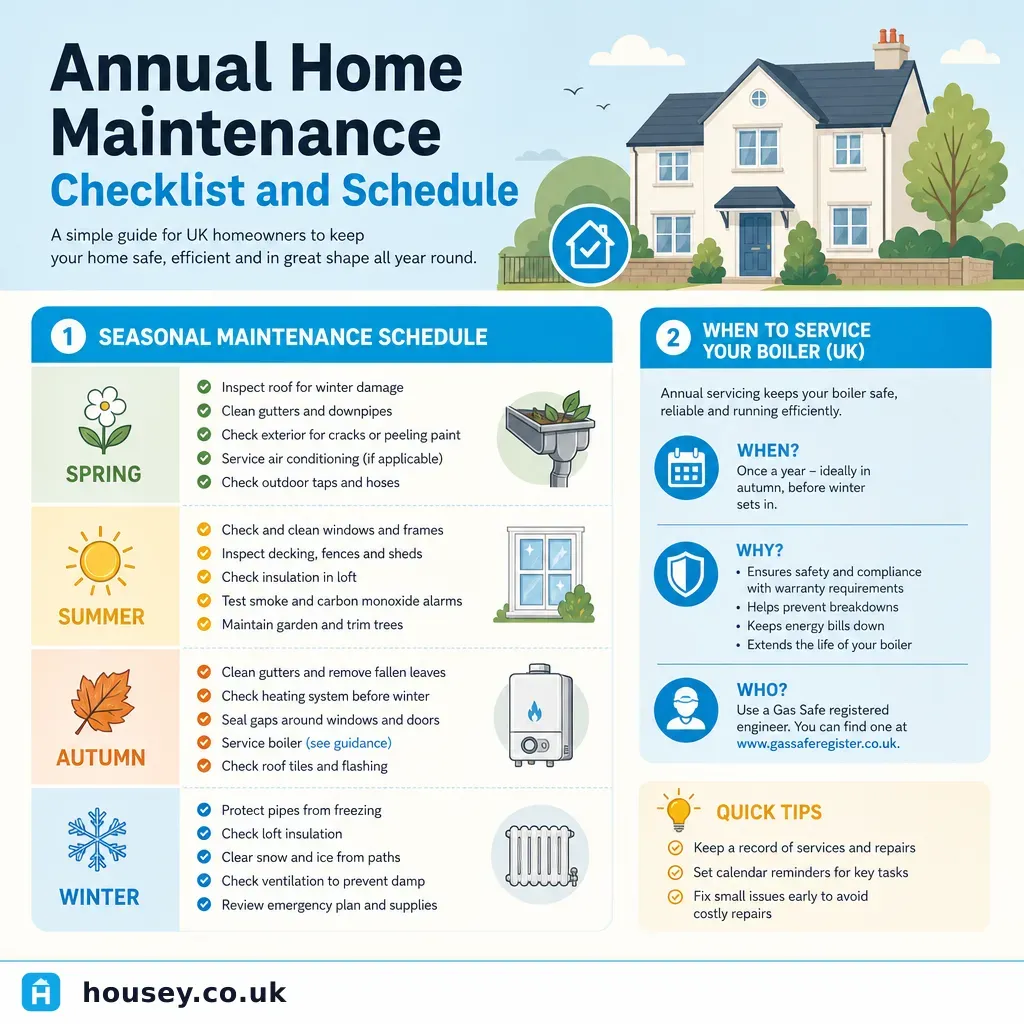
Annual Home Maintenance Checklist and Schedule
A structured annual maintenance schedule helps UK homeowners catch small problems before they become costly repairs.
 Surveys & Inspections
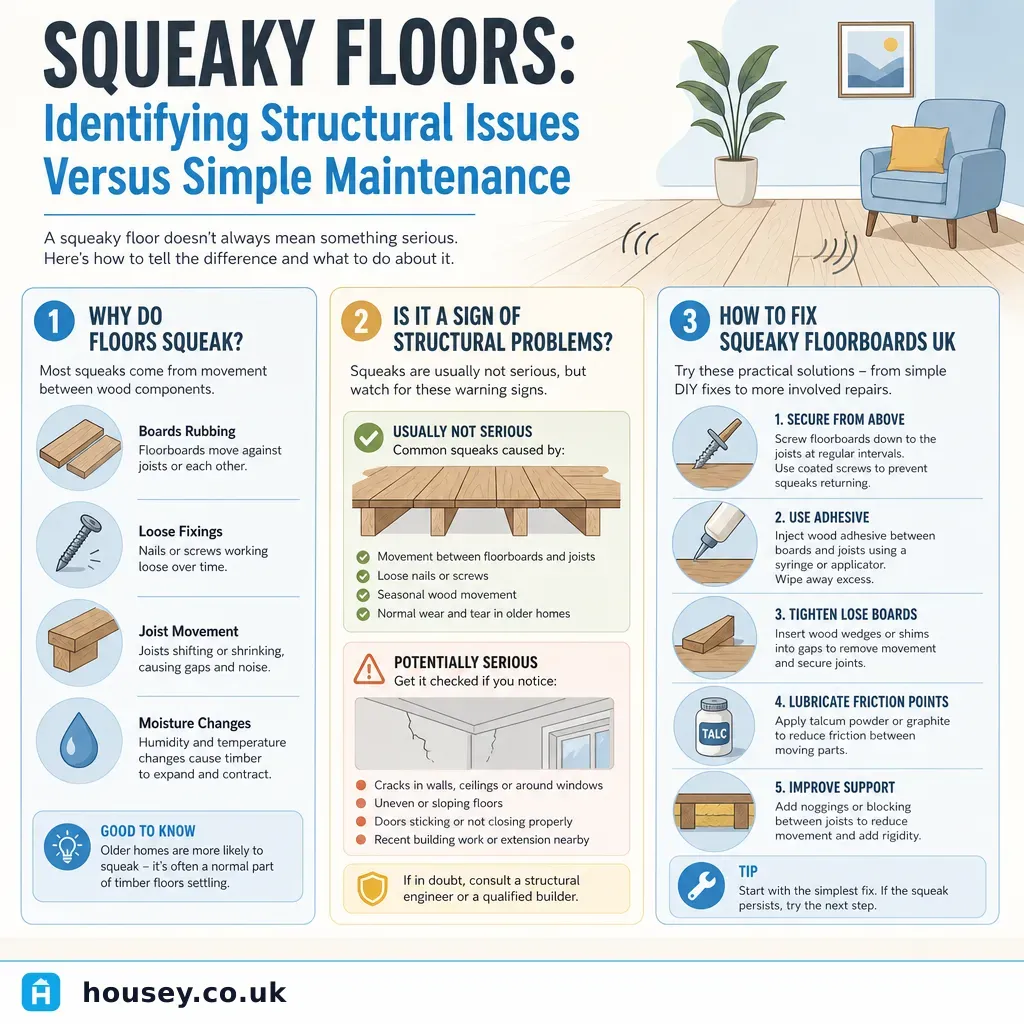
Squeaky Floors: Identifying Structural Issues Versus Simple Maintenance
Most squeaky floors in UK homes are caused by floorboards rubbing against each other or against fixings as they expand and contract — a maintenance issue rather than a structural one.