Screed Flooring: Installation, Types, and Finish Options
By Housey · Last reviewed 10th of May 2026
Screed Flooring: Installation, Types, and Finish Options
Screed is a question most homeowners encounter when planning a ground floor extension, a kitchen renovation with underfloor heating, or a garage conversion — typically at the point when a builder asks which type of screed you want and the decision suddenly feels more technical than expected. Getting the specification right at this stage prevents costly remedial work later, particularly when the screed will cover heating pipes or be overlaid with tiles, engineered timber, or luxury vinyl tile.
Key points
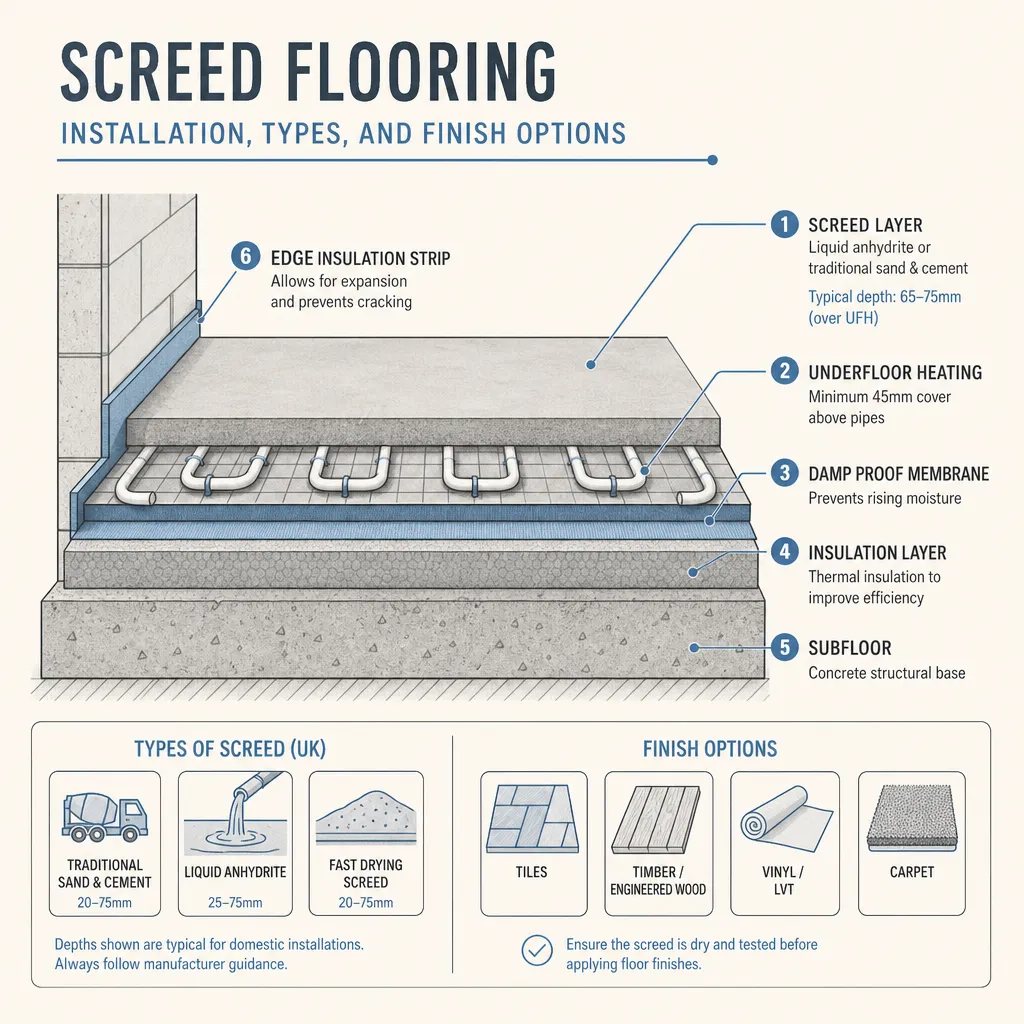
- Sand-and-cement screed requires a minimum depth of 65–75 mm over underfloor heating pipes to achieve adequate compressive strength and avoid cracking.
- Liquid anhydrite (calcium sulphate) screed can be installed at 30–40 mm over UFH pipes and flows around pipework without manual tamping.
- Anhydrite screed must be sealed with a specialist primer before any cement-based tile adhesive is applied — sulphate compounds can cause adhesive failure if this step is skipped.
- BS 8204 is the British Standard governing in-situ floorings including screeds; your contractor should be familiar with the relevant parts for the screed type being specified.
- Moisture testing using a hygrometer probe is required before any floor finish is applied; most finishes require the screed to read below 75% relative humidity.
What is screed and when do you need it?
Screed is a semi-dry or liquid cementitious mix applied over a structural concrete slab or beam-and-block floor to create a smooth, flat surface ready to receive a final floor finish. It is distinct from the structural slab beneath it: screed is thinner, finer, and not load-bearing. You are likely to need screed when:
- Constructing a ground floor extension or new build where the concrete oversite must be levelled before a floor finish is applied.
- Installing wet (hydronic) underfloor heating, which requires pipes to be fully encapsulated.
- Refurbishing a property with an uneven or damaged concrete floor before tiles, engineered timber, or LVT is laid.
- Converting a garage where the existing slab is too low or uneven for habitable use.
Screed types compared
Screed type | Min. depth (no UFH) | Min. depth (over UFH) | Drying guide | Best for | Limitations |
|---|---|---|---|---|---|
Sand-and-cement | 40–50 mm | 65–75 mm | ~1 mm/day up to 40 mm; slower beyond | Extensions, garages, general floor builds | Slow drying; heavy; needs skilled finishing |
Liquid anhydrite (flowing) | 25–30 mm | 30–40 mm | ~1 mm/day; confirm with manufacturer | UFH projects; large areas; fast programme | Sulphate sealing required; avoid areas of persistent damp |
Self-levelling compound | 3–20 mm (topping only) | Not suitable | 24–72 hours typically | Smoothing minor imperfections over a sound base | Not a structural screed; must go over solid substrate |
Polymer-modified screed | 25–40 mm | 50–65 mm | Faster than sand-and-cement | Renovation with limited build-up depth | Higher material cost |
Depths are indicative and must be confirmed against the screed manufacturer's technical data sheet and BS 8204. Indicative UK costs, last reviewed 2026-05-10.
Underfloor heating compatibility
Both sand-and-cement and liquid anhydrite screeds are compatible with wet underfloor heating, but the choice affects build depth and programme time. Liquid anhydrite's lower minimum cover depth — typically 30 mm over the pipe centreline for domestic systems — means a shallower overall floor build-up, which is useful in renovation projects where floor-to-ceiling height is constrained.
After screed is poured over UFH pipes, the system should not be switched on until the screed has cured — usually a minimum of 7 days for anhydrite and 14–28 days for sand-and-cement. A commissioning process, gradually increasing flow temperature over several days, then conditions the screed before normal use. Your UFH supplier should provide a written commissioning protocol.
Drying times and moisture testing
Screed drying times are often underestimated on site, causing delays when floor finishes are installed over a damp substrate.
- Sand-and-cement screed: approximately 1 mm per day up to 40 mm depth; thicker screeds dry proportionally more slowly. A 75 mm screed may take two to three months to reach the moisture level required for most floor finishes.
- Liquid anhydrite: manufacturer guidance typically quotes around 1 mm per day up to 40 mm; drying can be accelerated with gentle heating and adequate ventilation.
- Self-levelling compounds: usually 24–72 hours to foot traffic, though adhesive application timescales vary by product.
Before any floor finish is applied, the screed should be tested using a calibrated hygrometer probe rather than a surface-mounted moisture metre, which is not reliable for this purpose. Most tile adhesive and timber floor manufacturers specify a maximum of 75% relative humidity — confirm the requirement for the specific product being installed.
What floor finishes work with screed?
Once cured and dried to the required moisture level, screed accepts a wide range of finishes:
- Ceramic and porcelain tiles: widely used over screed; grout joint size and adhesive choice must be matched to the screed type, especially where anhydrite is involved.
- Engineered timber: must be fully dried; some manufacturers require a damp-proof membrane or vapour barrier over anhydrite screeds.
- Luxury vinyl tile (LVT) and sheet vinyl: require a particularly flat surface; a self-levelling compound skim is often applied to achieve the required flatness tolerance.
- Polished or exposed screed: specialist sand-and-cement mixes and liquid anhydrite can be ground and sealed to provide a finished surface without any overlay — increasingly popular in contemporary extensions and open-plan spaces.
- Carpet: can be laid over screed, typically on chipboard or directly with a suitable underlay.
Homeowner checklist before screed is poured
When to get professional help
For minor repair or patching in an existing home, a competent general builder can often apply self-levelling compound. For anything involving new extensions or full-floor installations, wet underfloor heating encapsulation, liquid anhydrite screed (which requires specialist pump equipment), or polished and exposed screed finishes, an experienced groundworker or specialist screed contractor should be appointed.
If the project is subject to Building Regulations — which applies to most new extensions and habitable conversions — building control consultants can advise on the required thermal and structural performance of the floor build-up and confirm what inspections are required at each stage.
How Housey can help
Housey connects you with experienced groundworkers for floor preparation and screed installation, and with building control consultants who can advise on compliance for extensions and conversions. Describe your project and receive quotes from vetted local professionals.
Frequently asked questions
What is the difference between screed and concrete?
Concrete is a structural material — a mixture of cement, coarse aggregate, and water designed to carry loads. Screed is a finer, thinner mix applied over a concrete slab to create a level, smooth surface for floor finishes. Screed is not structural. The two are part of the same floor build-up but serve different purposes.
Can I use self-levelling compound instead of screed?
Self-levelling compound is suitable for smoothing minor imperfections over a sound existing floor, typically at 3–20 mm depth. It is not a substitute for screed where significant depth is needed — for example, to encapsulate underfloor heating pipes. It must always be applied over a solid, stable base and is not appropriate for new floor builds.
How long before I can walk on a newly laid screed?
Most sand-and-cement screeds can be walked on carefully after 24–48 hours. Liquid anhydrite may be walkable within a few hours. However, full drying for floor finishes can take weeks to months depending on screed depth. Always carry out moisture testing before installing the final floor finish — the screed being walkable does not mean it is ready for tiling or timber.
Is screed covered by Building Regulations?
The floor build-up in a new extension or conversion — including screed and insulation layers — must comply with Building Regulations Part L (thermal performance) and Part C (moisture resistance). The screed itself is not separately notifiable, but the overall floor construction is subject to building control inspection at the appropriate stage.
Sources and further reading
Useful next reads
 Improvement & Build
Liniar uPVC Windows: Performance, Durability, and Quality Assessment
Liniar uPVC window profiles are manufactured in the UK using multi-chambered, foamed frames.
 Improvement & Build
Garden Tap Installation with Hot and Cold Water: Plumbing Options
Adding a cold garden tap is a common DIY project, but routing hot water outdoors requires a plumber to connect to your domestic hot water system and comply with the Water Supply (Water Fittings) Regulations 1999.
 Improvement & Build
Sealing and Maintaining Historic Leaded Glass Windows: Preservation and Performance
Leaded glass windows are maintained using traditional linseed oil cement — not silicone or modern sealants, which prevent natural movement in the lead came.
 Improvement & Build
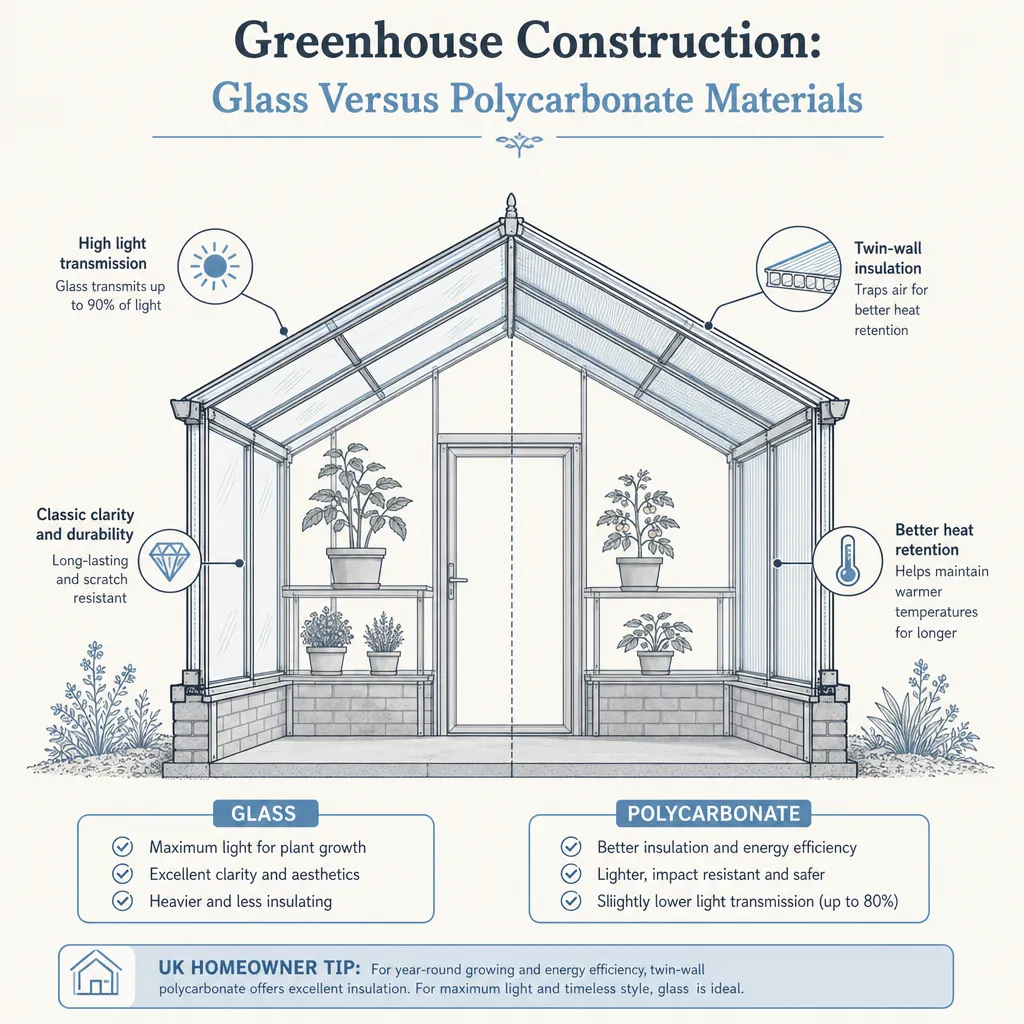
Greenhouse Construction: Glass Versus Polycarbonate Materials
Glass transmits around 90% of available light and lasts indefinitely if unbroken, but insulates poorly and shatters into sharp fragments.
 Improvement & Build
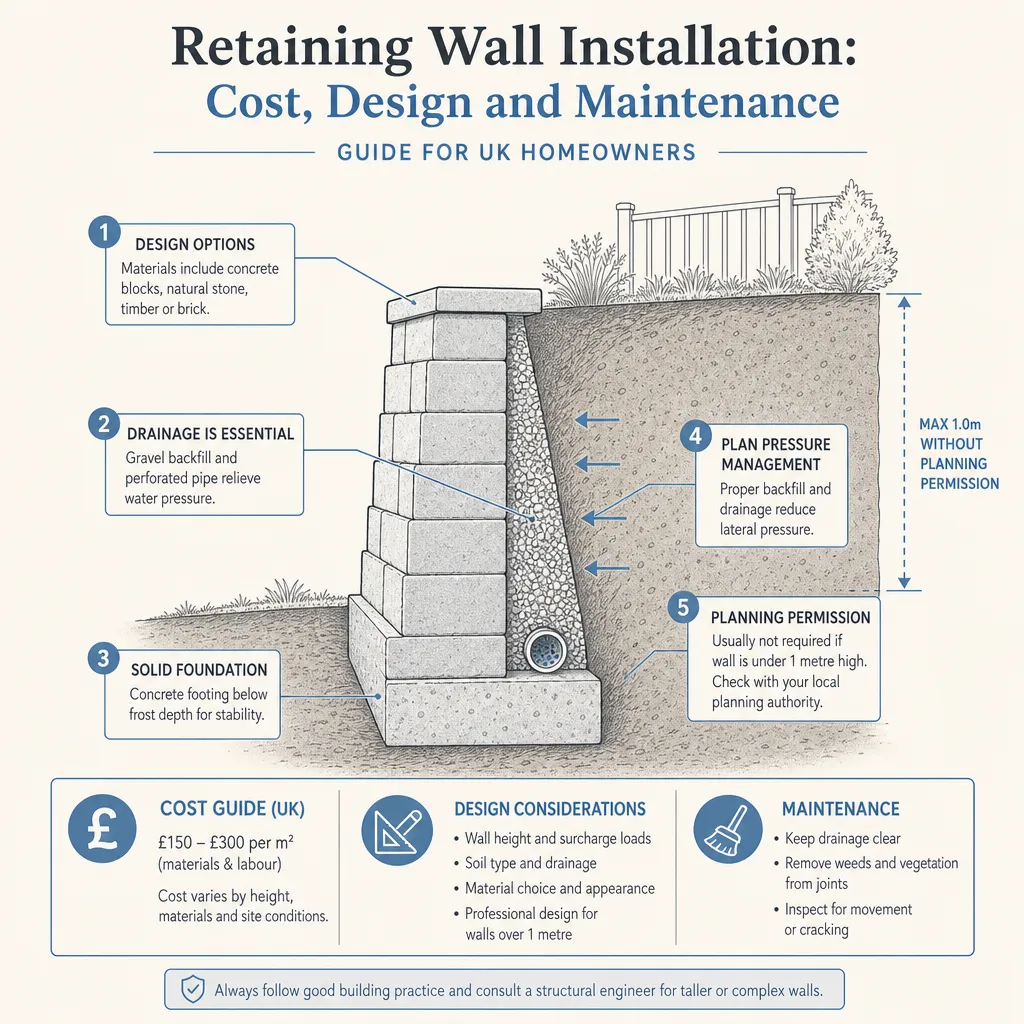
Retaining Wall Installation: Cost, Design and Maintenance
A retaining wall holds back soil on a sloped or banked site.