Treating Internal Damp: Diagnosis, Solutions, and Long-Term Moisture Management
By Housey · Last reviewed 18th of May 2026
Treating Internal Damp: Diagnosis, Solutions, and Long-Term Moisture Management
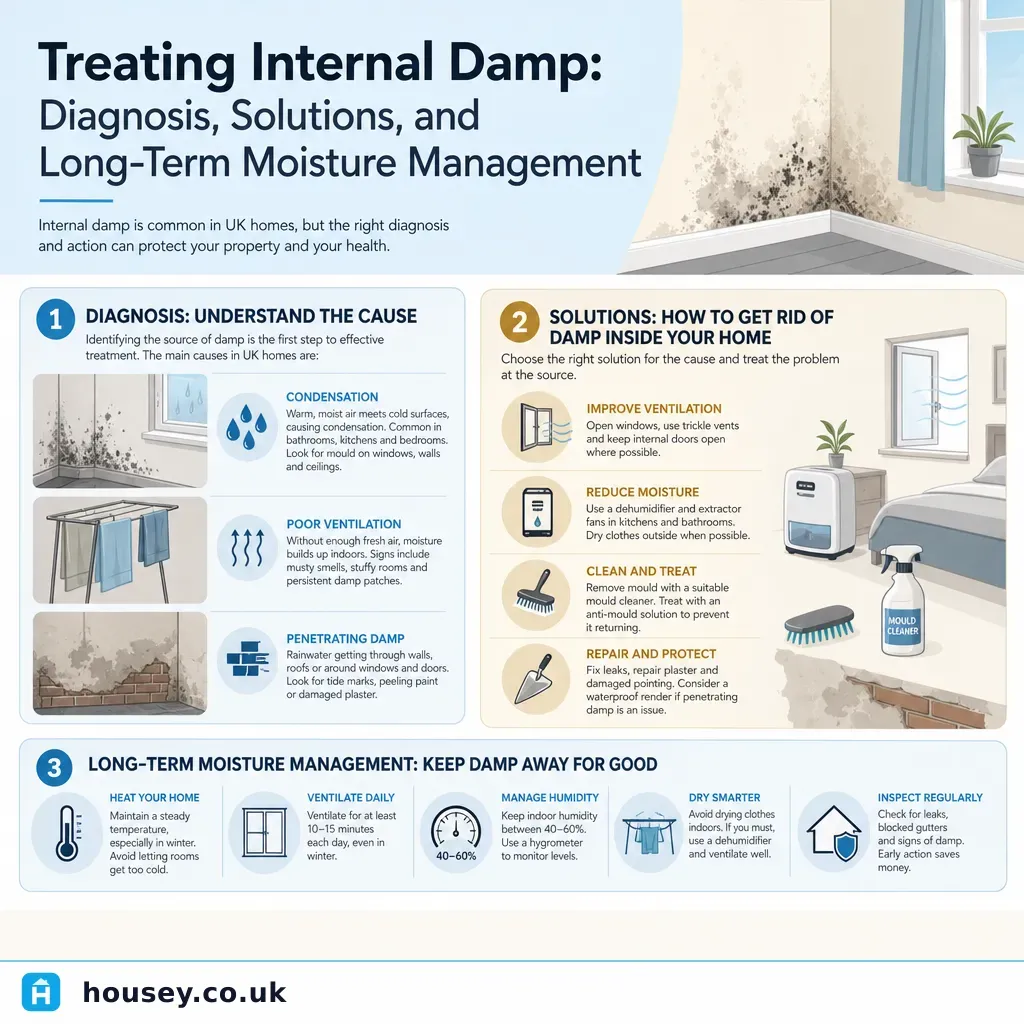
Internal damp in a UK home rarely resolves itself. Whether you are dealing with tide marks on the ground-floor wall of a Victorian terrace, a persistent damp patch beside a chimney breast in a 1930s semi, or black mould returning to a north-facing bedroom wall year after year, the damp type determines the treatment — and getting the diagnosis wrong means spending money on remediation that will not work. This guide covers the three main types of internal damp, the correct treatment for each, and how to manage moisture effectively over the long term.
Key points
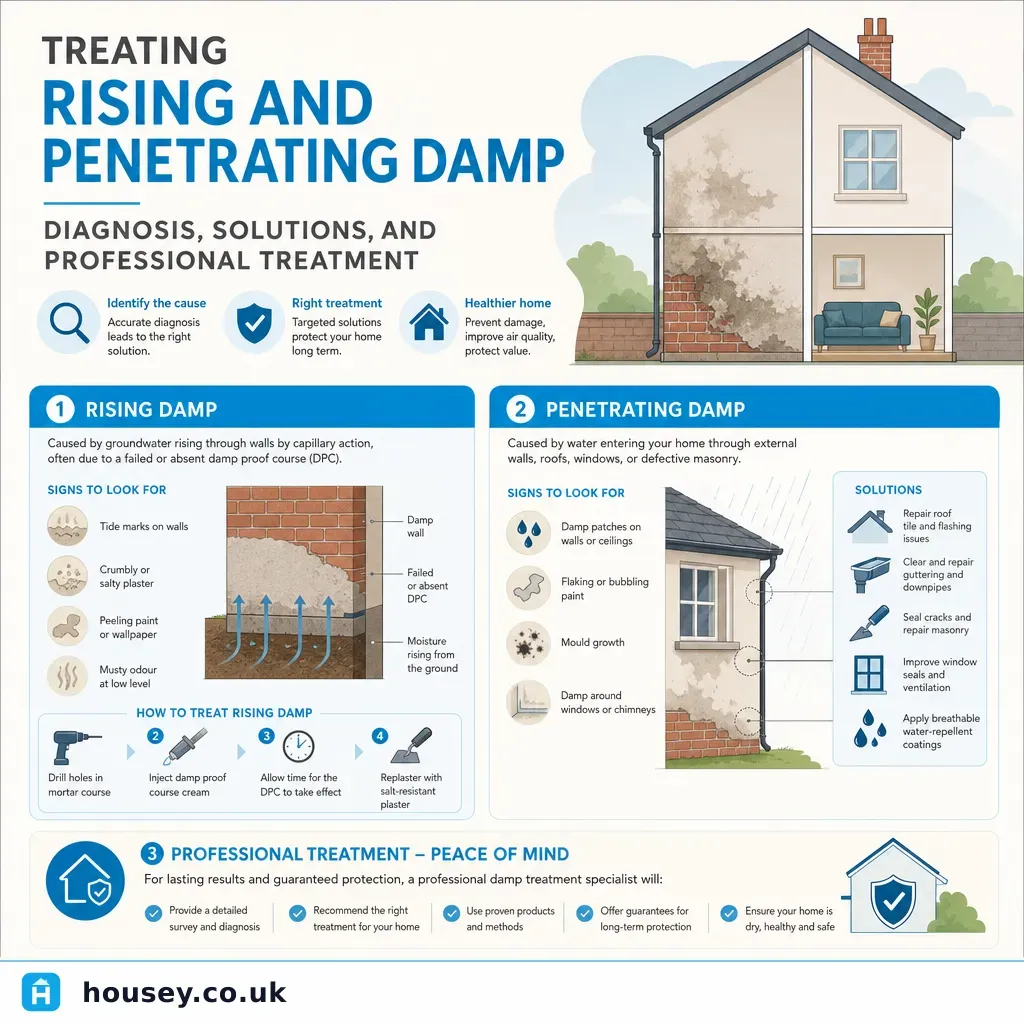
- Rising damp affects the lower walls of properties built before 1965 and is caused by the absence, failure, or bridging of the damp-proof course (DPC); chemical DPC injection is the standard modern remedy, but it must be followed by full salt-resistant replastering to produce a lasting result.
- Penetrating damp enters through defective external elements — eroded pointing, failed flashings, cracked render, or blocked gutters — and is the most common source of damp-related damage in UK terraced and semi-detached homes.
- Condensation is the leading cause of black mould growth in UK homes; Building Regulations Approved Document F requires intermittent extract rates of at least 15 litres/second for bathrooms and 30 litres/second for kitchens as a minimum baseline.
- The Property Care Association (PCA) accredits damp-proofing and timber treatment contractors in the UK; their insured guarantees — typically 20–30 years — are accepted by most mortgage lenders and conveyancers.
- Damp that reaches structural timber — floor joists, lintels, or rafters — can trigger wet rot or dry rot within weeks in warm, moist conditions; a damp and timber survey should assess both simultaneously.
Diagnosing the type of damp: a comparison
Damp type | Typical location | Key symptoms | Root cause | Treatment approach |
|---|---|---|---|---|
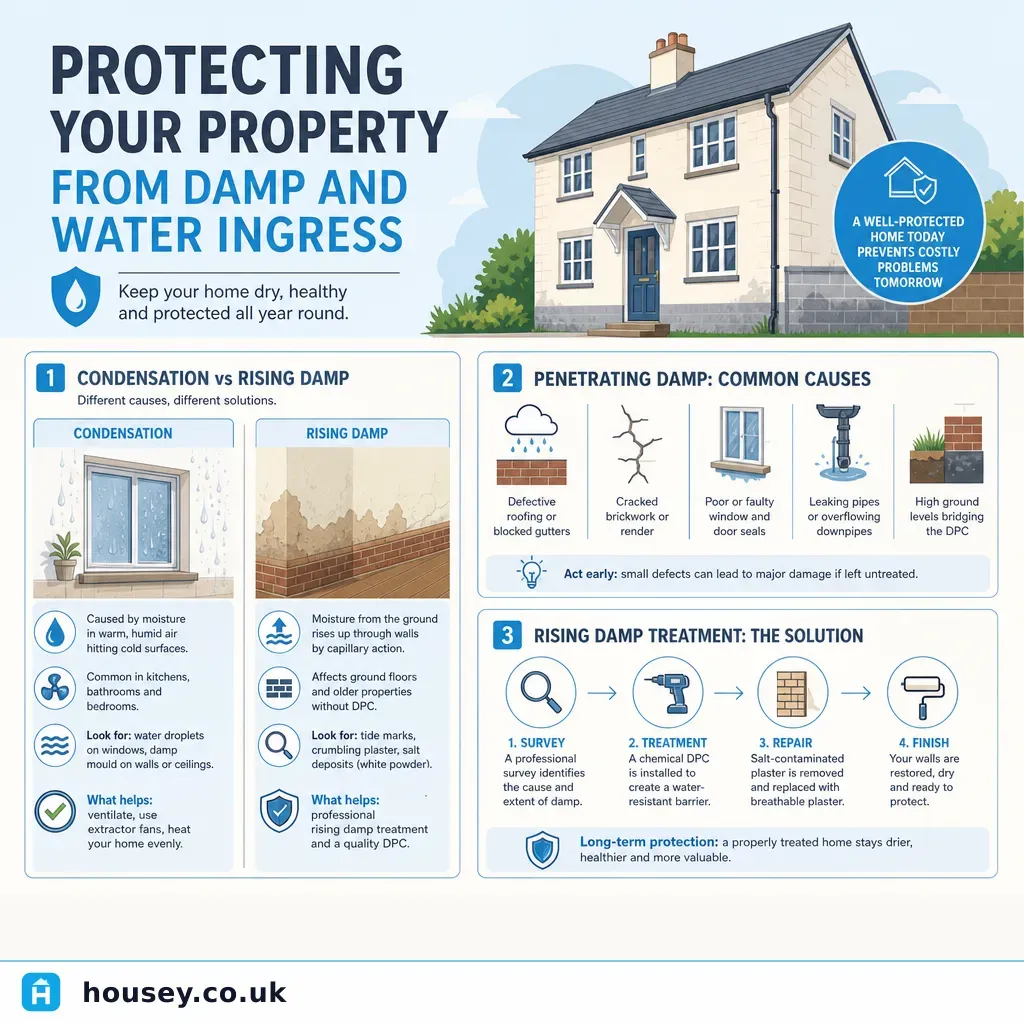
Rising damp | Below 1m on ground-floor walls | Tide marks, white salt deposits (efflorescence), persistently damp plaster | Absent, failed, or bridged DPC | DPC injection; hack off and replace salt-contaminated plaster with a sand-cement system |
Penetrating damp | Near windows, chimney breasts, party walls, roof junctions | Localised wet patches, worsens after rain, may dry out in dry periods | Defective external element (flashing, pointing, gutter, render) | Repair the external defect first; allow the wall to dry; replaster affected areas if needed |
Condensation | Mid-to-upper walls, cold corners, around window frames | Black mould spots, streaming windows, musty smell in winter | Warm moist air meeting cold surfaces | Improve ventilation; raise surface temperatures through insulation; reduce moisture sources |
Interstitial condensation | Within wall or roof construction (not visible at first) | Wet insulation, rotting timber inside wall, corroding cavity ties | Moisture diffusing through poorly detailed insulation | Vapour control layers, breathable membranes, specialist retrofit assessment |
Rising damp: what treatment involves
Chemical DPC injection is the standard remedy for rising damp in UK properties. A contractor drills a row of holes at mortar course level — typically the first bed joint above external ground level — and injects a silane-based cream or fluid that cures to form a water-repellent barrier within the masonry.
Injection alone is not sufficient. The following steps are all required for a lasting result:
- Identify and remove any DPC bridges — raised external ground levels, render taken below DPC line, or solid floor screeds abutting the wall without a tanked junction must be addressed before or alongside injection.
- Hack off all affected plaster to at least 1m above the highest tide mark or salt staining.
- Allow the masonry to dry — this can take several weeks to months depending on wall thickness and the level of saturation.
- Apply a salt-resistant re-plastering system — a sand-cement render with a waterproof admixture is standard; standard gypsum plaster will re-absorb hygroscopic salts and fail again.
- Allow new plaster to cure fully before any decoration — typically four to six weeks for a 13mm coat in normal conditions.
Penetrating damp: identifying and repairing external defects
Penetrating damp is a symptom — the treatment is always to repair the external defect first. Common sources in UK homes include:
- Failed or missing flashings — lead or aluminium flashings around chimney stacks, dormers, and roof-wall junctions fail with age or poor installation; step flashings and apron flashings are frequent problem areas.
- Eroded pointing — soft lime mortar joints in Victorian and Edwardian brickwork erode over decades; repointing with the correct mortar (typically NHL lime mortar for pre-1919 properties, not ordinary Portland cement) is the fix.
- Cracked or detached render — solid render walls, common on 1930s–1960s properties, develop shrinkage cracks or delaminate; large-scale rerendering may be required.
- Failed cavity wall ties — in 1960s–1980s cavity-wall homes, corroding ties can bridge the cavity and create wet paths through to the inner leaf; identified with a borescope camera and replaced if needed.
- Blocked or overflowing gutters — water running down the face of a wall saturates brickwork rapidly and is often the simplest and cheapest defect to fix.
Once the external defect is repaired, internal plaster in the affected area will contain residual hygroscopic salts. These can continue to cause surface staining and apparent dampness even after the source is sealed, so replastering with a salt-resistant system is often needed in areas that have been wet for an extended period.
Condensation and mould: long-term moisture management
Condensation is produced by everyday activities — cooking, bathing, drying clothes, breathing — and becomes a persistent problem when moisture cannot leave the building quickly enough. Effective long-term management requires a combination of approaches.
Ventilation improvements:
- Install or upgrade extractor fans in kitchens and bathrooms. Approved Document F requires minimum intermittent extract rates of 30 litres/second for kitchens and 15 litres/second for bathrooms (or 13 litres/second continuous).
- Add trickle ventilators to window frames where they are absent.
- Consider Positive Input Ventilation (PIV) — a loft-mounted unit that supplies fresh, slightly warmed air throughout the dwelling, diluting indoor humidity.
- For whole-house retrofits, Mechanical Ventilation with Heat Recovery (MVHR) is the preferred solution under PAS 2035, as it balances ventilation with energy efficiency.
Insulation and cold-bridge improvements:
- Insulate window reveals, cold lintels, and other thermal bridge points to raise internal surface temperatures and reduce the risk of condensation at those locations.
- Internal wall insulation (IWI) on solid-walled properties can raise surface temperatures significantly but must be specified carefully to avoid driving interstitial condensation into the wall build-up.
Day-to-day practices:
- Dry clothes outdoors or with a condenser tumble dryer rather than on radiators or airers.
- Keep lids on pans while cooking and use extractor fans consistently.
- Maintain background heating during cold weather to prevent wall and window surfaces dropping below the dew point.
What to ask before hiring a damp treatment specialist
Before instructing a damp-proofing contractor, ask:
- What is your diagnosis methodology — will you use a moisture meter, hygrometer, endoscope, or thermal imaging camera, and will the inspection cover the external envelope as well as internal surfaces?
- Are you accredited by the Property Care Association (PCA)?
- What guarantee do you offer — is it insured, and is it transferable to a future buyer?
- Are structural timbers within or adjacent to the affected area included in your survey scope?
- Who carries out the replastering — your firm or a subcontractor — and is it included in the quotation?
- What assumptions does the quoted price rest on, and what circumstances could change the final cost?
- Is VAT included in the quoted figure?
- Can you provide references from previous customers for similar work?
When to get professional help
Internal damp warrants professional diagnosis when:
- The affected area is widespread, recurring, or has been treated before without lasting success
- Timber floors, joists, or structural elements are within or adjacent to the damp zone
- Damp appears in unusual locations — mid-wall, ceiling, or below a tiled floor
- The property is pre-1919, with solid walls, lime plaster, or original construction details
- A surveyor or mortgage valuer has flagged damp in a report
- Black mould covers more than 1m² of wall or ceiling surface — at this scale, professional remediation is recommended by the NHS
How Housey can help
Housey connects UK homeowners with independent damp and timber survey specialists who can diagnose the source of damp before any treatment is committed to, and with vetted damp proofing specialists who carry out remediation backed by an insured, transferable guarantee. Separating diagnosis from treatment — using an independent surveyor before commissioning a contractor — is often recommended to avoid a conflict of interest.
Frequently asked questions
How much does damp proofing cost in the UK?
Costs vary by damp type, extent, and location. Chemical DPC injection for a standard semi-detached ground floor typically costs £500–£2,500 for the injection alone; replastering adds a further £800–£2,500 or more depending on the affected area. Penetrating damp repair costs depend entirely on the external defect — a repoint may cost £500–£3,000; a full re-render considerably more. Indicative UK costs, last reviewed 2026-05-18. Always obtain at least three independent quotes.
How do I know if a previous damp treatment guarantee still applies?
Check conveyancing paperwork — damp treatment guarantees are usually referenced in the TA6 property information form. Ask the vendor or previous owner for the original guarantee certificate. If the guarantee has not been novated (transferred) to you, contact the issuing firm or the PCA guarantee scheme directly. An expired or non-transferable guarantee may need to be replaced with indemnity insurance during a future property sale.
Can condensation cause structural damage?
Condensation that persists over months or years can saturate wall or roof build-ups sufficiently to cause timber decay, corrode cavity wall ties, and degrade insulation performance. In solid-wall or timber-frame homes, interstitial condensation — moisture condensing within the wall construction — can cause significant hidden damage before it becomes visible internally. A specialist retrofit assessment can identify these risks before insulation or airtightening works are carried out.
Is black mould always caused by condensation?
Black mould in UK homes is most commonly caused by condensation — warm moist air meeting a cold surface. In some cases it can follow penetrating damp or rising damp that keeps surfaces persistently wet. The distribution of mould helps indicate the cause: mould in cold corners and around windows in winter typically indicates condensation; mould following a horizontal tide mark below 1m is more likely rising damp. A professional survey can distinguish the two reliably.
Sources and further reading
- Property Care Association: find an accredited damp specialist — Property Care Association
- Building Regulations Approved Document F: ventilation — GOV.UK
- Historic England: diagnosing damp in traditional buildings — Historic England
- NHS: damp and mould in the home — NHS
- Energy Saving Trust: ventilation and condensation — Energy Saving Trust
Useful next reads
 Improvement & Build
Damp Proofing Solutions: Methods, Installation, and Long-Term Property Protection
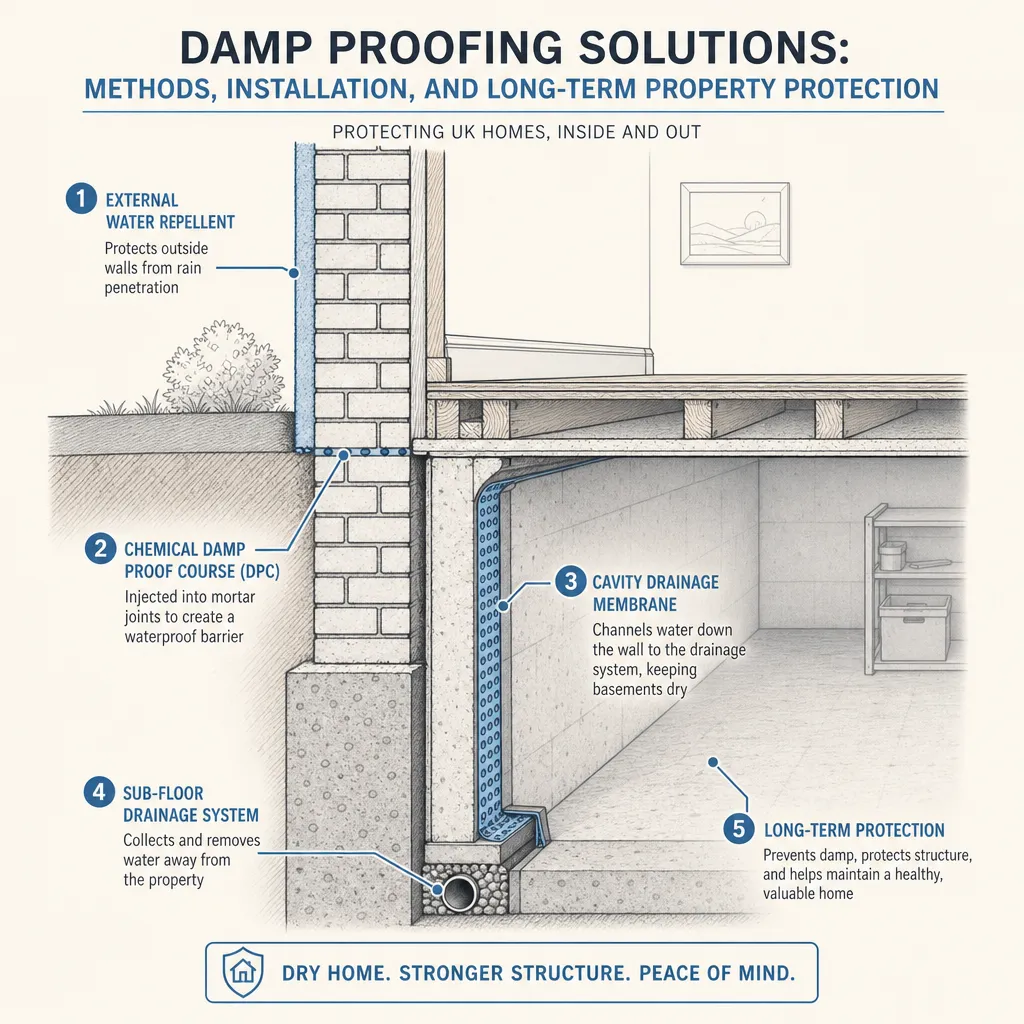
Damp proofing in UK homes typically involves chemical damp proof course (DPC) injection for rising damp, cavity drainage membranes for basement or below-ground moisture, and tanking for waterproofing solid walls.
 Improvement & Build
Protecting Your Property from Damp and Water Ingress
Damp in UK homes usually falls into three categories: rising damp (groundwater drawn up through walls), penetrating damp (rain or groundwater entering through the building envelope), and condensation (moisture from warm internal air meeting a cold surface).
 Improvement & Build
Treating Rising and Penetrating Damp: Diagnosis, Solutions, and Professional Treatment
Rising damp appears as a tide mark at the base of ground-floor walls and is caused by a failed or absent damp-proof course.
 Improvement & Build
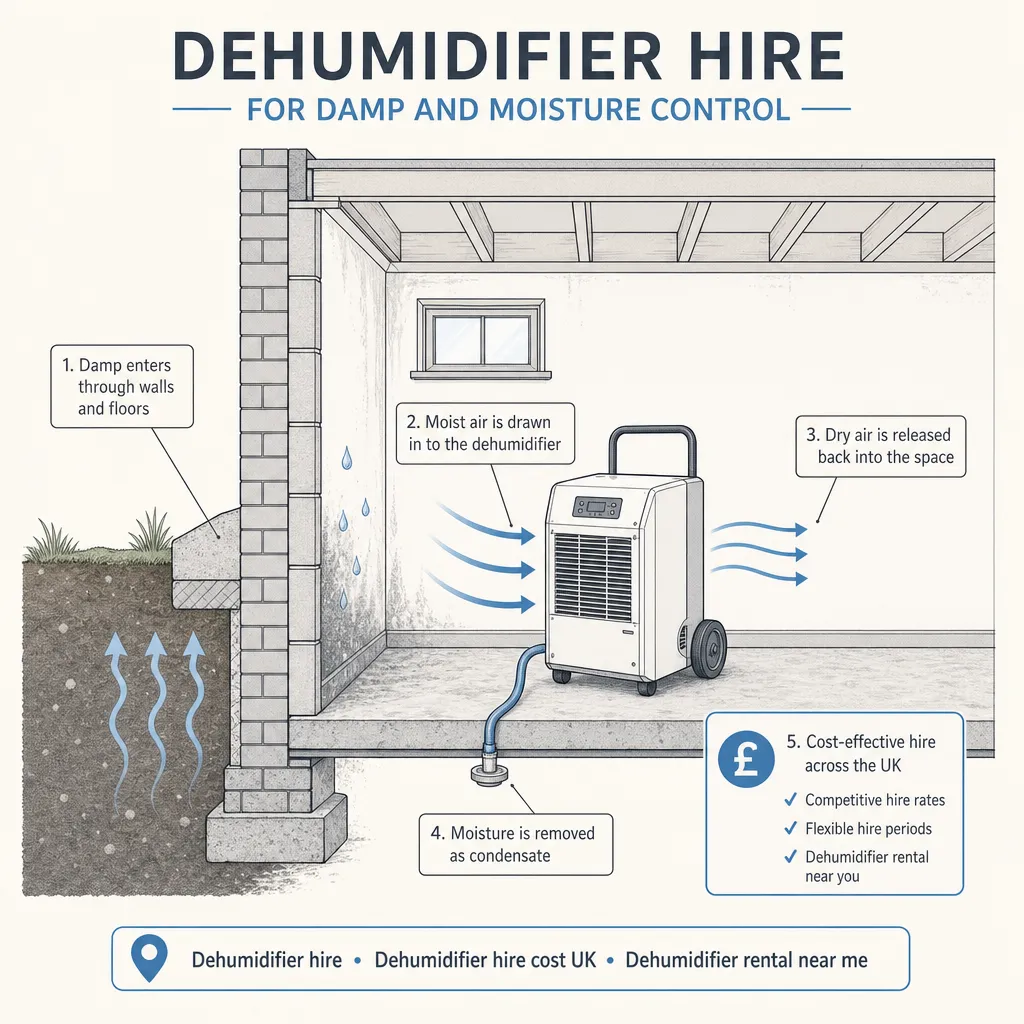
Dehumidifier Hire for Damp and Moisture Control
Hiring an industrial dehumidifier in the UK typically costs £25–£60 per day or £100–£250 per week for a standard 50-litre-per-day unit.
 Improvement & Build
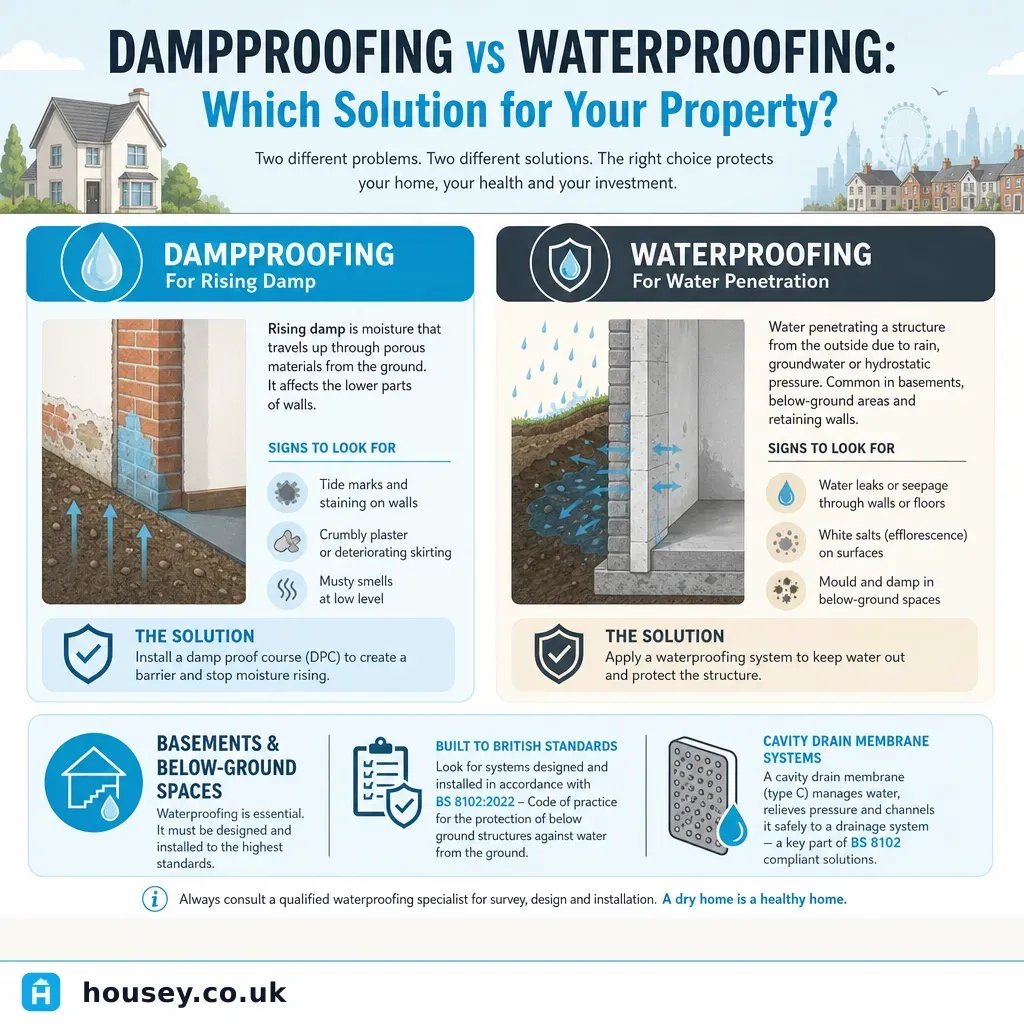
Dampproofing vs Waterproofing: Which Solution for Your Property
Damp proofing resists moisture vapour and capillary movement through masonry and is the correct treatment for rising damp.